What are Raids?
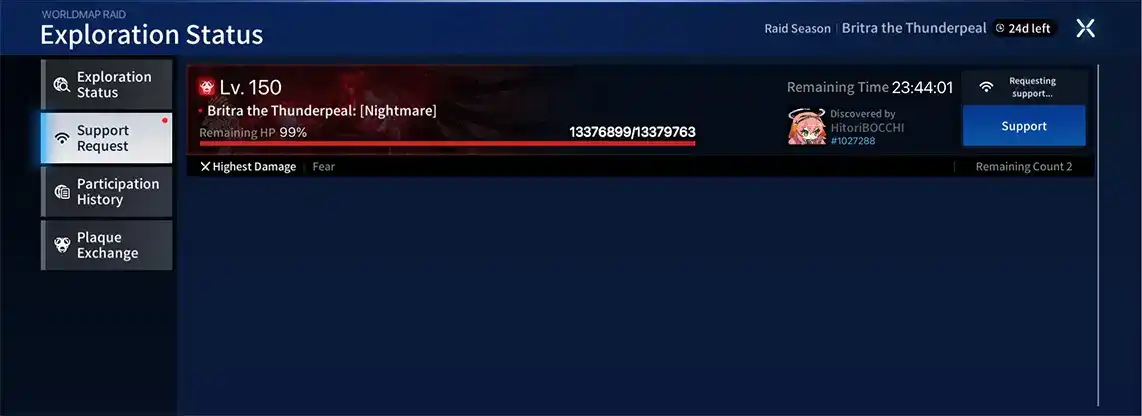
Raids are a form of boss battle where you use a 16 employee team to fight a boss with high stats. Raid bosses have a chance to spawn every time you claim a finished dispatch mission, and they come in various different levels (lvl 70, 90, 110, 130 and 150).
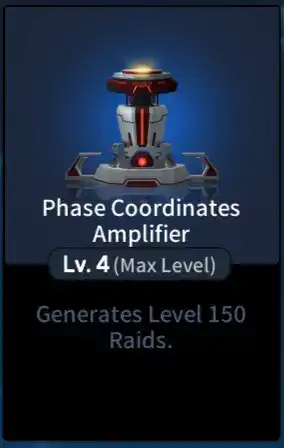
The levels which raid bosses can spawn at are determined by your branch’s Phase Coordinate Amplifier level.

There are currently two different raid bosses; Britra, a CO, and the Inhibitor, a mech. The mechanics for both bosses will be described below.
You can fight raids which have been shared by partners or guild members, and you are also able to share your own discovered raids with them. You can find raids from partners in the World Map, by clicking on the “Exploration Status” button on the bottom left and navigating to “Support Request”.

What are the rewards?
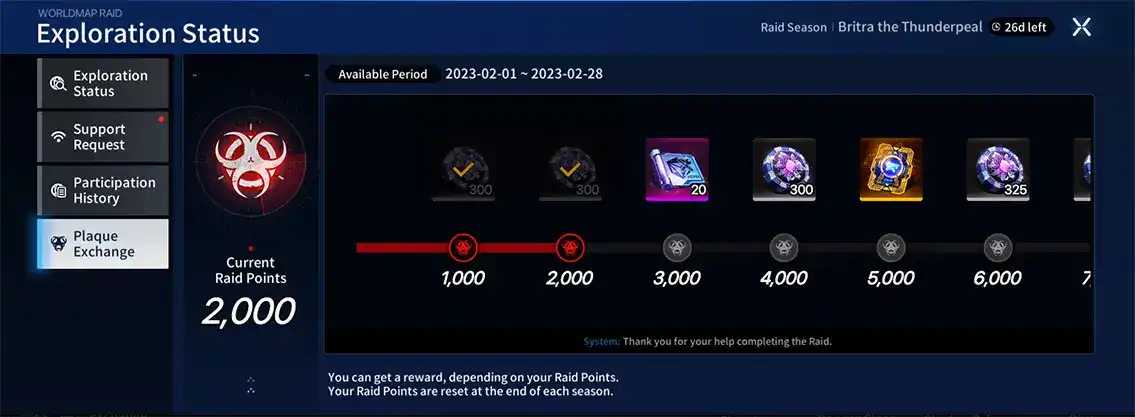
For participating in or finishing a raid, you can either get a random piece of T4-T5 Britra/Inhibitor gear (depending on the boss you fought) or Britra/Inhibitor raid tokens. On top of that, you also get points which can be exchanged for rewards, as shown below. These rewards include set binaries, tuning binaries, more raid tokens, and gear selectors (unfortunately, you cannot select sets from them, only the piece type).

What do I do with all my raid tokens?
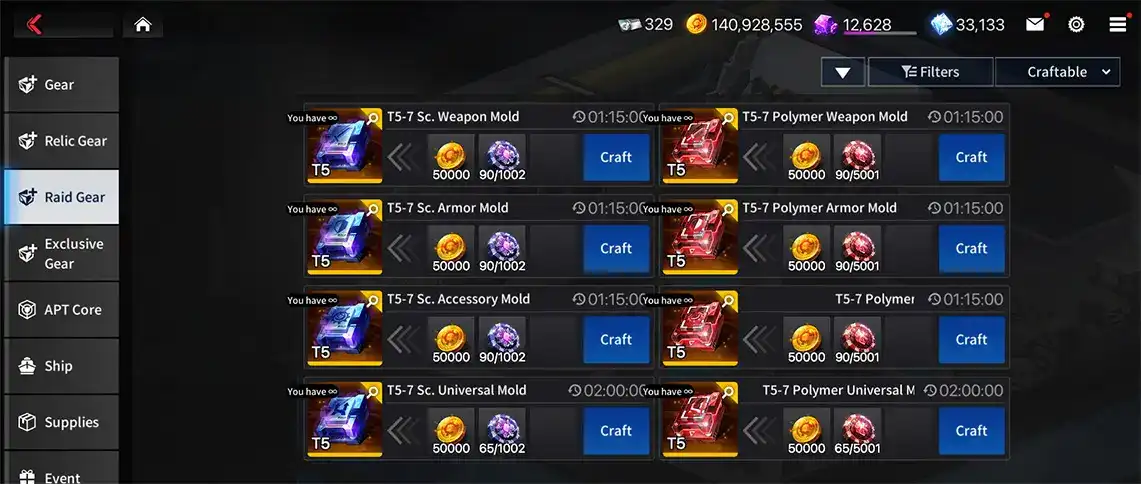
You can use the tokens to craft raid gear in your workshop, as shown below. You can either craft a generic mold, which costs 65 tokens per piece, or a specific gear piece mold, which costs 90 tokens per piece. Do note that you cannot choose between Counter, Soldier, or Mech gear crafting.

If the pieces you get from crafting are not what you want, it is recommended to delete them instead of foddering them into other gear for exp, because they give back some raid tokens when trashed.
Britra Mechanics
Britra bosses have two different versions; awakened (lvl 130 and 150) and non-awakened (lvl 70, 90 and 110). Both versions have different mechanics.
Non-Awakened Britra
The non-awakened Britra has three important mechanics to look out for. The first is a slam attack, which is used twice at about 80% and 20% hp. This attack does a large amount of AOE damage in a single hit, and can easily wipe out important backline units. You can avoid it by either using shields or a counterattack character (like Shiyoon) to counter it.
The second is Britra’s ult, where it will start a dps check, and if you fail it, Britra will knock back all your units while doing multiple instances of damage. This attack can also easily kill backline units, so make sure to avoid it by doing enough damage.
The final mechanic is Britra’s siege mode. At slightly below 50% hp, Britra will start directly attacking your ship instead of your units. To get past this phase, you have to damage Britra until it hits 20% hp (where it will do the aforementioned slam attack) without your ship dying.
Shiyoon is highly recommended for non-awakened Britra runs, because he can counter both the slam attack and Britra’s specials.
Awakened Britra
Awakened Britra’s primary mechanic is a universal debuff which decreases ATK and skill haste while also increasing damage taken on your units. However, it does not affect every unit type at the same time. For about the first minute of the fight, Britra applies those debuffs to Counters and Mechs only; for about the next minute, the debuffs are applied to Soldiers and Counters only; for the rest of the fight, the debuffs are applied to Soldiers and Mechs. As you may already be able to tell, the final phase not debuffing Counters is crucial, as it allows you to burst Britra down using Counter units.
In addition to those debuffs, Britra has universal healing reduction and barrier disruption (barriers are instantly destroyed by attacks and do not absorb any damage). These debuffs are not phase dependent and apply to all units for the entire fight.
You also will want to avoid awakened Britra’s specials. There are two versions of it; one pushes your units away, while the other pulls your units towards Britra. It is completely random as to which version of the special is used. The pull is the more dangerous of the two, but you should still be aiming to avoid both specials as much as possible. Since this version of Britra is awakened, only Awakened Joo Shiyoon is able to counter the specials (making him essential to Awakened Britra runs). SR Joo Shiyoon will not work.
Example team
Here is a team which is able to 100% clear lvl 150 Britra on auto.

Inhibitor Mechanics Mechanics
Unlike Britra, the mechanics for all levels of Inhibitor are the same.
The Inhibitor will always spawn a Defender CO in front of it when the fight first starts. To kill this defender, you have to complete the hit check (i.e. it is based on number of hits, not damage dealt) on it before the timer runs out. Completing the hit check allows you to completely kill the defender, which then allows you to attack the boss.
At around 2:03 and 0:35, the boss will also use a map-wide attack. On lower Inhibitor levels, such as level 70 and 90, both wipes are not strong enough to kill your units, but at lvl 130 and 150, the second wipe is strong enough to kill all your units except for naturally tanky units like defenders with MDL or units with immortality. For the first wipe, it is recommended to try and mitigate some of the damage dealt to your units by using shields from supporters like Harim, Awakened Shin Jia, and Arius. Done correctly, your entire team will survive the first wipe, even against the lvl 150 Inhibitor (Defenders are also not required for “protect” damage res if your main tank is built well enough to survive the whole run).
Finally, the Inhibitor has a laser on its special which will hit all your units and knock them to the ground. This attack cannot be countered as it has ult tier hitstun, and it is recommended to use shields to prevent your units from dying.
Example team
Here is a team which is able to 100% clear lvl 150 Inhibitor on auto.
