Aira Mechanics
Groggy bar

The same subjugation mechanic as all the rest, Aira has a bar that makes her immune to all CC. As of the Ayame ESS, all hard CC (stun, sleep, silence, charm) will bring this bar down (previously was only stuns). When the bar is depleted, Aira will go into groggy mode for a duration. It will also fully replenish all your characters’ mana bars and activate their ultimates, so using a charged ultimate before fully depleting the bar is ideal. Unlike in other ESS however, spamming your main skills is not recommended! This will be explained in detail later.
It is also important to note that starting with the Ayame ESS, the 4 types of hard CC were given values and some provided diminished reduction in the groggy bar. For Aira, sleeps are the best CC to use but in the current roster, only Naiah has them. Stun, silence and charm will still work but only at 50% efficiency.

Breaking her stun bar will also put a 100% received damage debuff on Aira for the duration of the stun, making it the ideal time to use your best DPS ultimates.
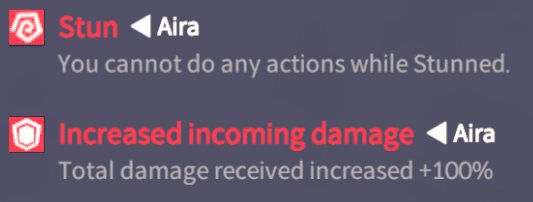
This stun bar mechanic is very important to making your life easier in subjugation, as the amount you remove from it in battle carries over from team to team. Keeping this in mind, you can use some “throwaway” CC teams in between your main DPS teams to deplete the bar prior to a fight. It’s also very important to make sure you don’t deplete it by accident in the last few seconds of a fight when you’ve already used up your good DPS ultimates, allowing it to carry over for your next team to start a fresh rotation.
Madness
The main mechanic to the Aira ESS is keeping her Madness stacks in check. All of her other skills revolve around this mechanic, so it is important to understand how it works, and how to prevent it from stacking up and killing you. Each stack increases Aira’s Atk by 5% and damage received by 3%, so there is some small benefit to the stacks, but not so much if you’re dead.
Erupting Madness
The main mechanic to this fight that probably causes the most self-inflicted death. Each time you use a character’s main skill, Aira will get a stack of Erupting Madness buff. The buff stack lasts 3 seconds, and using another character’s skill within this time will give her the current number of Erupting Madness stacks worth of Madness, plus give her another stack of Erupting Madness, up to three times.

So for example, if you main skill once, wait three seconds for the buff to disappear, then skill again, Aira will gain nothing.
If you skill once, then skill again before Erupting Madness wears off, she will gain 1 stack of Madness, and 1 stack of Erupting Madness - leaving her with 2 stacks of Erupting Madness.
If you skill once more while she has 2 stacks of Erupting Madness, she will gain 2 stacks of Madness, and another stack of Erupting Madness - maxing out at 3 stacks.
Basically said, if you spam all of your skills one after the other without waiting for this debuff to wear off, she will stack madness very very quickly, which causes all of her skills to do increased damage and apply various debuffs to your team. The most common debuff being death. This mechanic DOES NOT stop working while she is in groggy state. Keep this in mind when using skills during the DPS phase.
Pent-up Madness
Good news, though! Aira can also passively generate her own Madness stacks even if you’re careful in timing your skill usage. /s

The “certain number” is 3, and a debuff is basically anything your characters apply to Aira. This includes things like Atk/Def down, and even DoTs. As long as there are 3, she will not gain any stacks, as can be seen here:

This makes party building a bit more tricky, unless you choose to ignore this mechanic. Pent-up Madness lasts for 10 seconds, and gives her a stack of Madness every 2 seconds she doesn’t have 3 debuffs on her though, so Madness stacks can add up pretty quickly if you choose to ignore it.
Uncontrollable Madness and Juggling Targets
Another method to survival is being able to juggle Aira’s target by taking advantage of the contrast between her passive and two of her skills. I’ll CRUSH you! and Do not Disturb! will always target the furthest target from Aira, but her passive Uncontrollable Madness will cause her to swap targets to whoever used a main skill last. It is possible to split her damage by using main skills at the right time to get her to attack one target, then turn away and attack another target. Doing this can prevent the same targets being hit multiple times in a row and getting killed.
Main and Sub skills
Unlike other ESS, Aira does not use mana, and therefore doesn’t care about mana reduction. Her main and sub skills scale based on how many Madness stacks she’s acquired, which can start to cause problems if you don’t manage them well.
As always, the higher difficulty you take on, the more the skills will hurt.
| Skill Typ | Skill Name | Lv. | Details |
|---|---|---|---|
| Main | I’ll CRUSH you! | Basic | The mad beast focuses on the furthest enemy as she strikes the ground with enormous strength. She deals 300% ATK damage in a 20m long, 180 degree angle. This attack cannot be dodged. |
| Lv. 201 | Basic damage changes to 400%, and gains the following effects depending on number of Madness stacks. 10 or more stacks: – Deals additional 200% ATK damage. 20 or more stacks: – Decreases DEF of hit enemies by 50% for 20 seconds. | ||
| Lv. 301 | Hit enemies are put into a “Weakened” state for 20 seconds, and receive additional 1500% ATK damage when they get hit by the next “I’ll CRUSH you!” attack. | ||
| Lv. 400 | Gains the following effects depending on number of Madness stacks. 5 or more stacks – Hit enemies are stunned for 4 seconds. 10 or more stacks – Deals additional 200% ATK damage. 15 or more stacks – Decreases DEF of hit enemies by 50% for 20 seconds. 20 or more stacks – Deals additional 2000% ATK damage. | ||
| Sub | Do not disturb! | Basic | The mad beast runs toward the furthest enemy and swings her hammer in 360 degrees, while removing 1 of her debuff and dealing 150% ATK damage to enemies within 3m and pushing them back. |
| Lv. 120 | Damage changes to 200%. | ||
| Lv. 220 | Gains the following effects depending on number of Madness stacks. 10 or more stacks – Deals additional 100% ATK damage. 20 or more stacks – Reduces hit enemy’s Mana by 2000. | ||
| Lv. 320 | Gains the following effects depending on number of Madness stacks. 5 or more stacks – Additionally removes 1 of her debuff. 10 or more stacks – Deals additional 100% ATK damage. 15 or more stacks – Reduces hit enemy’s Mana by 2000. 20 or more stacks – Hit enemies are stunned for 8 seconds (this effect cannot be removed). | ||
| Sub | I shall destroy everything! | Basic | The mad beast strikes down with shattering force, dealing 300% ATK damage to all enemies. |
| Lv. 140 | Damage changes to 400%. | ||
| Lv. 240 | Gains the following effects depending on number of Madness stacks. 10 or more stacks – Deals additional 200% ATK damage. 20 or more stacks – Hit enemies are knocked down. | ||
| Lv. 340 | Gains the following effects depending on number of Madness stacks. 5 or more stacks – Reduces Mana recovery by 25% for 12 seconds. 10 or more stacks – Deals additional 200% ATK damage. 15 or more stacks – Hit enemies are knocked down. 20 or more stacks – Permanently reduces HP recovery by 50% (this effect cannot be removed). | ||
| Sub | I’ll SMASH you! | Basic | The made beast leaps up high, and strikes down, dealing 100% ATK damage to all enemies. |
| Lv. 160 | Damage changes to 150%. | ||
| Lv. 260 | Gains the following effects depending on number of Madness stacks. 10 or more stacks – Slows by 20% for 12 seconds. 20 or more stacks – Deals additional 100% ATK damage and knocks target down. | ||
| Lv. 360 | Gains the following effects depending on number of Madness stacks. 5 or more stacks – Slows by 20% for 12 seconds. 10 or more stacks – Deals additional 100% ATK damage and knocks them down. 15 or more stacks – Creates a shield with 3% of her HP. 20 or more stacks – Permanently increases ATK by 100%, and its effect cannot be removed (can be stacked). | ||
| Sub | Uncontrollable Madness | Basic | Gains a “Erupting Madness” buff for 3 seconds if her enemy uses a main skill, and then permanently inflicts a “Prey Detected” debuff on the target that used the main skill. All targeted attacks then focus towards the target marked with the debuff. The target’s “Prey Detected” debuff is removed when another target receives the “Prey Detected” debuff or when “Do not disturb!” or “Roar of Madness” is used. If an enemy uses a main skill while she has the “Erupting Madness” buff, she gains 1 “Madness” stack (each stack increases her ATK by 5%, incoming damage by 3%). This buff stacks infinitely and enhances all of her skills. |
| Lv. 201 | The mad beast activates the “Roar of Madness” skill during combat. When she uses the skill, she gains the “Pent-up Madness” buff which gives 1 “Madness” buff every 2 seconds for 10 seconds when she has 3 or fewer debuffs. | ||
| Lv. 280 | She can now stack up to 3 “Erupting Madness” buffs. | ||
| Lv. 301 | If she doesn’t have Madness, her “Roar of Madness” grants the “Pent-up Madness” buff, and she obtains 5 “Madness” buffs instead. Her buffs can no longer be canceled. | ||
| Lv. 380 | Duration of “Pent-up Madness” changes to 20 seconds. |
Notable Characters and Example Teams
Since progressing through ESS has the option to build many teams, a lot of which will depend on your own roster and character investments on ascensions and artifacts, this guide will only include some team and character suggestions, not static team builds or play order.
Overall there are 2 main things to remember when building teams: CC and literally any kind of negative status effect. Since all DoT and debuffs count toward keeping Aira from gaining Madness stacks, any combination of them works, as long as there is enough uptime to always have 3 active.
Startup team / Bar depletion
Unless you’ve got a particularly well-stacked roster, using throwaway teams that help deplete the Groggy bar before you use your main DPS teams is a good strategy. These teams usually have characters on them that have a decent amount of CC but aren’t expected to do much damage or live very long.
Special Mention:
Being a Fairy in this fight isn’t a good time, so unless your Naiah is pretty well invested, she’s likely just going to be cannon fodder for your throwaway CC team. She is amazing at nuking the Groggy bar though - so if you need a quick way to take down the bar, she’s your girl! It’s even possible to use multiple Naiah throughout your teams so if you have extras lying around that you can throw in sync - it’s honestly not a bad option.
Team Suggestions
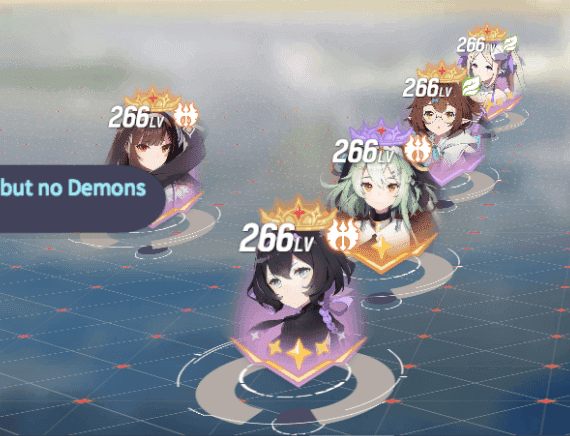
A decent setup for big DPS and breaking the Groggy bar. If your Naiah isn’t decently invested, she can be replaced with other options that apply debuffs to keep Aira from gaining stacks from Pent-up Madness, or help break the Groggy bar.

The usual Lize DPS team, nothing new here except that it will want the groggy bar to be close to broken since stuns don’t do as much to Aira as they did in other ESS.

This team is a decent filler if you need extra DPS and Groggy bar management in between your big DPS teams. It has pretty good survivability, especially at higher investment, and has a mid-tier amount of CC that you can use to lower, but not break, the Groggy bar.
Other options
The usual undead team featuring Violette/Nini/Garnet still brings big DPS as always, but will need Groggy bar setup to avoid dying. Adding Jiho to the team in place of Prim is suggested. The fifth member is variable.
Beast teams work well as filler, as the Mica/Seeha combination has great CC and survivability, and the beast roster overall works well together as a Groggy depletion team.
Claudia and Erusha can work well together for decent DPS, if you have 3 extra units to put with them to help keep them alive. Leftover Fairy units (Chloe, Talia, Renee) are decent filler options. Beast options are good too as long as they are not named Honglan.
Human units deal bonus damage to Aira, so most decently invested humanlike units will be helpful here. Cherrie, Mephi, and Naomi all work quite well.


