Introduction
The purpose of this guide is to familiarize new players with the various aspects of CounterSide. This guide will go over basic progression, the core gameplay loop, and address some frequently asked questions. This guide will not cover mechanics and game mode specific items, as they lie beyond the scope of this guide.
If you are willing to reroll for an Awakened SSR before you start playing the game, it is worth doing. Also check out our reroll guide:
The table of contents has been included below for ease of navigation.
Table of Contents
- Beginner Progression
- General expectations
- New Player Resources
- Early Direction
- Resource Challenge Stages
- Shadow Palaces
- Deep Conquest
- Dives
- Raids
- Core Gameplay Loop
- Basic resource management
- Eternium
- Quartz
- Employee Contracts
- Classified Employee Contracts
- Misc. Shop Currencies
- Competitive Game Modes
- Ranked Gauntlet (PVP)
- Danger Close (PVE)
- Frequently Asked Questions
- What do you do with dupes?
- Where do I farm gear?
- How do I improve gear?
- What do I do with bad gear?
- Should I farm Substream shops?
- How should I build my branches?
- Is Exclusive Equipment good?
- What characters are worth farming?
1. Beginner Progression
1.1 General Expectations
Before you get too deep into the game’s systems, there are some items you will want to keep in mind while you get through your early progression:
Endgame (PVE/ PVP) Specialization
Oftentimes, new players will adopt the mentality of “playing for PVE” or “playing for PVP”, and use this mindset to guide their decision-making. This is fine, but before picking a specialization it’s a good idea to understand what that actually entails.
All players are clearing the same general PVE stages because all players farm for the same resources. The main difference lies in how players prioritize spending their resources. At a high level, CounterSide’s resource management is centered around its two main competitive game modes, Danger Close (PVE) and Ranked Battle (PVP).
Before you get started on these game modes, there is a lot of foundational work that has to be done first. Account specialization will not do anything unless that stuff is done. CounterSide has a large cast of characters and the majority of the “meta” ones have great performance both in PVE and PVP. The competitive PVE/ PVP game modes should not influence your early game decision-making.
Account specialization doesn’t truly start until you invest in your first operator and that won’t happen until several months into the game.
Gear = Progression
Almost all CounterSide units (with few exceptions) share the same gear presets. Instead of every character having a unique build, there are a few gear archetypes (tank gear, damage gear, support gear etc.) you shuffle around as needed. Character performance can be almost entirely attributed to gear.
Your account progression can be measured by how many gear presets you have set up. Gear matters much more than characters. You will never be gated out of general PVE content because you lack a particular SSR, but you will periodically find yourself statchecked as a result of being undergeared.
Follow the TASKFORCE Plan
The TASKFORCE Plan covers the entirety of the new player experience. New players are heavily encouraged to use the TASKFORCE Plan missions as a starting point to determine your next steps.
TASKFORCE missions are always available so you do not have to rush them. Just treat them as a guide that gets you to engage with the various features of the game at a pace that loosely follows account progression.
Use the In-Game Management Guide
The in-game Management Guide (referred to as the “Guide Book” in-game) can be accessed by clicking the (?) icon, located near the top left of your screen in most pages of the game.
The Management Guide describes the basics of most mechanics and gamemodes in the game, so do refer to it whenever you are feeling lost.
1.2 New Player Resources
As part of the TASKFORCE Plan mission rewards, new players will receive (among other things) several selector coupons for various items. To set yourself up for success, it is heavily encouraged you use them as follows:
X6 New CEO Coupon [SSR]
The New CEO Coupon [SSR] is a character selector that allows you to pick from a limited pool of SSR characters.
If you have no personal preferences, the following characters listed below represent some of the strongest options in their respective roles and will remain relevant as you progress endgame content. If nothing else, you are heavily encouraged to reserve a selector for Yang Harim, arguably the strongest supporter in the game.
These suggestions are made with reference to the rearmament system. Some characters (Kaci Bins, Alex, Nanahara Chinatsu) become unbelievably broken when you unlock their rearms. The rearmament system allows you to “upgrade” eligible characters and give them new kits. For more information, see the Prydwen Rearm Guide:
Or here directly:
X1 New CEO Coupon [SSR] (Old)
A 20-day new player login event also gifts players with an SSR selector, but this one has an even more limited pool than those from the TASKFORCE Plan. You may want to consider using this selector for Gaeun/ Xiao Lin to free up a TASKFORCE Plan selector for someone else.
X1 T5 Replica Gear Set Option Selection Coupon
This gear selector is redeemable for a full T5 gear set with a set bonus and faction of your choosing. Only the T5 Replica Counter Gear Box [Skill Haste] is relevant. All other sets are terrible. This is because:
- In CounterSide, all buffs scale with target stats (e.g. healing skills heal a % of the target’s max HP). Support units only really care about skill haste because skill haste dictates cooldowns.
- T5 gear has lower substat values than T6/ T7 gear so it inevitably gets outpaced as you get better stuff. However, skill haste is not as affected as other (offensive/ defensive) substats so a T5 set is still usable.
- You will want a ton of skill haste sets for the myriad of supporters you bring in a team. Even when you complete a better set, the Replica stuff just gets passed down to the next supporter.
X1 New CEO Ship Selection Coupon [SSR]
For general content, the only two relevant ships are Enterprise and New Ohio.
For more information, see also:
Of note, the SSR ship selector allows you to bypass unlock prerequisites. While realistically you will never find a need early on for the unlockable ships, this lets you skip some steps and acquire them very early on.
X1 My First Operator Recruitment Coupon [SSR]
None of the operators in this selector are Kim Hana. This means the selector is largely irrelevant to your progression.
Of the operators available, Olivie is the only one that regularly sees use. Even if you never intend to play PVP, you would still take Olivie as the other operators are strictly worse than their alternatives. For more information, see also:
X4 T6 Polymer Gear Set Option Selection Coupon [SSR]
T6 polymer movements are flexible (relatively) easily accessible accessories that can be used to supplement tank gear and support gear. These selector coupons can be used to make:
- X2 HP Counter Polymer Movements
- X2 CDR Counter Polymer Movements
Windbow’s gear guide is an excellent resource for understanding CounterSide’s gear systeming. New players are heavily encouraged to read it before committing any resources towards gear. You can find the guide here.
X4 T6 Sc. Gear Set Option Selection Coupon [SSR]

Superconductive gear is used as filler pieces to complete offensive gear sets. You may use these coupons as you deem necessary.
T6 Sc. gear selectors are usually used on cases because they are the only cases in the game which can have both Crit DMG% and Skill Haste substats at the same time, making them the only case in the game with two offensive substats. Sc. cases are useful as generic DPS sets on units that can still benefit from some Haste.
If you don’t think your account would benefit from immediately redeeming these gear coupons, you may alternatively opt to hang onto them for half a year until you start seriously competing in Danger Close and need niche sets to squeeze out more damage against certain bosses.
1.3 Early Direction
Early on, your main goals should be:
- Progressing the Mainstream stages
- Progressing the Substream stages
- Completing the TASKFORCE missions
While you level your characters and collect T6 (Maze/ Gordias) gear from the various shops, good short-term goals to work towards include:
Resource Challenge Stages
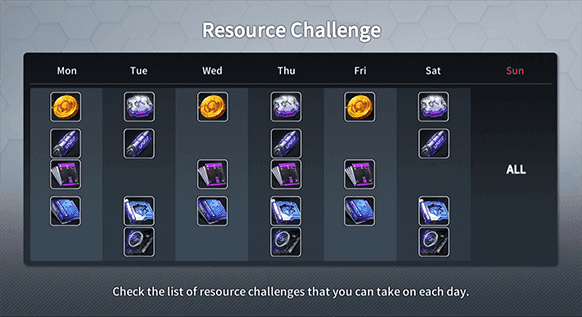
The rotating Resource Challenge stages form a core part of your dailies and is one of the main areas you’ll be dumping your Eternium, so you’ll want to get it figured out sooner than later.
Of the Resource Challenge stages, the three most important ones are:
- Anastasia’s Supply Maintenance (Tuning Binary)
- Anastasia’s Supply Maintenance (Enhancement Module)
- Chloe’s Credit Challenge (Credit)
The Daily Challenge Stages can be accessed from Operation > Request > Challenge. The schedule has been included below:
Shadow Palace
Shadow Palace is a one-off game mode where you clear dungeons of increasing difficulty for material to craft Spectral and Phantom gear.
- 1 Quantum Coords Crystal is generated daily, which can be accumulated up to a limit of 7.
- Quantum Coords Crystals are used to gain entry into the Shadow Palaces.
- Clearing the Shadow Palace will reward Shadow Fragments.
- Shadow Fragments can be used in the Shadow Palace shop to purchase:
- T6 Spectral Universal Molds used to craft Spectral gear.
- T6 Phantom Universal Molds used to craft Phantom gear.
There is an instant skip function, so you don’t need to clear the Palaces more than once.
Spectral and Phantom gear are designed to be transitional gear sets while you build your proper gear sets. Shadow Palace gear have far less set bonuses and substats in the RNG pool, making it an affordable way to get good gear that’s about on par with Maze/ Gordias.
- Spectral gear is considered a budget alternative to ASPD Maze. Spectral allows you to make a damage set with Anti-X DMG% and Anti-Ground DMG% substats without committing a full Maze set.
- Phantom gear is a cheap accessible source of tank gear pieces. Phantom gear is perfectly serviceable gear and can even be stronger than Gordias depending on the situation
For more information on Spectral gear, see Windbow’s Gear Guide. You can find the guide here.
For a complete rundown on the gamemode, check Prydwen’s Shadow Palace guides:
Shadow Palace can be accessed from Operation > Growth > Shadow Palaces.
Deep Conquest
Deep Conquest is a one-off game mode where you clear challenging and gimmicky stages for various rewards. Among other items:
- Challenge Act 2-20 rewards you with a Counter Gordias Crown and Movement
- Challenge Act 3-20 rewards you with a full set of Counter Maze gear
- Challenge Act 4-8 rewards you with Counter Challenger Hands and Case
For when you inevitably get stuck on Challenge Act 3-15, you can reference:
Deep Conquest can be accessed from Operation > Request > Challenge > Deep Conquest.
For a guide for the Deep Conquest, check this document.
Dives
Dives are a one-off game mode where you clear increasingly difficult stages for various rewards. Your Dive progress will have an impact on your long-term account progression.
A summary has been provided to quickly go over the resources managed in this game mode. The resources have been bolded to make it easier to follow along:
- 2 Exploration Permits are generated daily, which can be accumulated up to a limit of 10.
- Exploration Permits are used to advance your progress through Dives.
- Exploration Permits can be used on previous cleared Dives to perform Safety Mining.
- Safety Mining instantly clears the Dive to yield an amount of Eternium and Imaginary Cores.
- Your progress in Dives affects the level of the Dives that spawn from your Branches.
- At deeper depths, this also affects the enemy unit composition of the Dive.
- Branch Dives yield various resources, including Eternium, Imaginary Cores, and at higher levels, Gold Bullets.
- Imaginary Cores and Gold Bullets are used in the Dive shops to purchase various materials:
- Imaginary Cores can be used to purchase various ship materials and tuning binaries.
- Gold Bullets can be used to purchase a limited amount of Maze gear and one copy of Evolved-001.
See also:
Dives can be accessed from World Map > Dive.
Raid Comps
Raids are a seasonal co-op boss game mode where you form teams of 16 characters to fight a raid boss. Basic raid mechanics to understand are:
- Raid is co-op in the sense that multiple players can accumulate damage against the same boss through their own independent runs.
- The main purpose of raid seasons is to complete the 40,000 point Plaque Exchange and collect milestone rewards.
- Raid bosses have a chance to spawn every time you claim a finished dispatch mission.
- You will get the reward for raids spawned from your World Map branches, even if you do not attack them.
- Your shared raids are accessible by players from your friend list and consortium. You are heavily encouraged to build out your friend list and join an active guild to make raids easier to manage.
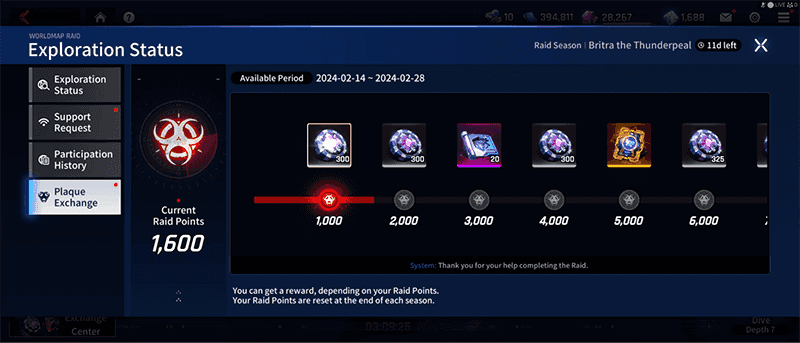
Plaque Exchange is your primary source of raid currency. The raids themselves give very little. The primary purpose of raids is to advance the Plaque Exchange. It is not worth clearing raids once you have completed the Plaque Exchange.
The ratio of raid points to info spent is exactly the same no matter what raid level you play (i.e. a level 70 raid is equally as info efficient as a level 150 raid), so it does not matter what level of raid you attack early on in the game.
The Plaque Exchange is a highly lucrative source of raid currency used to craft gear that will stay relevant long into the endgame. Raid gear can only be obtained in limited quantities each raid season.
- The Britra raid drops currency used to craft offensive gear:
- T7 Britra
- T6 Superconductive
- The Inhibitor raid drops currency used to craft defensive gear:
- T7 Inhibitor
- T6 Polymer
- The Kraken raid drops currency used to exchange for Britra/Inhibitor currency.
Raid currency is obtained when you help defeat bosses and when you progress the seasonal Plaque Exchange. The game does not care if you deal 0 damage. You will still receive the full rewards for helping defeat the boss. This is referred to as “leeching”.
While leeching raids is a perfectly acceptable way to progress raids, you will eventually want to set up a proper raid comp:
- Raid comps touch on most of the good PVE units; building a raid team means building up a solid roster of PVE damage dealers, buffers, and debuffers. This covers much of the groundwork needed to set yourself up for success in PVE.
- Accumulating the gear needed to equip a raid comp is a great way to plan and grasp gear progression in a more tangible way.
- Being able to one-shot raids grants you a lot of agency because it means you are no longer reliant on your peers for damage.
Raids spawned in by friends and guildmates can be accessed from World Map > Exploration Status > Support Request.
For more information on Raid gear (specifically Relic gear), see Windbow’s Gear Guide. You can find the guide here.
See also:
For detailed video guides, check Mage’s YouTube channel:
2. Core Gameplay Loop
2.1 Basic Resource Management
CounterSide juggles around dozens of resources but the two most important are:
- Eternium: Eternium is CounterSide’s stamina-equivalent. Eternium is used to clear stages and farm materials.
- Quartz: Quartz is CounterSide’s premium currency. It is regularly used to purchase various items spread across the game’s shops.
2.1.1 Eternium
CounterSide dailies are fairly straight-forward and you can complete them in under 5 minutes, but the initial setup can be daunting with everything scattered everywhere.
Try to reserve some Eternium every day to put towards clearing the few farmable stages that drop tuning binaries. Tuning binaries are used to fix gear substats. This is important because there are a ton of gear presets you will want to iron out.
| Priority Stages | Resource | Daily Limit |
|---|---|---|
| Supply Operation: Covert Ops 1-5 | Tuning Binaries | 3 |
| Supply Operation: Covert Ops 1-6 | Tuning Binaries | 3 |
The game gives you the option of paying quartz to clear the stages past the daily limit. This is never worth doing.
After tuning binaries, the next main Eternium resource sinks are:
- Enhancement Modules: Enhancement modules are used to raise gear level.
- Credits: Credits are used for pretty much everything.
- Unit Data: A ton of CounterSide’s characters (SSR, SR) can be farmed from Hard Stages.
| Optional Stages | Resource | Daily Limit |
|---|---|---|
| Resource Challenge: Anastasia’s Supply Maintenance 1-3 | Modules | Unlimited |
| Resource Challenge: Chloe’s Credit Search 1-3 | Credits | Unlimited |
| Substream: Hard Stages | Unit Data | 10 per stage |
Depending on what you’re working towards, some stages may be worth adding to your daily routine:
- Info: The game will provide you passive info income from various mission rewards, but you will periodically need a ton of info for certain activities.
- Leveling character skills
- Leveling operator side skill
- Grinding branch dives
- Completing raids
- Factor Binder: Factor binder is a crafting material used for Alternium Reactors.
- Gold Bullet: Gold Bullets are used (primarily) to purchase Maze gear from the Dive shop.
- Special Catalyst: APT > S-APT and S-APT > Fusion core conversion costs special catalyst. You will be periodically revisiting this stage when you inevitably run out.
- Dimension Trimming: Dimension Trimming is the endgame Eternium sink needed to craft T7 Relic gear. This will not be a priority for a long time, but it is worth mentioning.
| Other Considerations | Resource | Daily Limit |
|---|---|---|
| Dimension Trimming Stages | Relic Gear Mats. | Unlimited |
| Resource Challenge: Chloe’s Info Search 1-3 | Info | 3 |
| Supply Operation: Covert Ops 1-1 | Info | 3 |
| Supply Operation: Covert Ops 1-2 | Info | 3 |
| Supply Operation: Covert Ops 1-7 | Factor Binder | 3 |
| Supply Operation: Covert Ops 1-8 | Gold Bullet | 3 |
| Supply Operation: Investigation Activities 1-7 | Special Catalyst | Unlimited |
Training Simulations
On the topic of dailies, remember to do your simulations.
| Other Daily | Resource | Daily Limit |
|---|---|---|
| Simulation: Attack Training 1-6 | Appraisals | 2 |
| Simulation: Defense Training 1-5 | Training Data | 2 |
| Simulation: Anti-air Training 1-5 | APT/ S-APT Cores | 2* |
*You are encouraged to buy one extra Anti-Air Training Simulation Ticket every day using quartz; you will need a ton of S-APT cores at every point in the game.
Other Notable Sources of Eternium
There are a number of ways to get more Eternium beyond what is naturally regenerated:
- Use Exploration Permits to perform Safety Mining
- Spend Info to clear Branch Dives
- Watch up to 5 Ads/ Day (Mobile Client Only)
2.1.2 Quartz
Contrasting the way many games handle their premium currency, you are expected to spend quartz fairly regularly on certain shop items to accelerate your progression. These are:
Daily
- 5 Daily Shop Refreshes
- “Today’s Deals” is a shop that refreshes daily. It offers various goods but most importantly you can buy Employee Contracts (blue tickets) for credits.
- The shop will randomly generate items sold for quartz and credits. No item worth quartz is worth buying.
- The shop can be accessed from Shop > Shop List > Exchange Center.
- 1 Additional Anti-Air* Simulation Training Permit
- S-APT cores are one of the major resource bottlenecks in the game because you need them to limit break characters and craft fusion cores.
- While the Anti-Air Simulation provides the most value in the long run, there is nothing wrong with doing the other simulations if you need those materials.
Weekly
- Classified Recruitment Quartz Package (Highest Priority)
- This is your primary means of accumulating Classified Recruitment Contracts for the ASSR gacha banners.
- This package can be accessed from Shop > Shop List >Permanent Package > Classified Recruitment Package.
Monthly
- Set Binary Package
- There is a monthly set binary package that gives 30 set binaries for 1000 quartz.
- Set binaries are the most coveted resource in the game because you need them to reroll gear set effects.
- This package can be accessed from Shop > Shop List > Exchange Center > Convenience Goods.
Other
- Buying gear preset slots
- You will inevitably run out of gear presets while you’re organizing your inventory. You are heavily encouraged to buy as many gear presets as you need, and then buy more.
- Gear presets are a massive quality of life feature that can be used to manage large quantities of gear, plan work-in-progress builds, and even swap gear within sets.
- Expanding inventory
- Even with frequent inventory management you will still inevitably run out of inventory space.
- You are encouraged to buy as many inventory slots as you deem necessary.
2.1.3 Employee Contracts
Employee Contracts are used for Normal Recruitment and Operator Recruitment banners.
Normal Recruitment banners feature an SSR Employee rate-up.
- On rates:
- 3.5% rate for an SSR
- 1.0% rate for the rate up character
- On pity:
- On your 150th pull, you are guaranteed a copy of the rate up character.
- Normal Recruitment banner pity does not carry forward once the banner expires.
Operator Recruitment banners feature an SSR Operator rate-up.
- On rates:
- 2.0% rate for an SSR
- 1.0% rate for the rate up operator
- On pity:
- On your 150th pull, you are guaranteed a copy of the rate up operator.
- Normal Recruitment banner pity does not carry forward once the banner expires.
Early on, you can use Counter Cases to amass a ton of pulls very quickly. Counter Cases are collections of short stories that can be unlocked by paying Info.
As of writing, 34 characters have Cases. For each of the 34 characters, unlocking their second case awards the player 3 Employee Contracts for a total of 102 Employee Contracts
Counter Cases can be accessed from Operation > Substream > Counter Case.
2.1.4 Classified Employee Contracts
Classified Employee Contracts are used for Classified Recruitment. Classified Recruitment banners feature an “Awakened” SSR (ASSR) Employee.
- On rates:
- 3.5% rate for an SSR
- 1.0% rate for the rate up ASSR
- There are no “spooks”. The only ASSR in the gacha pool is the rate up ASSR.
- On pity:
- On your 150th pull, you are guaranteed a copy of the rate up ASSR.
- Classified Recruitment banner pity carries forward once the banner expires.
2.1.5 Misc. Shop Currencies
On top of these main resources, CounterSide has a ton of currencies for various shops. Check the Prydwen Shops and Currencies Guide:
2.2 Competitive Game Modes
CounterSide’s competitive game modes, Ranked Gauntlet (PVP), and Danger Close (PVE) are this game’s endgame. All of the game’s progression systems are to squeeze more value out of your characters in these game modes.
2.2.1 Ranked Gauntlet (PVP)
Ranked Gauntlet is CounterSide’s competitive PVP game mode. Ranked Gauntlet sees you assemble teams to face off against other players in real-time.
The Bans/ Up system regularly shuffles the meta to keep PVP fresh by rotating character bans on a weekly schedule based on character usage rates and community votes.
Rewards are distributed on a weekly basis depending on your division at the time of weekly reset. Weekly rewards are replaced by Seasonal rewards in the last week of the PVP season. Notably, these rewards include:
- Weekly rewards
- Eternium (increases with division)
- Quartz (increases with division)
- End-of-season rewards
- PVP-exclusive character skin (Diamond 5 and above)
To get started, check Prydwen’s Intro to PVP guide:
2.2.2 Danger Close (PVE)
Danger Close is CounterSide’s competitive PVE game mode. Danger Close sees you optimizing a team to kill one of many rotating bosses as efficiently as possible to maximize your score.
Every Danger Close season will feature a boss, seasonal buff/ debuff modifiers, and a standard selection of self-debuffs that can be taken to increase your final score multiplier. If you’ve played Blue Archive, the mechanics are similar to Total Assault.
Rewards are distributed at the end of every DC season depending on your leaderboard placement at the end of the season. Importantly, DC awards Danger Close Performance Points, a currency used to purchase items from the Danger Close shop.
For more information, check Prydwen’s DC game mode overview:
To get an idea how these bosses play out, Mage is a content creator who regularly covers Danger Close in his videos.
From Mage:
Danger close offers an intense gaming experience where players confront challenging bosses, each with unique mechanics designed to test their skills and strategy. The appeal of DC lies in the thrill of overcoming daunting odds on your own. As players strive to defeat bosses with speed and precision, the rewards they earn are valuable resources and rare gear. With its blend of strategic gameplay and satisfying rewards, DC provides a compelling and immersive challenge.
Check his CounterSide content here:
3. Frequently Asked Questions
This section covers some basic FAQs you may encounter as you progress through the game.
3.1 What do you do with dupes?
Duplicate characters can be fed into the Tactical Update system, or used as a resource for the Rearmament System. To go over both briefly:
Tactical Update System
Tactical updates will improve character performance based on the number of duplicates fed into the character. The bonus is standard and consistent across all characters in the game.
Rearmament System
The rearmament system allows you to “upgrade” eligible characters and give them new kits. Many of the strongest characters in the game are rearms. In order to upgrade SSR characters into their rearmed versions, you will need Prime Rearmament Data.
Prime Rearmament Data can be obtained by purchasing them from various shops, or by breaking down SSRs via Data Transmission.
Prime Rearmament Data from Shops:
- The Business Card shop sells 20 Prime Rearmament Data monthly. You may want to consider purchasing them if you have an excess of business cards or if you are unwilling to sacrifice SSRs to convert into Prime Rearmament Data (more on this below).
- Certain Sidestream shops will sell rearm data at exorbitant prices. Players are heavily discouraged from grinding them out as the opportunity cost is far too great.
Prime Rearmament Data from Data Transmission
- SSRs can be converted into Prime Rearmament Data. Players should consider converting duplicates of their low-performance SSRs into Prime Rearmament Data.
- Not all characters are worth the same amount of rearm data.
- SSRs obtained through through from the gacha
- These characters yield 20 Prime Rearmament Data
- These characters have been marked as Contract Obtained
- SSRs obtained outside the gacha
- These characters yield 2 Prime Rearmament Data
- This is a pittance, and frankly you might as well just use them as tactical updates
- While it should be obvious, it is worth emphasizing that converting an SSR character into Prime Rearmament Data will delete that copy of the SSR character.
- Data Transmission is accessible from Lab > Data Transmission Room.
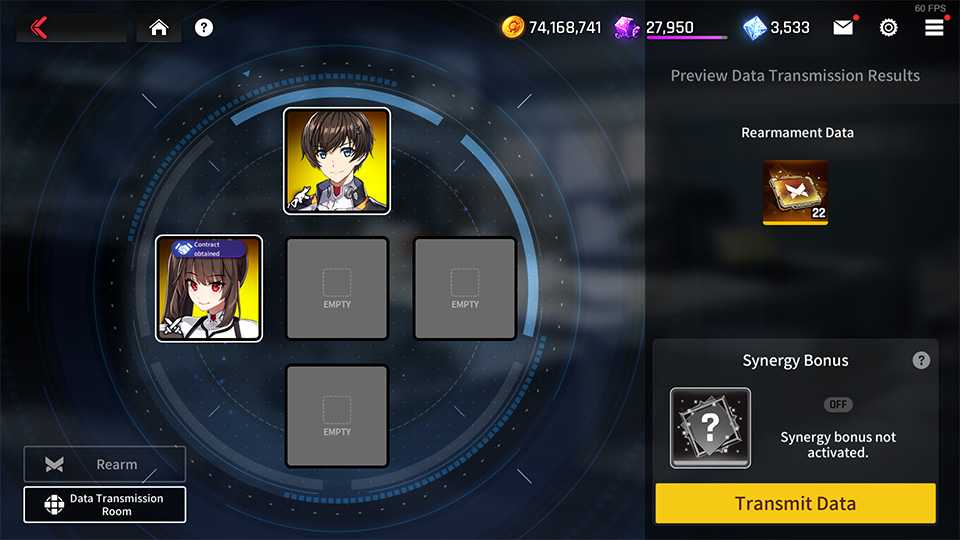
For more information, see the Prydwen Rearm Guide:
Prioritization
To summarize:
- If SR or below, use for tactical updates on a single copy. The rest can be dismissed for Business Cards.
- If SSR, save to transmit into rearm data.
- If you already have all the rearms you desire you can use for Tactical Updates.
- If the unit doesn’t have “Contract Obtained” (received from gacha), it will provide almost no rearm data, just use it for Tactical Update.
- If ASSR, use your own judgment. Rearms are very valuable but ASSR dupes are extremely rare and it can feel wasteful to just transmit them.
3.2 Where do I farm gear?
CounterSide is unique in that some of the strongest gear in the game, Maze and Gordias gear, are accessible very early on but cannot be farmed*. Maze/ Gordias gears are available in limited quantities from a variety of sources. Instead of farming more of it, you will be farming tuning binaries to iron out the sets and substats.
Technically, you can obtain random Maze pieces through Dimension Trimming but it’s less of a reward and more of a consolation prize for how long you’ve been trapped there.
To supplement your Maze/ Gordias pieces, you will be obtaining good endgame-relevant gear from:
- Raids operate on a seasonal basis, providing tokens that can be used to craft gear.
- Britra raids drop currency used to craft generic DPS gear.
- Inhibitor raids drop currency used to craft tank gear.
- For more information, check the relevant section under 1.3 Early Direction.
- Shadow Palace provides currency that can be exchanged for binaries and unique gear sets.
- Shadow Palace gear can be used as a strong, cheap alternative gear set on many units.
- For more information, check the relevant section under 1.3 Early Direction.
- Dimension Trimming is an endgame mode and a way to farm Relic gear.
- Due to the high cost of uncertain rewards, it is recommended that you avoid Dimension Trimming until you have your basic gear sets completed.
- For more information, check the relevant sections under Windbow’s Gear Guide.
3.3 How do I improve gear?
The most important thing about gear is the substat. Substats are arguably more important than set bonuses* because they come in higher values. The vast majority of a gear’s performance comes from the substat. Tuning binaries are used to adjust substats on gear:
- Tuning binaries can increase substat values up to their maximum.
- Tuning binaries can be used to reroll substats endlessly until you get what you want.
With the exception of the CDR set, which provides ~3 substats worth of skill haste and certain sets (Antagonist, Replica Maze, Initiative) come as a completed set.
Tuning binaries can be farmed from:
- Covert Ops 1-5
- Covert Ops 1-6
- Anastasia’s Supply Maintenance (every other day)
- Various shops
With the exception of Shadow Palace gear, substats on T6 gear can be further increased by upgrading the T6 piece to T7.
- Enhancement Modules or other gear can be fed into a gear piece to increase its level.
- At +10, T6 gear can be upgraded to T7 from the Upgrade Console.
- The Upgrade Console is accessible from Workshop > Upgrade
To avoid overcomplicating this section, only the relevant aspects of gear have been explained. For more information on gearing, check Windbow’s Gear Guide - Gear 101 - Part 6.
3.4 What do I do with bad gear?
It is important to keep in mind you’re expected to reroll the sets/ subs on your gear pieces, so a piece won’t be bad purely because it didn’t start with what you want. Do not throw away your limited gear. You will not be getting more.
However, some gear may not be worth spending set binaries on, and some gear is just irredeemably bad. To note some:
- T5/ T6 raid gear can be dismantled to get back some crafting tokens.
- T7 Relic gear with worthless latents can be fed into other gear as gear EXP.
- T3 Initiative sets that aren’t CDR sets can be fed into other gear as gear EXP.
3.5 Should I farm Substream shops?
As you farm Unit Data for characters from Substream hard stages, you will also earn currency specific to that Substream which can then be spent in its Substream shop.
Substream shops are extremely Eternium-inefficient. You would not go out of your way to farm the Substream shop even when there is an ongoing currency drop rate up event for that Substream. They should be viewed as a small bonus when farming Unit Data.
That said, there are some items exclusive to Substream shops worth noting. Whether you want to buy them or not is a personal judgment call:
- Pure Possibilities
- Lobby Backgrounds
For further information on shops and currencies:
3.6 How should I build my branches?
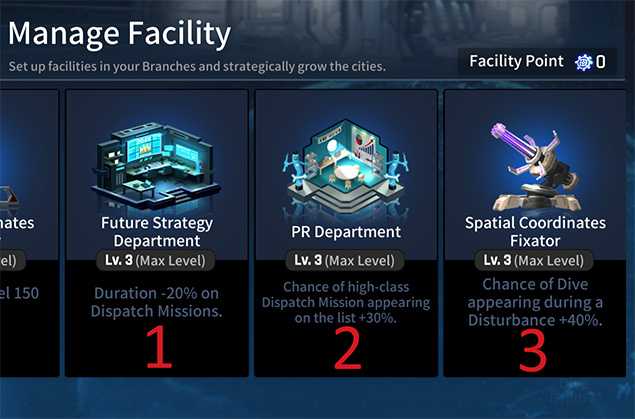
As you complete dispatches from the World Map, your branches will level up. To make the most of your branch, you will want to prioritize building/ leveling in this order:
- Future Strategy Department: Reduces dispatch duration by up to 20%.
- PR Department: Increases the chance of high-class dispatch appearance by up to 30%.
- Spatial Coordinates Fixator: Increases the chance of Dives spawning by up to 40%.
Some additional notes:
- Great Success rate is capped at 70%. Dispatch success rate is dependent on the level of your branch manager. In the vast majority of situations you will hit 70% without the Command Center. The Command Center is needed once you hit Branch level 10 to maintain 70% for S-rank missions.
- You can delete prerequisite facilities once you’re done with them.
3.7 Is Exclusive Equipment good?
The vast majority of Exclusive Equipment (EE) is completely worthless. EEs pull their substats from the same general pool as other gear, meaning (with exceedingly few exceptions) they offer nothing special. They frequently come with a locked substat but more often than not it won’t be an improvement over the alternatives.
Certain EEs will have unique main stats. Most of them are useless, but this makes some EEs so good they define the character’s performance. You would prioritize using these gear pieces even if they break the set bonus. These are:
3.8 What characters are worth farming?
Recalling 2.1 Basic Resource Management, Substream Hard Stages can be farmed for unit shards. Shards can be redeemed to obtain the full character from the Scout menu.
The scout menu is accessible from the CEO's Office > Scout.
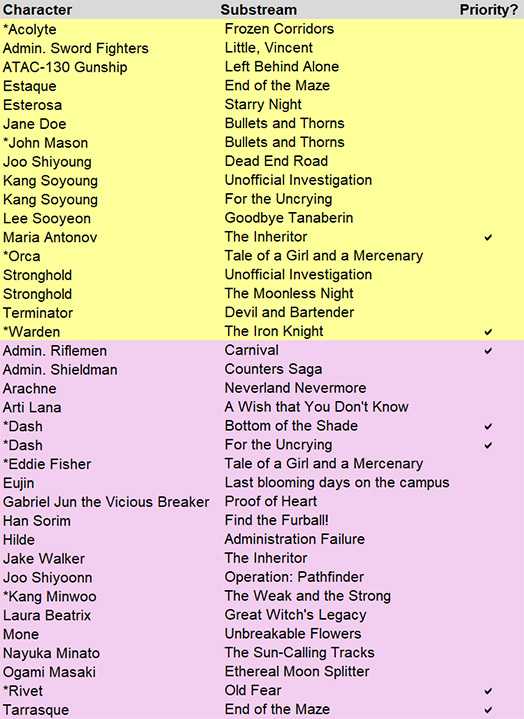
When starting out, you may want to prioritize farming unit data for the following:
Of these units, Rivet and Warden should be your top priority, because they can only be obtained from farming and are very versatile units. Notably, Rivet gets an extremely broken rearm that turns her into one of the strongest rangers in the game.
Dash can also only be obtained from farming, but she is arguably lower priority than Rivet and Warden because she is only good in raids.
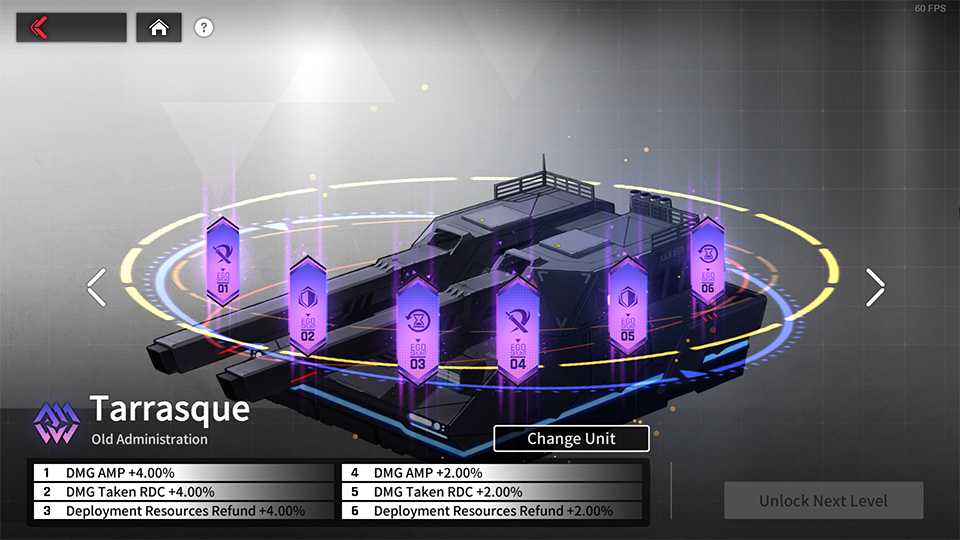
If you are strapped for Eternium early on, you can skip farming for Maria Antonov, Admin. Rifleman, and Tarrasque. SR units can be obtained from gacha and you will naturally accumulate a ton of copies as you play the game.
Certain characters (denoted by the asterisk) can only be obtained by farming their unit data.
