Gearing 101
This guide aims to set a rough guideline on gear progression. Farming for the perfect set of gear takes up a good part of your endgame, and it is generally expected that the devs will periodically release fresh sets of gear that will power creep existing sets. Nevertheless, the fundamentals for gearing remain the same throughout the game’s lifespan.
This also includes:
- Not using Auto Equip, which has a history of sucking.
- Ignoring Combat Power (CP matters little when it comes to gearing, as specific stats will inflate CP).
Summary
Players should aim for (in general, not a strict goal):
- About 10 - 3 to 4 line HP% Accessories to gear 2 parties of 5.
- At least 4 weapons each of the following:
- Swords for Knights.
- Staffs with (Added Target II) for healers and Magic DPS (This may or may not overlap).
- Bows for Archers.
- Enough 3-4 line Crit Resist% + Block Chance Armor for 2 parties.
- About 8 to 10 - 3 to 4 line HP%/CDMG% Runes.
This does not include special equipment that you can get from Events, the Tower of Oberon, and the World Tree Rift.
Equipment Basics
Equipment in Lost Sword can be farmed from various sources, including Adventure mode, Treasure Exploration, Stonehenge, Raids, and the Labyrinth. It comes in different rarities, ranked as follows: Legendary > Heroic > Rare > Uncommon > Common.
Stats on each equipment can be divided up into the following:
Main Stat - Standard lines that every equipment in the category gets - Flat ATK for weapons; Flat DEF for Armor; Flat HP and ATK for Accessories; and Flat HP and DEF for Runes. Increases with each upgrade level.
Unique Stats - Stats that come with the weapon, with 2 lines that get unlocked upon reaching Upgrade +7 and +10. Weapons and Runes usually come with Boss ATK and CDMG; Armors get Crit Resistance and DMG Reduction; and Accessories get Status Effect Resistance and DMG Reduction.
Special Stats (Sub-stats) - Each equipment piece has specific potential sub-stat rolls depending on its slot (e.g., weapon, helmet, armor). The maximum values for flat sub-stats increase with the item's level. When progressing, We recommend upgrading gear only to +5 initially, unless it's Legendary. Upgrading beyond +5 consumes significantly more resources, which can be wasteful for early-game gear that you will quickly replace.
Currently, percentage-based sub-stats generally provide a much greater impact than flat values. However, this balance may shift when significantly higher item levels become available.
Weapon
- ATK 100~300+
- ATK% 15%-30%
- Ignore Damage Reduction 5.5%~10%
- Critical Damage Increase 15%~30%
- Priority 20~30
Armor
- HP 1000~3000
- Defense 100~250+
- DEF% 10%~30%
- Block Chance Increase 6%~8%
- Crit Resistance Increase 4%~8%
Accessory
- HP 1000~3000
- HP% 15%~30%
Runes
- ATK 100~300+
- HP 1000~3000
- HP% 10%~30%
- DEF 100~300+
- Crit Damage Increase 15%~30%
- Priority 20~30
Refinement
Refinement further boosts your Legendary equipment. Each piece has a different refinement bonus, but the maximum value remains consistent. Each refinement level increases its bonus by 0.3% per level, up to 30% at Lv100. Refinement requires Refinement Stones, obtainable from Crafting, Event Shop, and Soul Shop. We recommend refining only equipment with exceptional substat rolls or pieces you'll use long-term to conserve resources.
- Weapon - 0.3%~30% ATK
- Armor - 0.3%~30% DEF
- Accessory - 0.3%~30% HP
- Rune - 0.3%~30% Crit Damage
General Recommended Substats
- Weapon: ATK% (especially for healers), CDMG% > Ignore Damage Reduction
- Armor: Crit Resist > Block Chance > DEF%
- Accessory: All HP%
- Runes: HP% (Tanks/Support), CDMG% (DPS)
DPS Substats (Rule of Thumb)
- CDMG% as a substat/speciality wants as high crit rate as possible to become comfortable to invest in. It becomes comfortable starting from about 50%.
- Crit Rate sources: 5% base, 10% Accessory, 10% Phoenix, 10% to 15% Merlin/NEO Bedi, 5% Goddess Weapon/20% Arondight or Thunderclap (Ch 53).
- Crit Resist Reduction Sources: (15% lvl 10 Lilith Card; 10% T5 Isabel Ultimate). Note: Crit Resist Reduction is an additive reduction and can go negative.
- You may have to reset for higher damage variance.
- CDMG% vs ATK% - aim for whatever is lower. CDMG usually becomes a stronger line most of the time because ATK% gets far more saturated:
- ATK% Sources: Weapon, Transcends, Card, Training, Pets (Main Lines), Gala/Dian ultimate skill, Passives, Specialities, Armor
- CDMG% Sources: Relic (Grail), Weapon, Card, Training (Only Tiamat), Pets (2nd/3rd lines), Passives (ie. Dian/ Ria passive)
- Against Enemies with high Crit Resistance (ie. Tiamat daily raid); ATK% is king.
- Ignore Damage Reduction (IDR) is a very powerful stat (additively reduces Damage Reduction), but only against enemies with Damage Reduction. Unlike Critical Resistance, Damage Reduction cannot go Negative as a result of IDR. You can also gain IDR from other sources (pets, cards, equipment), so adjust as necessary depending on the boss.
- Pay attention to what stats your DPS scales off and gear accordingly. You may refer to the builds in each character page.
Defensive Gearing (Rule of Thumb)
- Armor: Because Enemy ATK and Crit Rate are both unknowns, the most straightforward method is:
- To stack as much DEF as possible to reach the cap of 50% Defense Ratio (Enemy ATK/Your DEF + Enemy ATK).
- Having some Critical Resistance to minimise enemy critting.
- Block Chance also gives you a chance to double your DEF per hit.
- That being said, DEF% starts to receive diminishing returns at higher levels as we stack more and more DEF% and flat DEF from other sources (Training, Relics, etc). As meta continues to evolve, expect Crit Resistance lines to go up in value.
- At the same time, damage thresholds will continue to go up, and boss stats (base attack) will increase in response to received damage. Block Chance becomes more effective at higher scores because of this.
- As such, we usually recommend a mix of Defensive Stats on your Armor, with emphasis on Critical Resistance lines. (1 to 2 Block Chance, 2+ lines of Critical Resistance).
- Accessory: Accessories can only get Flat HP and HP%, so that one is self explanatory.
- Rune: HP% and CDMG are the only 2 notable stats for this slot. If you are having trouble surviving, go for HP%, otherwise CDMG to squeeze out more damage.
Side Note: What is DEF Ratio?
TL;DR - The game measures the enemy’s ATK against your DEF + Enemy ATK at the point of the hit and reduces the Damage taken accordingly. At the cap of 50% DEF Ratio, this means you take 50% less damage.
Commonly Used Gear for each class (General Purpose):
Disclaimer: The below are not a prescribed “Must Follow” equipment progression. Some parts can be skipped depending on how fast you progress in the game and the substats on new/existing gear.
Healer Progression
- Weapon: Dragon Weapon —-> Abyss Weapon —-> Goddess Weapon/Tempest Weapon (Anything with Added Target II/Good ATK% Substats.) –> Aquarius
- Armor: Dragon Armor —-> Goddess Armor/Tempest Armor/Gold Armor (depending on substats!) → Cowqueen Armor ~> Merlin’s Robe (Current defensive BiS)
- Accessory: Goddess Statue (SH8) —-> Goddess Ring (SH10)/Tempest Helmet (SH11)/ Cowqueen Crown (SH12)
- Rune: Extreme Rune (Hard/Hell mode) —-> Claiomh Solais (Hard/Hell Mode)/Thunderheart (if struggling to survive)
Support Progression:
- Weapon: Dragon Weapon —-> Abyss Weapon —-> Goddess/Tempest Weapon ~> Aquarius/ Sagittarius
- Armor: Dragon Armor —-> Goddess Armor/Tempest Armor/Gold Armor (depending on substats!) → Cowqueen Armor ~> Merlin’s Robe (Current defensive BiS))
- Accessory: Goddess Statue (SH8) —-> Goddess Ring (SH10)/Tempest Helmet.
- Rune: Everything Else —-> Thunderheart (depending on substats!)
Situational (Healer/Support):
- Weapon: Gambatein (Buff heavy bosses like Medusa), Infinity Staff (CC timing), Failnaught (NEO Bedi only, CC Timing)
- Accessory: Pegasus, Red Hare, Tiamat’s Scripture
Tank Progression:
- Weapon: Dragon Weapon/Trident —-> Barisada (10F World Tree)
- Armor: Dragon Armor —-> Goddess Armor/Tempest Armor/Gold Armor (depending on substats!) → Cowqueen Armor ~> Merlin’s Robe (Current defensive BiS)
- Accessory: Goddess Statue (SH8) —-> Goddess Ring (SH10)/Tempest Helmet (SH11)
- Rune: Everything Else —-> Thunderheart (depending on substats!)
Situational (Tank):
- Weapon: Dual Blades/ Arondight/ Fragarach (CC Immune bosses; DPS check bosses).
DPS Progression:
- Weapon (General): Dragon Weapon —-> Abyss Weapon —-> Goddess/ Tempest/ Cowqueen/ SH13 set
- Weapons (Knight): Dual Blades/ Arondight --> Fragarach
- Weapons (Archer): Failnaught/ Sagittarius
- Weapons (Caster): Thunderclap
- Armor: Dragon Armor —-> Goddess Armor/Tempest Armor/Gold Armor (depending on substats!) → Cowqueen Armor ~> Merlin’s Robe (Current defensive BiS)
- Accessory: Goddess Statue (SH8) —-> Goddess Ring (SH10)/Tempest Helmet (SH11)
- Rune: Everything Else —-> Thunderheart (depending on substats!)
Situational (DPS):
- Archer Weapon: Failnaught (Raid, CC timing)
- Armor: Ranger Robe/Red Ribboned Robe (Knights cope with Absolute Armor for now) —-> the Green Knight’s Armor/Holy Fire Armor (DPS check if survival check met)/ Agnes Wrath (Bring a healer!)
- Archer Accessory: Stiletto of Jealousy
Types of Equipment
Depending on the source, each equipment will have different unique stats.
Treasure Exploration/Adventure Gear

Comprises mainly gear that you receive from adventures and idle loot (Treasure Exploration) over time, and are the earliest kind of gear you can get in your playthrough. These gear typically have the similar unique stats with higher level gear having maybe 1 or 2 special statlines. You will be equipping whatever you can get early on, but later on, can afford to be more picky with these pieces of equipment depending on substats and unique stats.
The Armor slot is notable for being the only few armor pieces with offensive stats, starting from the Ranger Robe (Ch 28; Ranged ATK%); the Red Ribboned Robe (Ch 33; Magic ATK%) the Green Knight’s Armor (Ch 40; ATK%) and the Holy Fire Armor (Ch 53; ATK%), and are used primarily for DPS checks and raid situations.
Uses: BiS DPS Armor (post Ch 28), Rune Substat hunt.
Labyrinth Gear

The Labyrinth King set is a rare set of equipment drops that can only be obtained from the Weekly Labyrinth. While incredibly rare, the Jade Seal Accessory is the earliest point of the game where you can get an Accessory with the coveted 10% Crit Rate statline. The other pieces of gear have some unique skills for their slots but are ultimately just a fun and gimmicky bonus. If you get these dropped, these will last you for your early game playthrough until you unlock Stonehenge 9.
Uses: DPS Accessory until you unlock Crown or Goddess Rings, Ganbanteinn for Medusa Daily Raid.
Raid Gear

Equipment you can receive as drops; or craft with materials from Raid content. The Dragon Gear can be crafted with Gold Cubes as well. Equipment in this category typically are a small step up from Adventure gear and will have [Added Target II] in the weapon slot and 2 or more additional statlines in their unique stats. Used primarily early on for the [Added Target II] line for healers in the weapon slot and the additional Crit Resist line on the armor slot.
Uses: Healer Weapons (Bow (NEO Bedi)/Staff)/Survival Armor until you unlock Goddess Gear (SH10, Ch 40)
Stonehenge Gear

Special Equipment you can only obtain at low drop rates from farming the bosses and mobs in the Stonehenge map, or the Cowqueen map (3 free attempts a week). These gear usually have unique skills and effects and will typically be the Best-in-Slot (BiS) gear for their level bracket. They are much easier to farm now with the Weekly Cowqueen Map and will usually be the go to for the Weapon, Tank Armor, and Accessory slot.
Some equipment also continue to see use at high-end raid content, where the expected incoming damage is generally lower or confined to short but cheese-able periods of time.
Notable Stonehenge Gear

Pegasus (5F Stonehenge Unique Accessory): Notable for its non-stackable [Rubber I] unique stat that gives a 10% ATK Team Party buff. Used primarily for Walls in Avalon Guild Raid, where they do not attack. I would suggest trying to get at least 1 via the weekly Cowqueen Map.
Uses: BiS Raid Support Gear until you unlock Red Hare (World Tree 51F). Max 1 per party. Get 1 to 2 copies.

Tiamat’s Scripture (SH4 Unique Accessory): Probably one of the better accessories you can get early game, Tiamat’s Accessory is good for early game DPS/ supports and still remains fringe relevant for late game with its DEF reduction passive to squeeze out some additional damage. You only need 1 copy for that purpose, but you can look into getting some extra if you have cowqueen attempts to burn.

Aegis (7F Stonehenge Unique Accessory): Notable for its [Damage Reflect] unique stat which deals a 15% additional hit of the holder’s ATK. This is used against bosses with hit count immunity like Cowqueen. Get at least 1 copy from the Cowqueen map.
Uses: Bosses with hitcount gimmicks (Cowqueen), used primarily on Tanks. At least 2 to 3 copies.

Healing Goddess Statue (8F Stonehenge Unique Accessory): First set of Accessories to have the Healing + 10% (bonus healing done) line in its Unique Stats. 8F Stonehenge is also the first notable location where you will be able to farm Legendary Gear in bulk. It’s best used on Healers, but you will be equipping this (and pretty much every drop) to everyone until you get Stonehenge 9F unlocked. Get 2 to 5 pieces as a placeholder until you reach 9F/10F Stonehenge.
Uses: General purpose Accessory until you unlock Crown (SH9, ch 34), afterwards only for Healers until you unlock Goddess Rings (SH10, ch 40). Replaceable after.

Crown of the Dead (9F Stonehenge Unique Accessory) - Unlocked after Ch 34-20: While not the earliest piece of Gear to have 10% Critical Hit Rate, this is the first point of the game you will be able to get them in bulk. These get replaced by the Goddess Ring later when you unlock Stonehenge 10F, but it is a good idea to have at least 2 to 3 pieces to equip your DPS as a placeholder until you reach 10F Stonehenge.
Uses: DPS Accessory until you unlock Goddess Rings (SH10, ch 40). Replaceable after.
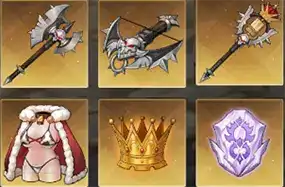
Goddess/Tempest/Cowqueen Set (10F/11F/12F Stonehenge Equipment Set - unlocked on completing Adventure Chapter 40/53/60 respectively):BiS early game gear (you can receive these pieces early on via Avalon Raid battles.) Notably, the weapons have [Added Target II], ATK% and Crit Rate, while the Ring has both Crit Rate and Healing +10%. The only differences between all 3 sets are the item level and flat stats.
Uses: General-purpose gear (Armor, Accessory, Rune). Weapons are BiS until you gain access to the unique weapons of each class (Arondight

Arondight (10F Stonehenge Unique Sword): BiS beginner Knight weapon outside of the Dual Blades for Knights, having [Added Target III], 20% Crit Chance and 10% Ignore Damage Reduction. You can only have 1 set of Dual Blades, so expect to farm at least 2 to 3 more of these for your other Knights.
Uses: BiS Knight Weapon alongside Dual Blades before you unlock Fragarach at Adventure Ch 65.

Gold Armor (10F Stonehenge Unique Armor): Current BiS Tank/Healer Armor for beginners, having additional 10% Crit Resist, 5% Block Chance and 10% Healing Received Unique Statlines. You will be farming about 5 to 6 sets for your Tanks, Supports and Healers.
Uses: BiS Defensive Armor until you unlock Merlin’s Robe at Adventure Ch 65.

Thunderclap (11F Stonehenge Unique Staff - unlocked Adventure Ch 53): New BiS staff, this finally gives Wizards access to a Arondight/ Dual Blades standard weapon - Crit Rate, Ignore Damage Reduction and a very powerful Active skill. You will want at least 4 usable pieces for Star Reincarnation.
Current BiS Wizard Weapon.

Thunderheart (11F Stonehenge Unique Rune - unlocked Adventure Ch 53): Currently the best Rune for its Eye of the Storm passive which gives the wearer emergency Healing when their HP falls below 35% HP. Runes are notoriously difficult to get usable substats on, so try to prioritise these for your Tanks, but ultimately everyone should be wearing one of these.
Uses: Current BiS Rune for all classes.

Sagittarius (12F Stonehenge Unique Bow - unlocked Adventure Ch 60): Current BiS general-purpose bow.
Current BiS Archer Weapon.

Aquarius (12F Stonehenge Unique Staff (Healers only): Unlocked Adventure Ch 60) - Current BiS general-purpose healer staff. Added Target III and Healing 30% just means you heal more, even with weaker substats. There are no substitutes for this.
Current BiS Healer Weapon.

Fragarach (13F Stonehenge Unique Sword): Unlocked Adventure Ch 65 - Similar to the legend which can bypass any armor and inflict unrecoverable wounds, Fragarach applies a stacking DEF reduction debuff with its active. The active also deals damage, giving Knights another ATK% multiplier to scale off. Fragarach comes with the usual 20% Crit Rate, 10% IDR, and [Added Target II].
Current BiS Knight DPS weapon replacing Arondight.

Merlin’s Robe (13F Stonehenge Unique Armor): Unlocked Adventure Ch 65 - Basically Gold Armor, but with higher % Block Chance stacked on top of the Healing Received and 2nd Crit Resistance Line.
Current BiS Tank Armor.
Event /Tower Gear
One of a kind Special Equipment that you can only obtain once per account playthrough via Events, Hard/Hell Adventure Mode, Tower of Oberon and the World Tree Rift. These equipment will usually have unique statlines outside of the norm in exchange for not having any Special Stats.

Extreme Rune/Claiomh Solais Rune (Dropped from certain levels of Hard/Hell Adventure Mode): Unique Runes that come with ATK%, HP% and DEF%, with statlines increasing with Item Level at higher level clears. These are the current BiS runes for Healers as it is impossible to get ATK% lines via substats in that slot.
Uses: BiS Healer Accessories; Chimera Daily Raid. Save 5 copies.

Trident (Seafood Party! Ocean Exploration 10F clear reward): One of the earliest Legendary Gear you can get, with a 48 second cooldown [Tidal Wave] Active that applies a 4% ATK reduction. It’s not much but could come in clutch for tanks and Melee DPS.

Mirror Armor (Obtained from Stage 10 of Hunting the Succubus Event Dungeon): Currently the Best-in-Slot Armor for Lancelot due to its +25% HP Unique stat. Armors cannot have HP% Substats so this makes it a very good armor to further increase Lancelot’s HP Pool and Damage. This Armor can also be used on Erin to increase her Shield amount on Ultimate. .
Uses: Early Game Armor, Lancelot/Erin/Belsey/Lueira scaling Armor.

Absolute Armor (Craftable via Gold Cubes/Nice to Meet You, Lady Urizabeth clear reward): Earliest Legendary Armor you can get outside of the Dragon set. This one comes with a 10 second 20% ATK boost and can be used for a while until you reach SH8. Don’t expect to get the other copy until later in the game.
Uses: Early Game Tank Weapon.

Stiletto of Jealousy (Crafted via Gold Cubes): Earliest Legendary Accessory you can get outside of the Labyrinth gear. This one has a unique 25% Ranged ATK statline which makes this suitable for your Archer DPSes like Lisa, in exchange for no % HP lines from substats. This will last you for the early game until you reach SH8/9, but only pick this up if you are using an Archer as a DPS carry.
Uses: Early Game Archer Accessory, still useful for higher DMG ceiling later on IF you can afford to give up HP% stats (you usually cannot).

Dual Blades (50F Tower of Oberon Unique Sword): A homage to the original Swordmaster Story by Codecat, this weapon has [Added Target III], 30% ATK, 20% ATK Speed and 20% Crit Rate. Expect to use this for a very long time.
Uses: BiS Knight Weapon alongside Arondight & Fragarach.

Barisada (10F World Tree Rift Unique Sword): Anessa’s personal weapon, used mainly for the [Blizzard Storm] unique stat - a 1.5 second Freeze to all enemies on a 15 second cooldown. BiS weapon for defensive tanks like Galahad.
Uses: Current BiS Tank Weapon.

Infinity Staff (20F World Tree Rift Unique Staff): Tiamat’s personal weapon. This weapon might not seem like much, but is unique in the sense that it unlocks a unique buff (Additional Damage, DEF%, ATK%, ATK Speed, CDMG, and Crit Rate) every 7 seconds into the fight. This weapon is used primarily for Raid content and has been superseded by the Goddess Staff everywhere else.
Uses: Lueira Raid Weapon for when you don’t have a near perfect Void Staff with Crit Damage.

Gambanteinn (31F World Tree Rift Unique Staff):Previously only obtainable in Labyrinth as an ultra rare drop, 31F World Tree gives you a copy guaranteed. A curious weapon with a 36 Second 1 Buff Dispel. Unlike other World Tree equipment, this staff can roll for Substats. We recommend getting at least 2 ATK% lines.
Uses: Mainly for bosses with dangerous buffs (Erin support weapon).

Failnaught (50F World Tree Rift Unique Bow): A bow that is purely intended for bossing - no Added Target, but has a rare Attack Speed Statline and the Unerring Bow Active skill, which grants the wearer 200% Critical Hit Rate for a short amount of time.
Nesha/Lisa BiS DPS weapon (Chimera Raid); Used by NEO Bedi/Tristan/Isabel for adjusting CC timings.

Red Hare (51F World Tree Rift Unique Accessory):Think Pegasus, but with an additional Loyalty Line that grants 3% Additional Damage to the whole party. This gear cannot gain substats, but already comes with 30% HP and DEF lines, so you shouldn’t miss it much. You will be using one of these in any raid/DPS check situation.
Uses: BiS Raid Support Gear. Only have access to 1 so use Pegasus in the other party for Star Reincarnation.

Wrath of Agnes (56-40 Hell Unique Armor):The wearer gains 6% Crit DMG every 10 seconds, scaling up to a max of 30% by the 45 second mark. It is potentially the strongest offensive raid armor currently released. However, this Armor piece CANNOT gain substats and damages the wearer every second. Those ticks can crit, scaling off the wearer’s own Crit Rate and CDMG stat, meaning the 3.3% HP loss can translate to upwards of 18% HP loss PER second. This HP burn puts a lot of stress on the healer, especially Failnaught NEO Bedi with no Added Target bonuses. There MIGHT be possible applications with Ran’s card proccing its Counterattack, but testing will need to be done. This armor would be very good for Stonehenge since the burn does not reapply, but the CDMG does reset between Boss Tickets.
Uses: Offensive statline Raid/Stonehenge armor for your DPS. PLEASE FOR THE LOVE OF GOD BRING A HEALER.

Celestial Rune (Abyss 50F Unique Rune): Basically a much bigger Extreme Rune, packing 35% ATK/ DEF/ HP. See the Extreme Rune entry for an explanation.
Uses: Current BiS Rune for traditional healers, ATK% stat-wise, Chimera Rune or Morgan le Fay’s Rune for increasing her Brand damage.

Destruction’s Favour (69-40 Hell Unique Accessory): Applies a buff featuring the newly introduced ATK AMP stat, which is a newly added multiplier on ATK%. Despite the effect decaying over the course of 50 seconds after, it is incredibly potent on any ATK scaling DPSes.
Uses: Likely BiS Accessory for any ATK scaling DPS.


