
Foreword
Special thanks to Liriell who worked tirelessly on this guide.
Introduction
This guide is aimed at giving tips for those who just started playing Reverse:1999 or plan to. If you're one of them, welcome! But if you don't know what the game is about yet or where to start, you may want to check our [Introduction] guide first. Reroll is not needed or recommended in this game, but if you'd like to check that anyway, we also have a [Reroll] guide. Without further ado, let's get started!


Common Terms

These are some common terms you may find around the game and community:
- AP: Action Points. Each round, there's a limited amount of Action Points for using or moving cards. The amount of AP is tied to the amount of characters you have on the field, which means that on most occasions, you'll have 3 AP per round. Having two characters on the field means only 2 AP per round, and having only one character means only 1 AP per round, so be extra careful about not letting your characters die! There are special cases such as boss battles and duel stages, but the general rule is that the amount of AP equals the amount of characters in battle. Tuning Skills don't consume AP.
- “AP generous”: Refers to characters who don't need to spend many Action Points to fulfill their role.
- “AP greedy”: The opposite. Characters who need to use cards and moves constantly to fulfill their role.
- Tuning Skills: Vertin's skills. They can be found in the bottom left corner of the screen during combat. There are two sets: “First Melody” and “Grand Orchestra”.


- Moxie: The little dots below the HP bar of each character. It's possible to gain Moxie by using cards, merging them or moving them. Some characters also have their own mechanics to gain Moxie or give Moxie to allies.
- i0, i1, i2, i3: Refers to the character's Insight level, also known as “Inheritance”. Similar to ascension or promotion in other games. Low rarity characters only go up to i2 (insight 2) while 5☆ and 6☆ can reach i3 (insight 3). Each Insight level unlocks a passive.

- Afflatus: The name given to the “Elements” in Reverse:1999. There are six of them: Star, Mineral, Beast, Plant, Spirit and Intellect.
- Reality DMG and Mental DMG: Similar to “Physical” and “Magical” damage from other games. Reality and Mental damage have their Reality and Mental defense counterparts. Meanwhile, “Genesis damage” ignores all kinds of defense, being the equivalent to “True damage”.
- Strat / Team Comp: The kind of strategy or team composition that the player is going for. Synergy and team composition are key in Reverse:1999.
- Substitute: In most stages, you can select up to four characters, but while three of them will be on the field, the fourth one will wait at the suitcase, with a “substitute” tag (and a cute little alternate form known as Udimo, being most often an animal that represents the character). Once someone dies in combat, and only through that, the Substitute will take their place.
- Sacc / Sacrifice Strat: A kind of strategy where the player purposefully sacrifices a character. The two 2☆, Door and Ms. Radio, have their kits made for this type of strategy.
- Psychube: The equivalent of gear or equipment in this game. There are no banners for them, and they can only be obtained by playing.
- Resonance: Another facet of character upgrade, Resonance allows for increasing raw attributes. When saying that a character is at “i2 L50 R7”, that means the character is at “Insight 2, Level 50, Resonance level 7”. Resonance matters as much as the character's core level, and sometimes more, so pay attention to it if you notice that your characters are struggling.
First steps

#1 Enjoy the story
List of which stages unlock what:
- Tutorial ends at 1-1, unlocks 2x speed in combat.
- After stage 1-6, unlock Traces (and you can get Leilani by interacting with a Trace in the map),
- Clearing 1-11 unlocks Dust Farming (exp mat.) stages.
- After stage 1-12, get Eagle by interacting with a Trace in the map,
- At 1-14, Unlock the Tuning Skill Set “First Melody”
- Tuning Skill Set “Grand Orchestra” can be obtained by clearing all training stages. Training stages can be accessed from any main story map, by clicking at the notepad icon at the top right of the screen.
- Check the video on Basics of Combat below the list for some helpful tips.
- Stage 2-6 Unlocks Hard Mode
- Stage 2-8 Unlocks Insight stages
- Stage 2-10 Unlocks Psychubes and Pneuma Analysis (Psychubes farm stages)
- Stage 3-2 Unlocks Resonance system and Artificial Somnambulism game mode.
Answers for the puzzles
We have hidden the answers to the puzzle in the section below to avoid spoiling those who want to have a go at them first.
Chapter 1
| Stage | Question/Info | Answer/Source |
|---|---|---|
| Stage 1-7 | Sotheby’s mansion has thousands of artifacts. What is the thing with one horn hung high above her hall that always gazes at people? | Quiet Ravenheart |
| Stage 1-10 | Matilda's School Report: [...] So what is Matilda Bouanich's score? | 86 |
| Stage 1-12 | Item needed: Truth Serum | From a Trace after clearing stage 1-11 |
| Stage 1-15 | How many older sisters does Schneider have? | Twelve / 12 |
Chapter 2
| Stage | Question/Info | Answer/Source |
|---|---|---|
| Stage 2-3 | Item needed: Tiny Key | Obtained by clearing 2-15 |
| Stage 2-4 | 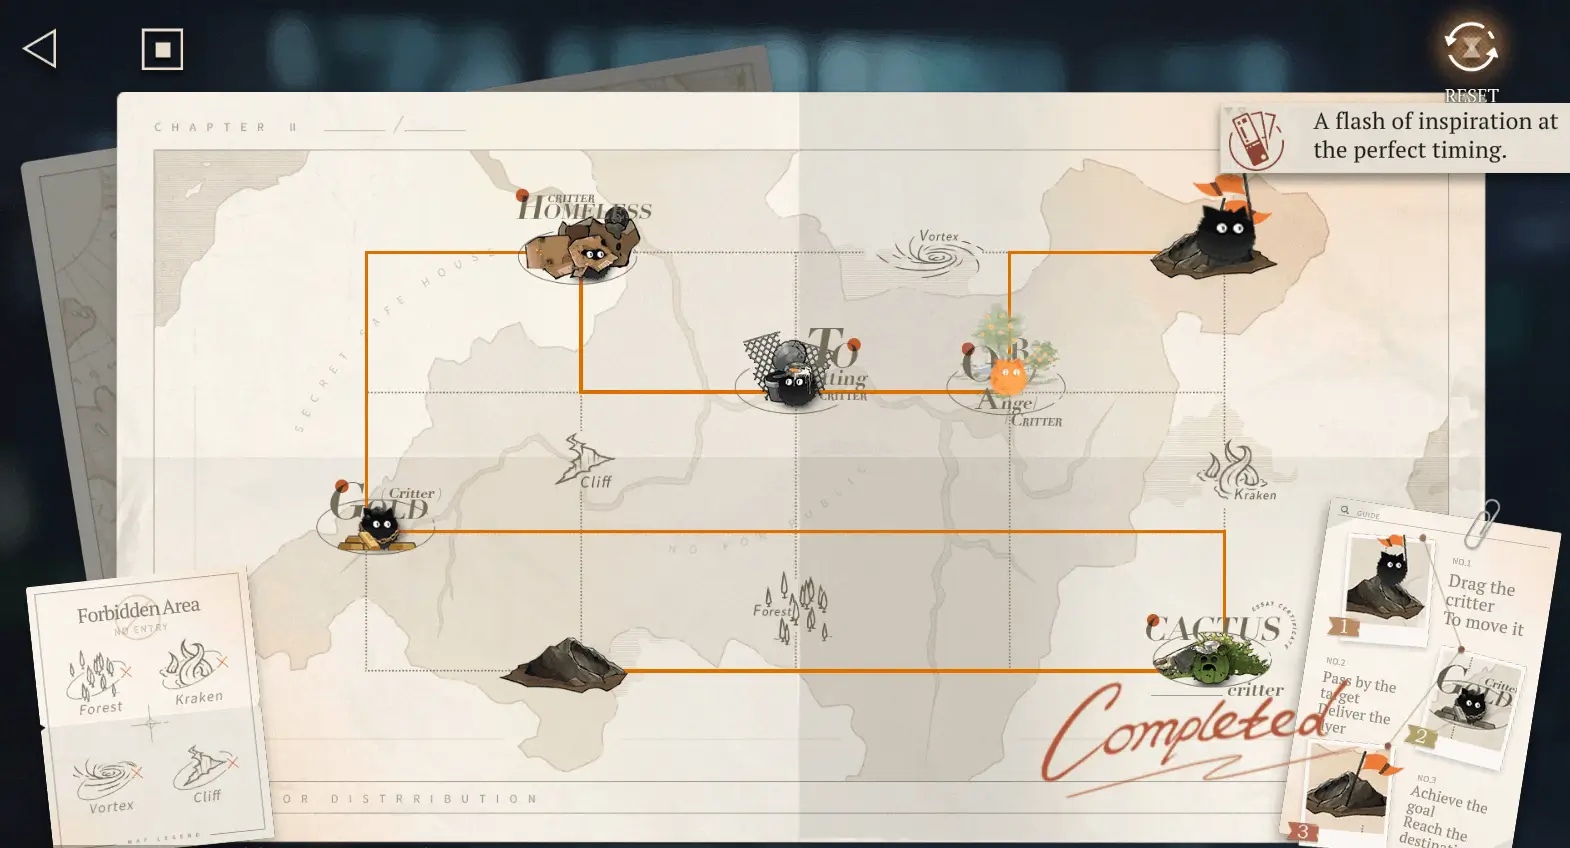 | |
| Stage 2-6 | Item needed: Garden Key | Obtainable by clearing 2-12 |
Chapter 3
| Stage | Question/Info | Answer/Source |
|---|---|---|
| Stage 3-5 | Item needed: Tiny Acorn | Obtained by answering the puzzle at 3-15 |
| Stage 3-7 | Where are the fish and chips? / Where is the peas puree? | Basket / Cabinet |
| Stage 3-12 | 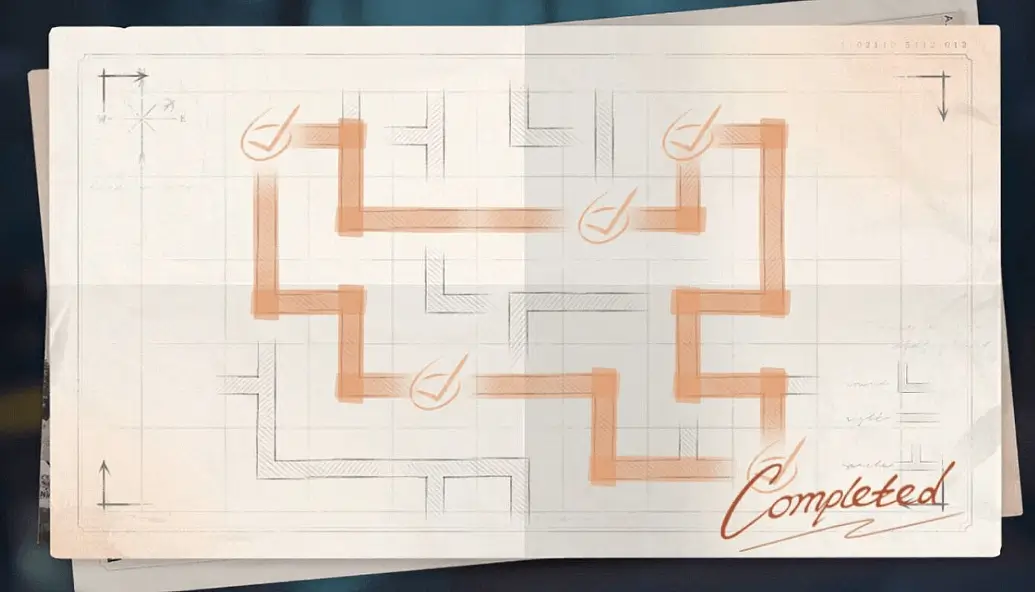 | |
| Stage 3-15 | George the Oak is already 800 years old. Which animals in the tree hole listened to that song with you? | Red squirrels and woodpeckers |
Chapter 4
| Stage | Answer |
|---|---|
| Stage 4-6 | 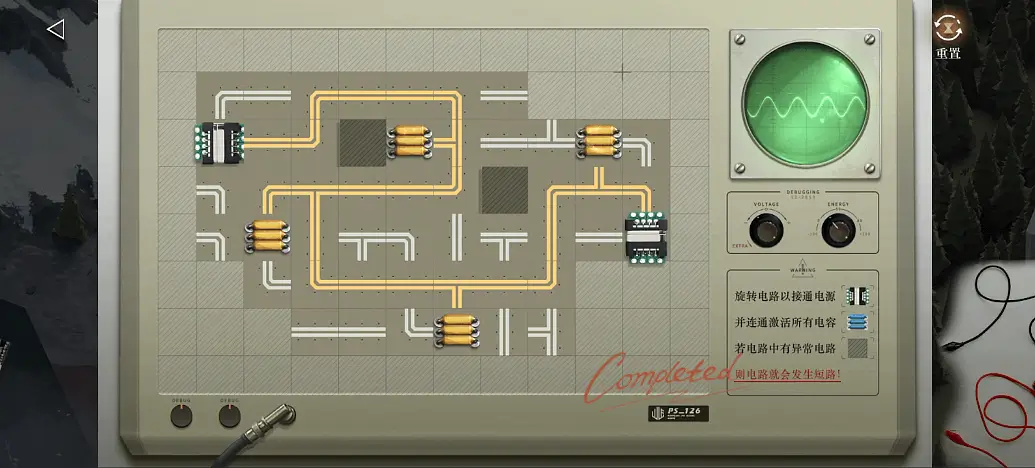 |
| Stage 4-10 | Intuitive. Move the bar until the pieces of paper take the shape of the boat.  |
Beginning of the Tale
“Beginning of the Tale” refers to the Beginner Missions. Following these missions, you will learn the basics of the game and its flow, as well as earn many rewards. They are very intuitive in nature, and have shortcuts to take you directly to where you need to go. Among these missions, it can be highlighted:
- You earn the resources back by leveling and then promoting four of the free characters to i1. (Sonetto, APPLe, Leilani and Eagle)
- Completing Act 3 gives you “The Footloose”, a 5✦ Psychube that is useful in general to any Damage Dealer.

- Completing Act 5 gives you “Laughter and Laughter”, a 5✦ Psychube that is useful in general to any Healer.

- Completing Act 6 gives you Sonetto’s “Parade Anthem” skin.
- Your progress in “Beginning of the Tale” isn’t tied to the progress of the main story and its rewards.
Wilderness
Once you unlock Wilderness (Chapter 2) try to place as many islands and buildings as you can as soon as possible. You can always change the design later for no charge, and it will be a good source of passive income + character bond.
Other General Tips
- At the fifth day of login, you will get a consumable item called “Carrierwaver Carrier”, that allows you to get a 6-star Psychube of your choice. It’s advised to pick one that will suit your main Damage Dealer the best.
- Early on, healers won’t be really needed, and you won’t have to worry too much about team synergy. Pretty much any character will be good enough to simply steamroll the stages. However, the more the game progresses, the more important healers and survival mechanics become.
- The game may seem generous in materials early on because of the beginner missions, but it actually takes a while to raise a character. For this reason, try to not spread yourself thin and plan your priorities ahead. (More on this in the Team Building section)
Initial Characters

Free Characters
APPLe
Sub-DMG, Healer

How to obtain: Prologue
Gameplay tips: Since APPLe heals passively, try to save his skill “Equal Amount of Light” and letting it merge as much as possible to have a decent source of healing in a pinch. APPLe’s biggest disadvantage in comparison to other healers, is the fact that he only heals one ally per skill/ultimate use, and always the one with the lowest HP. To remediate that, give him either an additional source of healing such as “Her Second Life” (6✦ Psychube) or a Psychube like “Laughter and Laughter” (5✦) to amp up his base healing done and help him stay alive.
Synergies: Can fit well in any early game team. Pairs well with “AP greedy” characters.
Should you invest? Maybe. As discussed above, APPLe isn’t as efficient as a dedicated healer. He does, however, fill a Mixed Role niche, acting as much as a DPS as he does as a Healer, since almost all his healing comes from his attacks. The biggest reason to invest in him would be, however, his passive healing. APPLe is an AP generous character, which can be extremely valuable and give your main Damage Dealer or other supports more room to act.
Sonetto
Damage Dealer, Support

How to obtain: Prologue, story progression (NOT available in gacha)
Gameplay tips: If you’re using Sonetto merely to attack, there isn’t any difference in damage between “Commandment V”’s level 1 and 2. If you do have a copy of this card already upgraded to level 2 or a chance to upgrade it, try to save it to disarm an enemy who is about to attack. Most of the time, Sonetto will be focusing on buffing duty, which works well with her own ultimate, as it gets a bonus on DMG and Penetration Rate if Sonetto is under a positive status.
Synergies: Sonetto works in almost any team, but she’s a notable enabler for characters whose skills need the caster to be under a positive status to enjoy a bonus, or those who need the enemy to be under a negative status to enjoy a bonus.
Should you invest? Yes. Sonetto is one of the most versatile characters in the game, one of the best buffers, can reliably apply crowd control (Disarm) and deals good damage herself. To make all that even better, you can upgrade her Portray just from advancing the story, and since she’s a 5✦, you can opt to promote her to i3 and bring her to Late Game. Tl;dr, a flex character to almost any situation.
Notes: Sonetto loses most of her utility when it comes to boss stages. Most bosses are immune to crowd control, and usually a strong single-target ultimate is more useful in situations like this than AoE ultimates.
Leilani
Damage Dealer

How to obtain: After Stage 1-6, check one of the Traces in the map
Gameplay tips: Leilani has a very unique mechanic that gives Moxie to allies when she enters battle (Passive from Insight 1) and everytime she uses her Ultimate. For this reason, it is recommended to get her at least to i1 L1 as soon as possible. When it comes to gameplay, one of her skills, “A Greeting!” deal bonus damage when the enemy is under a Control or Negative status, so try to pair her with a debuffer. Her second skill, “Check Carefully”, deals more damage if the enemy is below 50% HP, so that should most of the time be selected as the last attack of the round. Another way to use Leilani, since her damage is average at best, is to spam her cards early so she can use her ultimate right away and give the team a headstart.
Synergies: Teams with a debuffer, and teams where one or more of the characters are reliant on their ultimates.
Should you invest? Maybe. Due to being a 3✦ unit, Leilani’s damage isn’t impressive and doesn’t scale well into the late game. Since you get the resources back for raising her to insight 1, it may still be worth leveling her to fill a need for Beast DMG early on, or for her Moxie mechanic. If you wish to use her for sacrifice strats, that’s enough. Another option is getting her to max level, which is very cheap as well since she’s a low rarity unit, and setting her as a Substitute. That way, if someone in the team dies, Leilani enters and automatically gives 1 Moxie to all allies and 2 to herself, facilitating a comeback. Also, since one of her skills is best suited for enemies below 50% HP, she tends to work best in situations like this.
Eagle
Damage Dealer

How to obtain: After Stage 1-12, check one of the Traces in the map
Gameplay tips: Much like Leilani, Eagle benefits for a team with a debuffer to enjoy the bonuses of her first skill, “Old Pocket Watch”. Eagle is a very easy and straightforward character to play. She’s a Crit-focused character, so make sure to give her critical psychubes and stats.
Synergies: Teams with debuffers, crit-oriented teams, teams with Defense-type characters to help keep her alive.
Should you invest? Yes. Eagle is very cheap due to being a low rarity character, but her kit is extremely solid and offers her the tools to be one of the strongest Plant Damage Dealers in the game despite of that. Once she enters combat, her passive will inflict “Sense Weakness” on the enemy with the highest attack, lowering its Reality DEF and Crit DEF by 20%. This means that Eagle’s presence alone already helps the team, especially when dealing with elite enemies. She also has a very high base crit, passives that increase her ult’s crit rate, and the excess crit rate gets turned into crit damage, allowing Eagle to reach numbers of damage that aren’t possible for other low rarity characters.
Dikke
Sub-DMG, Healer

How to obtain: 8th day of login
Gameplay tips: Dikke can be considered a “mixed role” unit, as she balances healing and damage in equal measures. Her healing heals all teammates, and is stronger is the target is below 50% HP. Taking that into consideration, try to keep her healing cards saved and let them merge naturally as much as possible to have a burst healing ready for the right moment. Outside that, focus on attacking. Dikke can deal decent damage and should be built full on ATK (her healing scales based on her ATK as well). When her ult is ready, if she has any debuff on her, use her ult first to not hinder the performance of her healing or subsequent attacks.
Synergies: Flex character, can fill in for most teams. Not recommended if your team needs a dedicated healer or specific utility, as utility is the one thing Dikke lacks.
Should you invest? Yes. Dikke is very worthy of investment, being a flexible unit who works well on providing both damage and healing. Furthermore, her ult cleanses herself of all debuffs, helping keep herself alive and her output decent on both fronts.
Matilda
Damage Dealer

How to obtain: Pre-Registration Rewards (NOT available in gacha)
Gameplay tips: Matilda is a crit-oriented character, but her kit doesn’t work much in her favor. She needs to be constantly on a buffed state and have her skill “Ingenious Etude” on level 2 or above to use as an opener in order to make the best use of her potential.
Synergies: Buffers (Sonetto being a prime example), anyone who can lower the enemy’s critical def or critical resist.
Should you invest? Probably not. Unless you really like Matilda, the self-entitled “best student” doesn’t have much going on in her favor even inside her own niche. At i3 she only enjoys a critical technique score of 356 despite being a 5✦, meanwhile, Eagle at i2 and being a 4✦ has a critical technique score of 445. Matilda can be a decent enough Damage Dealer in the early game, but the farther in the game, the more her kit plays against her. Her passives don’t really add anything noticeable, her multipliers are on the lower side, and she needs too much set up and a team built around her to do anything at all.
Notes: You will only receive a single copy of Matilda as pre-registration reward. She’s NOT in the gacha and as of now, there isn’t any way to get copies of her to upgrade her Portray, making her case even more difficult to defend.
Starter 6-star
(From Beginner Banner, “First Drop of Rain”)
Regulus
Damage Dealer, Support

Gameplay tips: Get Regulus to i1 as soon as possible. Her passive, “Restless Heart” gives her +50% crit rate when she doesn’t act for one turn, and any excess of crit rate gets turned into crit damage. That means you have a downtime of one turn to manage Regulus card and prepare for a burst window, or focus on the other teammates. Mastering her uptime is the key for success, as big utilities (reducing Moxie from enemies) relies on having her skill “Challenge for the Eyes” being at least at level 2 and landing a critical hit.
How much to invest? Regulus only needs i1 to unlock her main tool, “Restless Heart”. She benefits heavily from Psychubes, but doesn’t need as much of a team comp around crit to work as other crit-oriented characters. However, a critical-focused team is still welcome, since any excess in crit. rate gets added to crit. damage, thus easily giving her a boost on damage.
Psychubes:


Synergies: Can work well alongside AP greedy teammates since she's AP generous. If she's the main Damage Dealer, try to bring allies who can buff crit or inflict crit-related debuffs.
Eternity
Damage Dealer, Survival

Gameplay tips: Much like Regulus, getting Eternity at least to i1 is essential. She gains immunity to [Bleed], [Corrode] and [Poison] statuses, and every round she gains a stack of her passive, [Blood of Longevity], stacking up to +15% DMG dealt and +15% DMG Heal. That greatly helps with her survivability, but at this point, it isn’t enough. Since Eternity sacrifices 10% of her HP every time she casts a skill, pair her with a healer or a shielder to help keep her alive.
How much to invest? I1 is enough to have her functional, but it’s only at I3, when she gains great upgrades to her passives, that Eternity truly shines.
Psychubes:

Synergies: Healers and shielders in general. When going duo, bring someone who can offer extra utility through buffs, moxie mechanics or counter. (Too many options of all rarities to list here)
Lilya
Damage Dealer

Gameplay tips: Lilya is a very straightforward character to play, but take note that she doesn’t convert excess crit rate into crit DMG.
How much to invest? Lilya starts to shine at i2, when her base stats and Resonance level begin to reach higher levels. However, her i3 passive is essential to make her reach her potential. She also needs a team built around her.
Psychubes:

Synergies: Crit-oriented supports and AP generous allies, so Lilya can spam her cards and charge her ultimate as often as possible.
Team Building 101
For now we are only going to dip our toes in Team Building. This is a Beginner’s Guide after all.
How many units to raise at first
Between 4 to 6 units early on. Depends on the amount of high rarities you're trying to build, as the 6✦ in particular are considerably more expensive. I'd advise you to pick only a 6✦ to build at first, then the others should be from varying elements and roles. Once you have a solid main team in this fashion, you can slowly branch out to have mono-type teams. Synergy is vital in this game, so when in doubt of who to raise or invest in, check synergy with who you already have.
Team structure
Team composition can be very flexible and varied since most characters can do more than one thing, but there’s a generic guideline you can follow. There are three main roles:
- Damage Dealer: Characters focused on dealing as much damage as possible. They may be great at that job, but some of them don’t offer any utility at all.
- Support: Characters whose focus is on their ability to enable their teammates (especially the main Damage Dealer). They often can act as a Sub-DMG too, but the main reason to bring them is for their buffs, debuffs or control skills.
- Survival: Arcanists focused on keeping their teammates alive. They’re the healers, shielders and tanks.
There are some special cases where a character has a perfect balance between two of these roles, in which case we are going to refer to them as “Mixed Role”. Being Flex unit, they can freely take part in many different teams to fill a niche, or are ideal characters to have in your Substitute slot.
How to compose a team:
First, choose your main Damage Dealer. Then, see what kind of support they need to bring forth the most of their potential. When in doubt, you can find that out by checking the full character reviews for suggestions on synergy. Last but not least, the team will need either a second Support or a Survival character. Damage Dealers tend to die easily, so towards the endgame, making sure they stay alive becomes more and more important. Last but not least, the Substitute slot. As commented above, it can be a flex character or even a second Damage Dealer, in case the first one dies and you’re close to clearing the stage.
If you’re running low on materials, most low rarity characters are focused on utility, and can fill a specific niche. Since they’re cheap to raise, you can always consider them to fill the role you need in the meantime.
Account Progression

Routine
- Dailies usually take only a couple of minutes. Interact with the character at the main menu, gather resources from Wilderness, run Pneuma Analysis, and spend your Activity (stamina) towards whatever you’re working on at the moment. Since the game has a replay mode that can give x4 rewards at once, this gets done quickly.
- Do the Psychube stages (Pneuma Analysis) twice every day, they cost you nothing and the resources are important.
- Once you unlock Artificial Somnambulism (early Chapter 3), try it. It's a huge boost on Sharpodonty, general resources through the Oneiric Shop and Clear Drops for gacha. Try to finish all stages from "Surface" even if you don't get perfect stars so you can unlock "Limbo". "Surface" gives you a passive income every week, and Limbo can give you up to 600 Clear drops (gacha income) and Oneiric Shop currency every two weeks.
- Try to plan out ahead since resources are scarce, but don't stress too much about it since side-events give plenty of resources and mats.
Extra tips about Psychubes
Since you can only bring up to four characters per stage, you likely won’t need a big amount of them. Low rarity Psychubes are only fodder to level up the high rarity ones; As long as you keep doing the Pneuma Analysis stages daily, you should be able to save currency for Psychubes in no time. Once you have your main team covered, use this currency to buy copies of Psychubes. Dupes (or the “Gluttony” Psychube) can be used to increase the level of the Psychube’s passive, making it a lot more effective or powerful, depending on its nature.
Spending tips

If you plan on spending money in Reverse:1999, below you can check a list of recommended purchase priorities based on different needs. The prices shown in this section come from the CN version of the game - we will update the guide with official prices once the game releases.
Recommended spending order for Summons:
Roaring Month (Monthly Card) > Rookie Shopping Day > Initial Summon Pack > Offer of the Month > Rookie Offer = Crystal Drops (with first charge bonus) > Roar Jukebox (BP) > Crystal Drops (without first charge bonus)
Recommended spending order for Materials/Raising characters:
Roaring Month > Roar Jukebox > Rookie Shopping Day > Rookie Offer
Balanced spending order:
Roaring Month > Roar Jukebox > Rookie Shopping Day > Initial Summon Pack > Offer of the Month > Rookie Offer > Crystal Drops (with first charge bonus) > Crystal Drops (without first charge bonus)
| Offer | Name | Content | Price |
|---|---|---|---|
 | ROARING MONTH |
| ¥30 (~$4) |
 | ROOKIE SHOPPING DAY |
| ¥6 (~$1) |
 | ROOKIE OFFER |
| ¥68 (~$10) |
 | INITIAL SUMMON PACK |
| ¥128 (~$18) |
 | OFFER OF THE MONTH |
| ¥168 (~$23) |
Battle Pass
The Deluxe Edition of the Battle Pass costs ¥68 (~$10) and the Collector Edition costs ¥98 (~$14).