


URA Training Guide
Umamusume: Pretty Derby has a unique approach to gacha games in the sense that the powercreep comes majorly from newly added scenarios. Each new scenario tends to be longer and harder than the previous one (although that’s not always the case), and gives better stats. For this guide, we will be taking a look at the first career scenario: URA Finale. It is the easiest and shortest scenario, perfect to learn the basics of training Umas, and remains relevant later as a source for quick parent/spark farming and quick dailies.
Getting Started
First you need to decide who you will train and for what purpose. Check the skills in your deck and Legacies to make sure they match the Aptitudes you're aiming for; If you're building an “End Closer” for “Long Races”, then skills aimed at that style, partnered with lots of


- Check your Uma’s growth rates and Aptitudes, you can take advantage of sparks or skills to cover her weaknesses on certain stats or races;
- Borrow MLB Support Cards and legacies with the sparks you need until you have your own legacies built. This will give you a nice headstart;

Training Loop
Your first year up until the first summer camp will be focused on building bonds and increase the level of training facilities.

- Start by always looking over who is available for training in each of the five training types. In order of priority: Check who is available in your main stats training > If there are two or more people, train there > If not, train wherever there are the most people > If no training has at least two partners, then hit the “Recreation” button, but never do so if your energy is full or if your mood is already “Great”.
- Whenever the risk of injury reaches 20% or above, consider resting unless the training session grants significant bonuses. Injuries can debuff your character and you may take up to 3 turns to recover in full.
- Hints (!) give additional +5 bond points, consider prioritizing them even if the partner doesn’t have a skill that you want in order to build up bond.
- Do not train something you don’t need merely for the friendship bonuses (i.e. ). It’s still priority that you manage to have enough stats to win your races. Furthermore, every 4 training sessions grants a facility upgrade, so when in doubt, always consider either the facility you need to upgrade the most, orGuts
![Guts]() in early career for better energy cycling.Wit
in early career for better energy cycling.Wit![Wit]()
- Once you reach orange bonds (4 bars), there will be a chance to get rainbows (Friendship Training). From this point onwards, prioritize training with two or more rainbows. If there aren’t any, you may consider running an optional race instead.
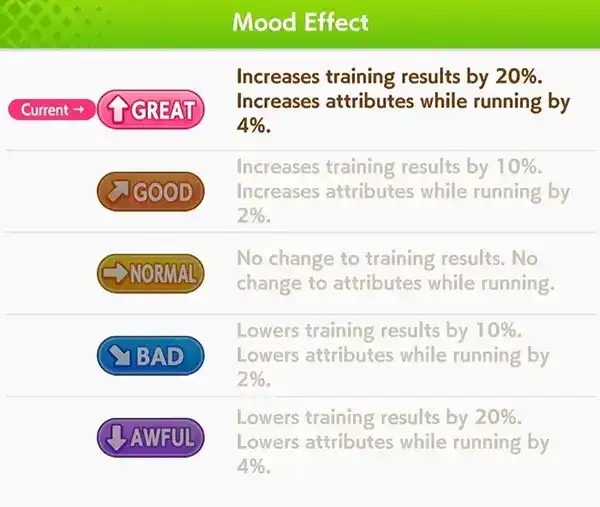
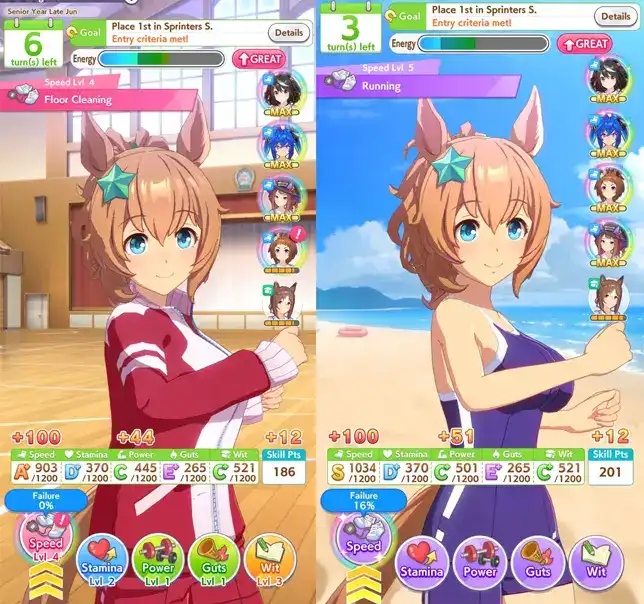
- The amount of stats you get from each training section are determined by mood and the effects “Training Effectiveness” and “Friendship Bonus” (for rainbows). “Specialty Priority” is also another nice effect to have to ensure that you will get your rainbows and partners in the type of training stat you want. The maximum amount of a stat you can get from a single training section is +100, as demonstrated below.


Meanwhile, the amount of stats you can get from a race is determined by the effect “Race Bonus”. At 35% Race Bonus, you can get 13 stat + 60 skill points for the average cost of 15 energy when running a G1, 10 + 47 for G2/G3 and 6+47 for OP. It’s overall a best cost-benefit than training, however, there are two things to be taken into consideration: First, the stat you get is random. Second, running many races is only beneficial for Team Trials Umas, who take advantage of many skills. For Champions Meeting, where the skill choice has to be more streamlined and raw stat checks are higher, you should try to keep your focus on training over races as much as possible.
Winning Races
In order to win races during the campaign, you must consider the kind of race and build you are going for. The primary concern here is

- Each Gold/Unique skill compensates for (estimate, rounded numbers) 290~320 , while each white skill compensates for 80Stamina
![Stamina]() on average.Stamina
on average.Stamina![Stamina]()

| Distance | Guts Threshold |
|---|---|
| Sprint | 210 |
| Mile | 260 |
| Medium | 320 |
| Long (3000m) | 380 |
| Long (3600m) | 440 |
Recommended

| Required Stamina | Front Runner | Pace Chaser | Late Surger | End Closer |
|---|---|---|---|---|
| Sprint - 1400m | 460 | 520 | 490 | 500 |
| Mile - 1800m | 700 | 790 | 740 | 750 |
| Risky Mile - 1800m | 540 + 1 gold | 620 + 1 gold | 580 + 1 gold | 590 + 1 gold |
| Medium - 2400m | 980 | 1100 | 1020 | 1040 |
| Risky Medium - 2400m | 770 + 1 gold | 880 + 1 gold | 820 + 1 gold | 830 + 1 gold |
| Long - 2600m | 1160 | 1200 | 1200 | 990 + 1 gold |
| Long - 3200m | 940 + 2 golds | 1070 + 2 golds | 980 + 2 golds | 1000 + 2 golds |
| Long - 3600m | 1020 + 3 golds | 1160 + 3 golds | 1090 + 3 golds | 1110 + 3 golds |
There are even more formulas and variables to be taken in consideration, but we’re trying to keep it quick and simple. If you want to delve deeper into min-maxing without burying yourself into formulas, we recommend this calculator.
You may be wondering, if these are the final thresholds to aim for, then how do you manage midway through a Career?
- Use the tables above as guidelines, check your Trainee’s goals and if she has one or more checks (Long races), shift your training focus ahead of time;Stamina
![Stamina]()
- Change your Trainee’s positioning in race, put her as Front.
- Avoid buying skills during the career itself if you can get away with it. This may save you a lot of skill points by getting extra hints along the way.
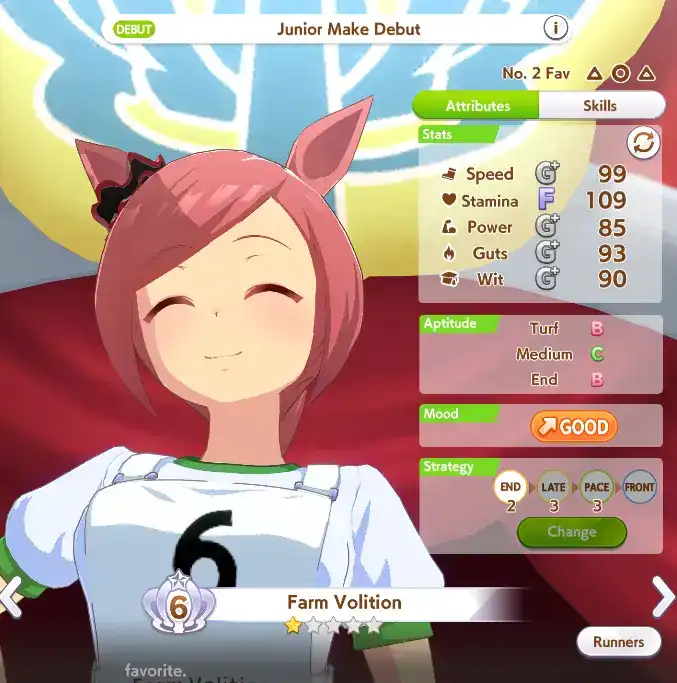
- Click the arrow on the sides to check on the other runner’s stats. Career mode allows you to be more lenient on stats overall, since the opponents are much weaker than actual player-trained Umas. If you’re struggling with a specific race, take note of your opponents and set stats higher than them as goals for that part of the career.

Scenario Specific Tips
- The Career lasts 70 turns. On average, 10 are reserved for goal races (including the URA Finale phase), and 8 for summer. This leaves 58 regular turns (note that this number may change depending on character goals and overlaps with summer).
- Each training facility takes 4 training sections to level up, totalling 16 turns to reach level 5 (max).
- During the first Summer trip, the top option choice always gives +10 while the bottom choice always gives +10Power
![Power]() ;Guts
;Guts![Guts]()
- During the second Summer trip, the choice doesn’t matter and the reward will always give +5 to three random stats;
- During the first New Year:
- Top option: +10 to the Uma’s favored stat
- Middle option: +20 Energy
- Bottom option: Skill Points +20
- During the second New Year:
- Top option: +30 Energy
- Middle option: +5 All Stats
- Bottom option: Skill Points +35
- The best cost-benefit is always the +Energy choice, unless your energy is nearing the full bar.
- Unique skills level up:
- Senior Year, Early February (Req.: Turf: 60.000 Fans / Dirt: 40.000 Fans)
- Senior Year, Early April (Req.: Green bar bond with Director Akikawa + Turf: 70.000 Fans/ Dirt: 60.000 Fans)
- Senior Year, Late December (Req.: Turf: 120.000 Fans / Dirt: 80.000 Fans)
- Acupuncturist is the ultimate gamble. The safest choice is the last one (+10 Energy). All other choices have varying chances of success, while a failure will incur penalties and debuffs:
- Option 1: (~30% chance) All stats +20 / (~70% chance) Mood -2, All stats -15, get [Night Owl] negative status;
- Option 2: (~45% chance) Obtain Corner Recovery ○ and Straightaway Recovery skills / (~55% chance) Energy -20 and Mood -2;
- Option 3: (~70% chance) Max Energy +12, Energy +40, Heal all negative statuses / (~30% chance) Energy -20, Mood -2, get [Practice Poor] negative status;
- Option 4: (~85% chance) Energy +20, Mood +1, get Charming ○ positive status / (~15% chance) Energy -10 or -20, Mood -1, chance to get [Practice Poor] negative status.
Getting High Scores
Only two things affect score: Stats and Skills.
Stats can go from +352 score at 300, up to +3841 score each at 1200, following a crescent pattern. If you want to inflate your score, it’s more valuable to focus only on 1~2 stats, especially if you don’t have a strong deck or strong legacies.
Skills give points based on type:
- 1★ or 2★ Uma: Each unique skill level = +120 rating
- 3★ or higher Uma: Each unique skill level = +170 rating
- Base score for 100 and above cost skills (ignoring discounts) = +239 rating
- Base score for below 100 cost skills (ignoring discounts) = +129 rating
Using this, you can inflate your score to get achievements or increase your Team Trials rating to get Carats. However, remember that a high score doesn’t necessarily equal a strong Uma.
FAQ
- What are Fans for?
- They're used as a requirement to become eligible to races, upgrade Unique skill, and unlock character fanclub titles.
- How do I get [Distance] URA Finale ending?
- The URA Finale phase ending type will be determined by the type of race your Uma ran the most. You can count how many races of each distance she has as her goals, and then add optional races of the desired length until that distance becomes the majority.