


4 cost


3 cost

3 cost
1 cost

1 cost
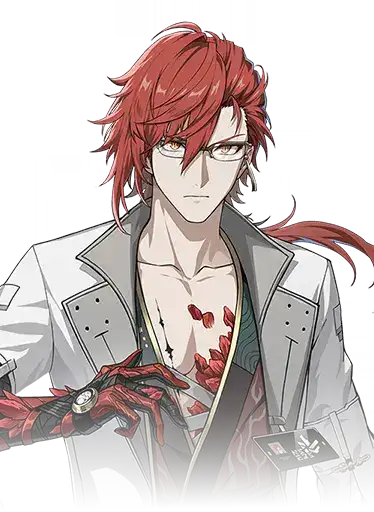
Mortefi, a skilled expert in Applied Tacetite Study and a member of the Academy’s Department of Safety, possesses the unique ability to transform his accumulated frustration into fiery flames. From a burning wrath that consumes all, the red dragon shall descend.
This character has no video guide yet.
Last review update
Patch 1.3
Last major build/calcs update
Patch 2.3
Last profile update*
January 22nd, 2025
*Profile update means smaller edits to echoes, stats, synergies or teams that don't require new calculations.
To learn more about Mortefi check the sections below. Use the tabs to quickly switch to the kind of information you're looking for.
Profile
Review
Build
Gameplay and teams
Calculations
Profile
Impromptu Show
Mortefi uses his dual guns and fire to perform up to 4 continuous attacks dealing Fusion DMG.
Mortefi enters the aiming state for a more powerful shot. The aimed shot fired after charging finishes deals Fusion DMG.
Mortefi consumes Stamina to perform consecutive shots at the target in mid-air, dealing Fusion DMG.
Use Basic Attack after successful Dodge to attack the target, dealing Fusion DMG.
Passionate Variation
Launch high-speed flame lightning forward, dealing Fusion DMG.
Violent Finale
Deal Fusion DMG, and apply Burning Rhapsody to all characters in the team.
When the on-field character's Basic Attack hits the target, Mortefi launches a Coordinated Attack, firing 1 Marcato. When the on-field character's Heavy Attack hits the target, Mortefi launches a Coordinated Attack, firing 2 Marcato. Mortefi can launch one Coordinated Attack every 0.35s.
Deals Fusion DMG.
Fury Fugue
When Mortefi's "Annoyance" reaches 100, his Resonance Skill is replaced with Fury Fudge. When casting Fury Fudge, Mortefi consumes all "Annoyance" to unleash high-speed flame lightning, dealing Fusion DMG, considered as Resonance Skill damage.
Mortefi can hold up to 100 Annoyance. When Normal Attack Impromptu Show hits the target, “Annoyance” is restored. When Intro Skill Dissonance hits the target, “Annoyance” is restored. When Resonance Skill Passionate Variation hits the target, “Annoyance” is restored. Within 5 seconds after casting Passionate Variation, Basic Attack Impromptu that hits the target additionally restores “Annoyance”.
Harmonic Control
After casting Resonance Skill Passionate Variation, the damage of Resonance Skill Draconic Hellfire is increased by 25% for 8s.
Rhythmic Vibrato
During Resonance Liberation Burning Rhapsody, each hit of Resonance Liberation Marcato will increase the damage of the next Resonance Liberation Marcato by 1.5%, which can be triggered once every 0.35s, stacking up to 50 times. The effect will be reset after Resonance Liberation Burning Rhapsody ends.
Dissonance
Attack the target, dealing Fusion DMG.
Rage Transposition
The next character (or other characters on a nearby team that activates an Outro Skill) gains 38% Heavy Attack DMG Deepen for 14 seconds or until the Character is switched.
Sequence Node 1
During Resonance Liberation Burning Rhapsody, Mortefi launches Coordinated Attacks when the on-field character performs their Resonance Skills, firing 2 Resonance Liberation's Marcato hits, dealing Fusion Damage.
Sequence Node 2
After using the Echo Skill, Mortefi restores an additional 10 Resonance Energy. This can be triggered once every 20 second.
Sequence Node 3
During Resonance Liberation Burning Rhapsody, the Crit. DMG of Resonance Liberation's Marcato is increased by 30%.
Sequence Node 4
The duration of Resonance Liberation Burning Rhapsody is extended by 7s.
Sequence Node 5
When Resonance Skill Passionate Variation or Resonance Skill Fury Fugue hits a target, 4 Resonance Liberation's Marcato hits will be fired, dealing Fusion Damage. DMG of Resonance Liberation's Marcato fired in this way is reduced by 50%.
Sequence Node 6
When Resonance Liberation Violent Finale is cast, ATK of all team members is increased by 20% for 20s.
While the source of the materials can be quickly found in the game, when it comes Coriolus you will have to gather them from the map. Check our Interactive map to find them quickly:
Review
Please keep in mind Wuthering Waves is a skill-based game and each character has a different playstyle, difficulty level and even special tricks and combos. Wuthering Waves is also a team based game and it's only by combining both these factors to the highest level a character can reach optimal performance.
Incredibly fast Concerto rotation allowing fast access to his Outro
Incredible synergy with Heavy Attackers, boosting them and himself tremendously
Good personal damage considering the suite of buffs he provides
Insane Sequences that make him even stronger
Easy to understand and play even at the highest level
Strong enough to be played as a Hybrid even outside of his Heavy Attacker niche
Long Ultimate cooldown - 20 seconds compared to 10 second duration of the buff - so you need to keep this in mind while doing your rotations
If you're stuck at S0, looking at the overpowered Sequences will make you feel bad
Mortefi is a 4-star Fusion Pistol wielding Hybrid that can dish out good damage when built correctly, but truly shines in a more Supportive role with teammates that primarily deal Heavy Attack damage. This is because his Ultimate Skill synergises with Heavy Attacks and his Outro amplies them by a further 38%.
Mortefi recharges his Forte Gauge with Basic Attacks, Resonance Skill and Intro Skill, which when full will convert his skill to Fury Fugue. This is similar to his Resonance Skill, being an excellent generator of Concerto Energy and Resonance Energy, with the addition of Fusion DMG in an AoE radius. His Forte Gauge can be quickly filled by using his Basic Attacks after Resonance Skill, unlocking Fury Fugue faster. Another great point of Fury Fugue is that it lacks any CD; it can be spammed indefinitely as long as your Forte Gauge fills up, and it doesn’t interfere with his normal Resonance Skill, allowing him to use the two in quick succession.
His Resonance Skill generates a good amount of Concerto Energy and Resonance Energy while dealing Fusion Damage to his primary target.
His Ultimate Skill deals Fusion Damage in front of him, generating a good chunk of Concerto Energy and buffing the entire team with Burning Rhapsody. While the buff is active, Mortefi will launch a coordinated attack when an enemy is hit by an ally, up to once every 0.35 seconds. If the landed attack is a Heavy Attack, he instead deals 2 coordinated attacks, doubling his potential damage output, making Heavy Attackers his ideal partners.
Mortefi requires minimal field time thanks to having one of the fastest and easiest to execute Concerto rotations in the game, which combines his excellent Outro buff, solid DPS and highly synergistic Ultimate Skill. He is also easy to play as his rotation is simple and fast to execute, making him a good choice for players of all skill. Even if you happen to mess up his rotation, it is quite easy to recover.
While being able to deal good damage as far as Hybrid characters go, his true calling is being a Support thanks to his Outro Skill, hence he prefers the combination of 5P Moonlit Clouds and Impermanence Heron Echo. This stacks an additional 12% DMG and 22% ATK on top of his already potent 38% Heavy Attack amplification from Outro, generating a massive buff stack for the character switching in.
Overall, Mortefi is currently one of the top Hybrid characters in endgame, especially for characters/teams centered around Heavy Attack burst rotation. Even if not for that, he sees use thanks to his incredibly fast Concerto Rotation and synergy with the 5P Moonlit Clouds and Impermanence Heron Echo. His strong Sequences can further increase his utility to your team.
Mortefi guide videos aren't available yet.
Build
100%
Stats at Level 90: ATK: 587 | CRIT Rate: 24.3%
106.12%
Stats at Level 90: ATK: 500 | CRIT DMG: 72%
83.92%
Stats at Level 90: ATK: 462 | ATK: 18.2%
83.64%
Stats at Level 90: ATK: 412 | ATK: 30.3%
83.07%
Stats at Level 90: ATK: 387 | ATK: 36.4%
82.65%
Stats at Level 90: ATK: 387 | ATK: 36.4%
81.87%
Stats at Level 90: ATK: 412 | ATK: 30.3%
Best Echo Sets show the best sets that support the main character playstyle and work out of the box while the Special Echo Sets either are situational, support an alternative playstyle or are targeted toward min-maxers. The percentage numbers showcase the relative DPS increase when you take into account the set bonus only. For some characters there's no DPS (or its equivalent) available and in that case we listed the sets in the order of priority.
1
2 Set: Energy Regen increases by 10%.
5 Set: Upon using Outro Skill, ATK of the next Resonator increases by 22.5% for 15s.
Offers a 10% unconditional Energy Regen% boost taking some pressure off your gear when aiming at ER breakpoints. Also upon using Outro, grants the next character switching in a 22.5% ATK boost, amplifying any of your main damage dealers burst windows.
Below you can find Main Echo options that you should be using with the set:
2
2 Set: Energy Regen +10%.
5 Set: Increase the Resonator's Coordinated Attack DMG by 80%. Upon a critical hit of Coordinated Attack, increase the active Resonator's ATK by 20% for 4s.
Offers an unconditional 10% Energy Regen% and 80% Coordinated DMG boost. Also grants a passive supportive effect which triggers when the wearer of this set critically strikes with a Coordinated attack - this effect grants the on field Resonator an ATK% boost regardless if they're the wearer of the set or not. The set is better than Moonlit Clouds if and only if the equipped character's Echoes have endgame investment (with 9 or 10 CRIT substats total) and the character has a 5-star weapon equipped. If both conditions aren't met, Moonlit Clouds is a better choice.
Below you can find Main Echo options that you should be using with the set:
Substats: Energy Regeneration (Until Breakpoint) >= CRIT RATE = CRIT DMG > ATK% > Flat ATK
Important! CRIT DMG has base value of 150% and Energy Regen has a base value of 100% when you check them in game. The recommended values below don't include the base value but rather show how much on top of it you need to obtain.
ATK: 1700-2000+
HP: 14000+
DEF: 1100+
FUSION DMG%: 42%-72%+
CRIT RATE%: 50-70%+
CRIT DMG% 100-140%+
Energy Regeneration: 10-20%
Below you can find the order of leveling the abilities for Mortefi.
Res. Liberation
Forte Circuit
Basic Attack
Res. Skill
Intro Skill
Gameplay and teams
Below you can find optimal rotation (or rotations) for Mortefi. The total time needed to perform it is 5.62 seconds. When selecting the rotations we prioritized achieving 100 Concerto as fast as possible and once that condition was fulfilled, we focused on maximizing the damage output. As or if new and more optimal rotations are found, we'll update the characters calculations as needed.
Mortefi is easy and straightforward to play when following the rotation below, however keep an eye out for the following things while playing him:
- Intro
- Skill: Passionate Variation
- Skill: Fury Fugue
- Basic P1
- Basic P2
- Basic P3
- Basic P4
- Skill: Fury Fugue
- Ultimate
- Echo (Impermanance Heron Swap-Cancel)
Below you can find a list of some of the stronger synergies between this character and others.
Best Team
Phoebe Team
Zani Team
Calculations
Don't use the damage output calculations as an indication on who is worth pulling or investing as those are just simulations and in day-to-day gameplay there's a lot variables and also the skill of the player is important - if you can't consistently perform the character's rotation, their damage will suffer.
As usual, don't compare the numbers between characters - especially between Main DPS and Hybrids as they fulfill different roles in the team.
The numbers below show the character's DPS (Damage Per Second) and DMG (total damage done). When selecting the rotations we prioritized achieving 100 Concerto as fast as possible and once that condition was fulfilled, we focused on maximizing the damage output. As or if new and more optimal rotations are found, we'll update the characters calculations as needed. Listed character calculations are done without buffs or any damage contribution from teammates (full solo). They only include what the character, their Weapon, Echo and gear are capable of during their ideal Burst or Concerto rotation when starting with their Intro and Resonance Liberation available.
Do note that DPS and DMG aren’t perfect metrics for a character’s individual value and should be taken with a grain of salt. Anything pertaining a character’s relevance in the meta is addressed in our Review and Tier List, which the numbers below shouldn’t be used for as an end-all-be-all to. Instead, DPS and DMG are good metrics for a character’s sequence value and comparison between an individual character’s different rotations. We recommend using those metrics for such purposes.
Rotation time: 5.62s
Mortefi (S6)
Mortefi (S5)
Mortefi (S4)
Mortefi (S3)
Mortefi (S2)
Mortefi (S1)
Mortefi (S0)
Disclaimer: Mortefi does more damage depending on who he is supporting due to how his ultimate works. His ultimate can fire a maximum amount of 60 coordinated attacks at S0 in a literal perfect world when being abused by a Heavy Attack spammer, but this is not realistic, so we've used 35 coordinated attacks instead. This is how many you could expect to get when using Jiyan. Mortefi's S1 doesn't scale particularly well with Jiyan which is how we've represented but works much much better with characters like Danjin compared to what is shown here.
Here's the rotation we have used to calculate the DPS (Damage Per Second) shown above.
- Intro
- Skill: Passionate Variation
- Skill: Fury Fugue
- Basic P1
- Basic P2
- Basic P3
- Basic P4
- Skill: Fury Fugue
- Ultimate
- Echo (Impermanance Heron Swap-Cancel)
And here are the Echoes and Weapons used in the calculations.
Stats at Level 90: ATK: 587 | CRIT Rate: 24.3%
2 Set: Energy Regen increases by 10%.
5 Set: Upon using Outro Skill, ATK of the next Resonator increases by 22.5% for 15s.
Substats: ATK (45%), CRIT Rate (42%), CRIT DMG (84%), Energy Regen (9.6%)
