


Class Overview
Skills
How to level
Class Overview
Heavy Guardian is one of the classes available in Blue Protocol: Star Resonance. They fulfill the Tank role while wielding a Guardblade as their weapon of choice. Heavy Guardian has access to two specs - Earthfort and Block. Below you can find a summary of both, showing their strong and weak sides, how they play and more.


Earthfort's survivability and mitigation are primarily tied to its shields, with many of its strongest talents only working while you have one. With that in mind, naturally, its gameplay revolves entirely around generating shields through abilities such as Rage Burst and Shield Bash, which you’ll access by spending Sand Crystals and Rage.
Earthfort also gains access to near-permanent Super Armor, making them an immovable object in the face of enemies, ensuring you’re always in control of your character. Despite having minimal heals, Earthfort's shields allow it to handle its own survival competently, even with minimal assistance.
Pros
- Large shields and mitigation.
- Near-permanent Super Armor.
- Defensive party buff.
Cons
- Takes a bit to set up shields.
- Squishy without a shield.
- Can get overwhelmed on big pulls.

If what you want is raw damage mitigation without too much else, Block is the go-to choice when tanking. Block spec is unique in that it gains 100% block for free almost permanently, thanks to its signature Special ability Countercrush, which applies a buff that temporarily maxes it out. Keeping this active is at the heart of Block’s playstyle. Much of the spec's damage mitigation comes through enhancing Block’s total damage reduction effect, which, with guaranteed blocks, can be treated as permanent.
Block also gains access to a second layer of block, “Lucky Block”, for further protection and mitigation, incentivising building Luck considerably. Finally, Block is capable of running the ability Sandgrip without sacrificing much, adding another control effect to its arsenal. This can also be swapped out for further resource generation, though.
Pros
- High skill flexibility - can run more control or resource generation.
- Best raw damage mitigation.
- Easy to play.
Cons
- Difficult early game due to lack of Luck.
- Low self-sustain capabilities.
Skills
Halberd’s Edge
Tags: Basic Attack, Physical, Rock, Direct DMG, Single Target, Energy Restore, Melee
Multipliers:
- Strike I: 42% ATK +120 (Resilience Break: 41)
- Strike II: 56% ATK +160 (Resilience Break: 55)
- Strike III: 72.78% ATK +208 (Resilience Break: 70)
- Strike IV: 109.2% ATK +312 (Resilience Break: 107)
- Red Light Counter: 140% ATK +400 (Resilience Break: 100)
Shield Bash
Tags: Special Attack, Physical, Rock, Direct DMG, Single Target, Shield, Melee
Multipliers:
- Total Damage: 182% ATK +520 (Resilience Break: 578)
- Shield Amount per Sand Crystal Consumed: 110% ATK +1500
- CD: 1s
[Shield]: Extra HP shield, which can absorb damage before HP.
Cracking Echo
Tags: Ultimate, Physical, Rock, Direct DMG, AoE, Protect, Energy Restore, Melee
Multipliers:
- Total Damage: 629.99% ATK +1800 (Resilience Break: 884)
- CD: 60s
[Stun]: Prevents the enemy from taking any actions. Does not affect bosses. This is a status effect.
[Taunt]: Forcing enemy monsters to attack oneself
[Super Armor]: Cannot be knocked back, knocked up, or knocked down.
[Earth Guard]: Lasts 8s and grants Super Armor, which increases your Armor by 100%, Max HP by 50%, and generates 40 Rage over time.
Star Shatter
Tags: Expertise Skill, Physical, Rock, Direct DMG, Single Target, Sprint, Energy Restore, Stun, Melee
This skill holds 2 charges.
Multipliers:
- Total Damage: 364% ATK +1040 (Resilience Break: 629)
- CD: 1s
- Charge Time: 12s
[Stun]: Prevents the enemy from taking any actions. Does not affect bosses. This is a status effect.
Sandshroud
Tags: Expertise Skill, Physical, Rock, DOT, AoE, Energy Restore, Melee
Multipliers:
- Sandstone Convergence Damage: 79.79% ATK +228 (Resilience Break: 78)
- Total DoT: 184.8% ATK +528 (Resilience Break: 180)
- CD: 15s
Stoneform
Tags: Expertise Skill, Protect
Multipliers:
- Armor Up: 14% + 195
- Duration: 10s
- CD: 35s
[Taunt]: Forcing enemy monsters to attack oneself
Sandgrip
Tags: Expertise Skill, Physical, Rock, Direct DMG, AoE, Crowd Control, Slow, Melee
Multipliers:
- Total Damage: 420% ATK +1200 (Resilience Break: 608)
- CD: 30s
[Interrupt]: Interrupts the target’s casting and puts the interrupted skill on CD. Does not affect bosses.
Granite Fury
Tags: Expertise Skill, Physical, Rock, Direct DMG, Single Target, Melee
Multipliers:
- Total Damage: 700% ATK +2000 (Resilience Break: 677)
Rage Burst
Tags: Expertise Skill, Physical, Rock, Direct DMG, AoE, Shield, Melee
Multipliers:
- Total Damage: 700% ATK +2000 (Resilience Break: 1028)
- Shield Amount: 550% ATK +7500
- Active: 12s
- CD: 15s
[Interrupt]: Interrupts the target’s casting and puts the interrupted skill on CD. Does not affect bosses.
[Shield]: Extra HP shield, which can absorb damage before HP.
Brave Bastion
Tags: Expertise Skill, Protect
Multipliers:
- Block Bonus: 20%
- Duration: 13s
- CD: 45s
[Taunt]: Forcing enemy monsters to attack oneself
Sandward
Tags: Expertise Skill, Physical, Rock, Direct DMG, AoE, Protect, Melee
Multipliers:
- Total Damage: 629.99% ATK +1800 (Resilience Break: 500)
- CD: 45s
[Taunt]: Forcing enemy monsters to attack oneself
How to level?
Important!
After you unlock the ability to choose a specialization, move directly to, and follow their guide instead. This simple guide is only meant you to take you to that point.
Skills
Equip the abilities below in the order you unlock them for the most effective pre-specialization Heavy Guardian build.
- Star Shatter
![Imagine]()
- Sandshroud
![Imagine]()
- Rage Burst
![Imagine]()
- Stoneform
![Imagine]()
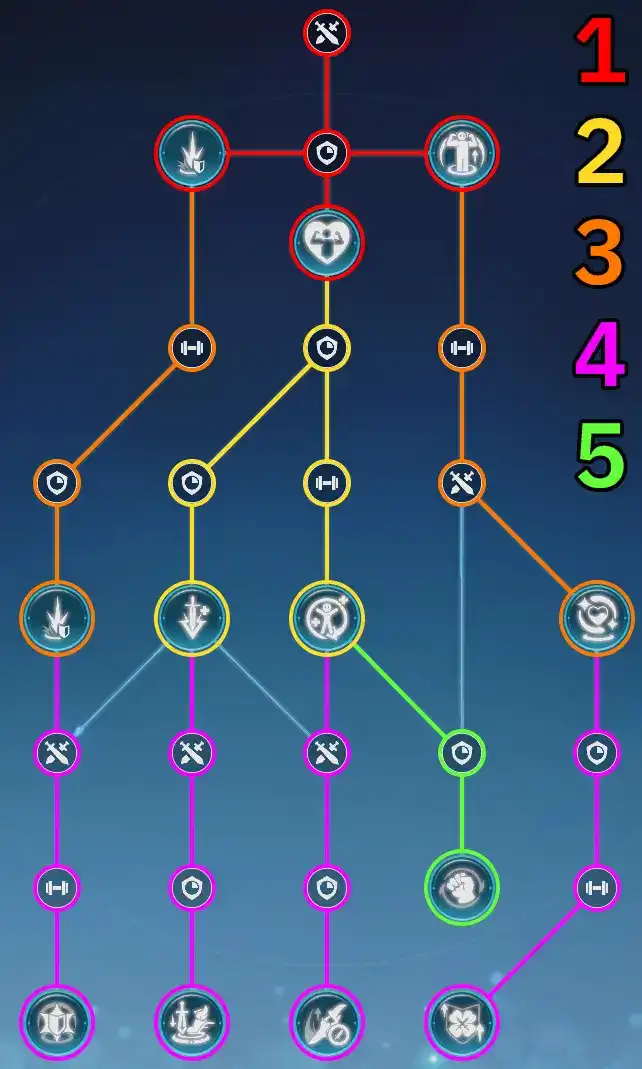
Talents
For optimal power, activate your starting talents in the following order:

How to play
Early Heavy Guardian plays similarly to its Earthfort Spec. Here is how to play:
- Use to taunt nearby enemies and reduce damage taken temporarily.Stoneform
![Imagine]()
- Use andStar Shatter
![Imagine]() to generate Rage, Sand Crystals, and Stun enemies.Sandshroud
to generate Rage, Sand Crystals, and Stun enemies.Sandshroud![Imagine]()
- Use to consume 5 Sand Crystals to generate shield.Rage Burst
![Imagine]()
- Use to consume Sand Crystals for shield whileShield Bash
![Imagine]() is on cooldown.Rage Burst
is on cooldown.Rage Burst![Imagine]()
Use 
Battle Imagines
Important!
Do not choose your Imagines based on your leveling experience. Reaching max level with no Imagines is easy - save crafting them until after you’ve found a spec you enjoy, then choose the best Imagines for it. You can use the freely given Imagines in the meantime.