


Overview
Modules are a set of four additional equipable items on top of your standard gear that unlock after reaching max level. Modules come in three different rarities, with each rarity improving the number of power cores they feature and, as a result stats they provide:
- Basic = 1 Power Core
- Advanced = 2 power Cores
- Excellent = 3 Power Cores
In addition to rarities, Modules also come in three different types corresponding to the game's three different roles. They are:
- Attack = Triangle = DPS
- Survival = Diamond = Tank
- Support = Circle = Healer/Support
The Module type determines which Power Cores it’s able to roll.
| Modules | Type | Rarity |
|---|---|---|
 | Attack | Basic |
 | Survival | Advanced |
 | Support | Excellent |

Power Cores
Power Cores are one of Blue Protocol: Star Resonance’s take on set bonuses. Each Power Core will be randomly set from a collection of potential bonuses upon a Module's creation. Power Core set bonuses are divided into four categories based on their color. You can see a full list of all Module Set bonuses and what they do at the bottom of this guide.
Note
Power Cores we tag with the “Extreme” tag are much harder to find and can only appear on Excellent Modules.
| Power Cores | Class |
|---|---|
 | Yellow Powercores can appear on all types of modules and provide general buffs usable by all roles. |
 | Red Powercores can appear only on Attack Modules and provide damage-oriented buffs. |
 | Blue Powercores can appear only on Survival Modules and provide defense-oriented buffs. |
 | Green Powercores can appear only on Support Modules and provide healing-oriented buffs. |

When dropping or generating a Module in addition to rarity, type and the different set combinations, each power core may roll, there is one more factor to be concerned with and that is “Link Points”.
Link Points
Link points determine how many set bonuses your character may have active at once as well as how strong they’ll be. Link Points also determine the total amount of stats a Module will grant you when equipped. Here are the key takeaways.
- Every Power Core on a Module will roll a Link Point value between 1 - 10 randomly.
- Every Link Point present on a Module will grant 2 of every Basic Attribute when equipped. 30 Link Points = 60 Strength, Intelligence, Endurance and Agility.
- Power Core Set bonuses gain empowered or additional effects upon reaching totals of 1, 4, 8, 12, 16 and 20 Link Points in that specific set type across all Modules.
- Power Core Set bonuses become far, far more powerful at higher amounts, with 20 being a substantial upgrade over 16.
- Link Points of the same set type over 20 still grant stats, but do not grant any benefits to set bonuses.


Armed with this information, min-maxing your Modules is relatively simple. Your goal should be to target the best two or three Power Core set bonuses of your Class to cap them out at 20 Link Points when possible. While having multiple Level 20 bonuses that are ideal for your Class is the goal, it's not an easy task. While progressing, it’s perfectly acceptable to run a single 20 alongside lower-level bonuses of other sets that are powerful for your class.
Note
Modules tend to roll Link Points toward an average meaning if one Power Core rolls a 10 the other is more likely to roll a 1 or 2. The same is true with a roll of 4 the other is likely to be a 7 or 8.

How to Obtain Modules


Modules can be acquired in many ways, both from weekly and daily activities but something vital to understand is that they can drop in two forms:
- Unknown - Tradeable + Power Cores are Unknown
- Unlocked/Raw - Non-Tradeable + Power Cores are Known
For F2P players selling Unknown Modules can be an outstanding source of

With that covered here are all the ways to acquire both Module Types:
Monster Hunts


Monsters' Hunts can drop both Unlocked/Raw and Unknown Module types when using Keys on Boss and Elite Chests. Boss Chests may drop bothExcellent and Advanced Modules, while Elite Chests can only drop Advanced Modules. Just one more reason to stay on top of your world boss farming!
Honor Coin Shop
The Honor Coin Shop offers 20 Raw Modules of each type at the Advancedrarity per week. These don’t have a chance at being tradeable, but are still a great pick-up for those still searching for strong AdvancedModules.
Tip
Even if you don’t need two of the three types of Modules, you can purchase them to salvage later.
Module Exchange & Salvage Store


By speaking to “Grace” located within the Artisan Guild in Asterleeds, we can both dismantle and purchase additional Modules. Salvaging unwanted Modules will yield Advanced or Perfect components based on the rarity of the Module consumed. These components can then be used to craft new Modules of the corresponding rarity color.
Tip
You can trade-up Advanced components for Perfect ones at a rate of 8:1, 100 times a week, allowing you greater access to higher rarity Modules.
Stimen Vaults
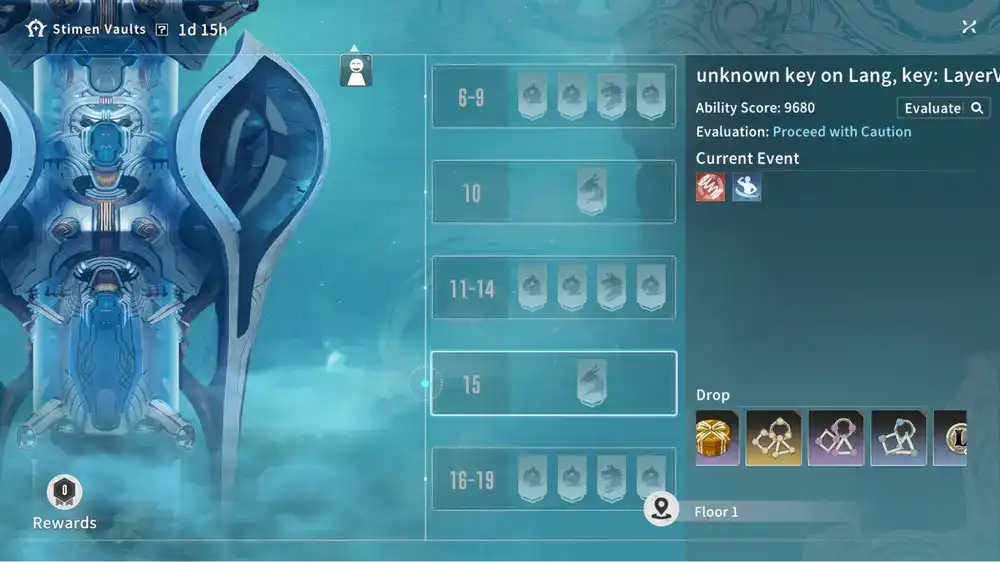
Stimen Vaults is another one of the main sources of Modules in endgame with each lesser floor offering Advanced Modules and every greater floor (every 5th) offering Excellent Modules. You should already be clearing as much of Stimen Vaults as you can for Imagine Materials but Module farming is just one more reason to do so.
Dragon Raids
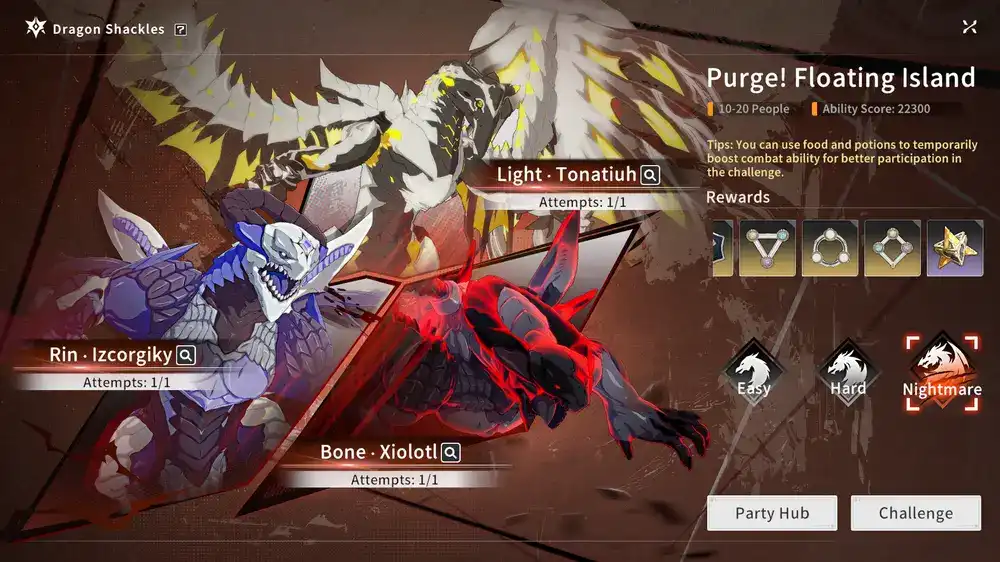
Once the server reaches a certain point, Dragon Raids will also begin to drop Unknown Modules. Normal and Hard difficulties drop AdvancedModules while Nightmare drops Excellent Modules.
Power Core Set Bonuses
As mentioned earlier, below are all the possible Power Core Set bonuses available at the time of release.
Note
While Extreme sets are generally more powerful, they are far more rare.
General Nodes

Node Name: Extreme Team Luck & Crit
- Level 1: Adaptive Atk +10.
- Level 2: Adaptive Atk +20.
- Level 3: Adaptive Atk +30 | Adaptive Main stat +20.
- Level 4: Adaptive Atk +40 | Adaptive Main stat +40.
- Level 5: Adaptive Atk +50 | Adaptive Main stat +60 | The team 3.1% Crit Damage and 2% Luck Damage, Doubled on user. Max 1.
- Level 6: Adaptive Atk +60 | Adaptive Main stat +80 | The team 5.2% Crit Damage and 3.4% Luck Damage, Doubled on user. Max 1.

Node Name: Extreme Life Steal
- Level 1: Atk +10.
- Level 2: Atk +20.
- Level 3: Atk +30 | Strength +20.
- Level 4: Atk +40 | Strength +40.
- Level 5: Atk +50 | Strength +60 | 6% of the damage done from skills are converted to heals, Max 5% of Max HP.
- Level 6: Atk +60 | Strength +80 | 10% of the damage done from skills are converted to heals, Max 5% of Max HP.

Node Name: Extreme Life Wave
- Level 1: Max HP +600.
- Level 2: Max HP +1200.
- Level 3: Max HP +1800 | Adaptive Main stat +20.
- Level 4: Max HP +2400 | Adaptive Main stat +40.
- Level 5: Max HP +3000 | Adaptive Main stat +60 | When the current health value changes, the highest attribute among Critical Hit, Mastery, Haste, Versatility or Luck is increased by 6% for 5 seconds.
- Level 6: Max HP +3600 | Adaptive Main stat +80 | When the current health value changes, the highest attribute among Critical Hit, Mastery, Haste, Versatility or Luck is increased by 10% for 5 seconds.

Node Name: Luck Focus
- Level 1: Max HP +300.
- Level 2: Max HP +600.
- Level 3: Max HP +900 | All element power +20.
- Level 4: Max HP +1200 | All element power +40.
- Level 5: Max HP+1200 | All element power +60 | Luck DamageMultiplier +4.7%, Luck Healing Multiplier +3.7%.
- Level 6: Max HP+1800 | All element power +80 | Luck DamageMultiplier +7.8%, Luck Healing Multiplier +6.2%.

Node Name: Crit Focus
- Level 1: Max HP +300.
- Level 2: Max HP +600.
- Level 3: Max HP +900 | All element power +20.
- Level 4: Max HP +1200 | All element power +40.
- Level 5: Max HP +1200 | All element power +60 | Critical Damage +7.1%, Crit Healing +7.1%.
- Level 6: Max HP +1800 | All element power +80 | Critical Damage +12%, Crit Healing +12%.

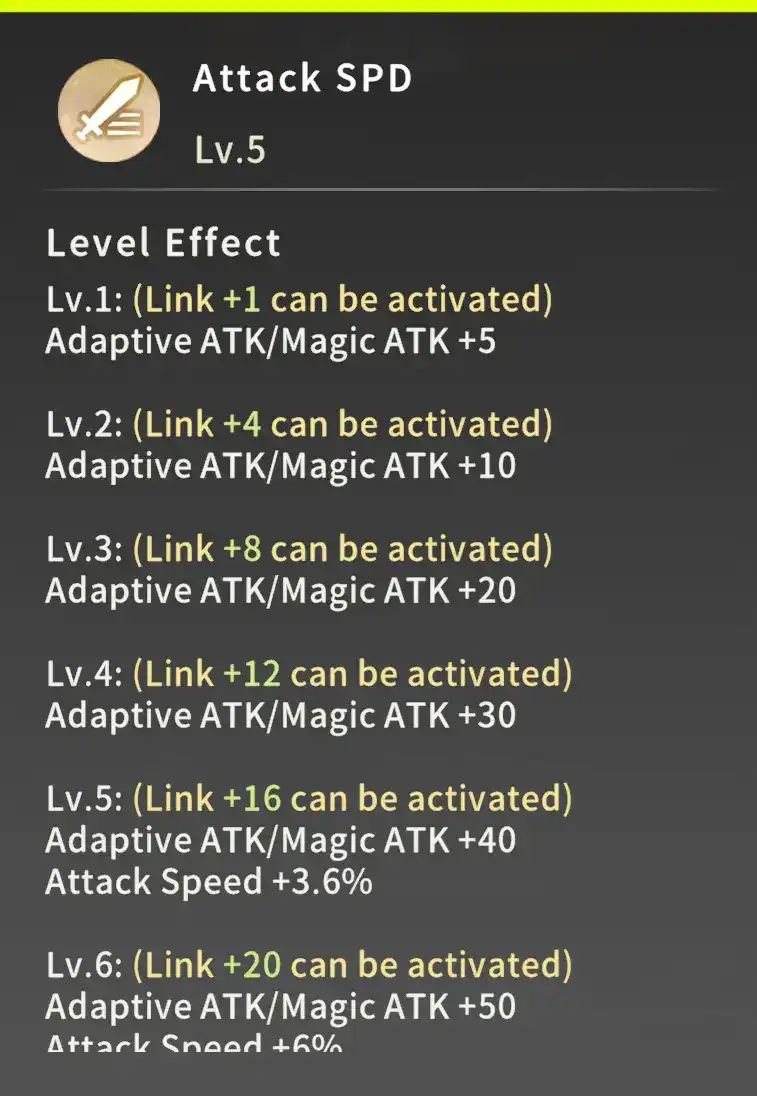
Node Name: Attack SPD
- Level 1: Adaptive Atk +5.
- Level 2: Adaptive Atk +10.
- Level 3: Adaptive Atk +20.
- Level 4: Adaptive Atk +30.
- Level 5: Adaptive Atk +40 | Attack speed +3.6%.
- Level 6: Adaptive Atk +50 | Attack speed +6%.

Node Name: Cast Focus
- Level 1: Adaptive Atk +5.
- Level 2: Adaptive Atk +10.
- Level 3: Adaptive Atk +20.
- Level 4: Adaptive Atk +30.
- Level 5: Adaptive Atk +40 | Cast speed +7.2%.
- Level 6: Adaptive Atk +50 | Cast speed +12%.
Attack Nodes

Node Name: Extreme Agile
- Level 1: Adaptive Atk +10.
- Level 2: Adaptive Atk +20.
- Level 3: Adaptive Atk +30 | Adaptive Main stat +20.
- Level 4: Adaptive Atk +40 | Adaptive Main stat +40.
- Level 5: Adaptive Atk +50 | Adaptive Main stat +60 | After entering combat, movement speed is increased by 18% and attack power is increased by 6%. After being attacked, the buff is removed. If no damage is taken within 5 seconds, the buff is regained.
- Level 6: Adaptive Atk +60 | Adaptive Main stat +80 | After entering combat, movement speed is increased by 30% and attack power is increased by 10%. After being attacked, the buff is removed. If no damage is taken within 5 seconds, the buff is regained.

Node Name: Extreme DMG Stack
- Level 1: Adaptive Atk +10.
- Level 2: Adaptive Atk +20.
- Level 3: Adaptive Atk +30 | Adaptive Main stat +20.
- Level 4: Adaptive Atk +40 | Adaptive Main stat +40.
- Level 5: Adaptive Atk +50 | Adaptive Main stat +60 | When causing damage, there is a 20% chance to cause damage to be increased by 1.65%, can be stacked up to 4 times, and lasts for 8 seconds.
- Level 6: Adaptive Atk +60 | Adaptive Main stat +80 | When causing damage, there is a 20% chance to cause damage to be increased by 2.75%, can be stacked up to 4 times, and lasts for 8 seconds.

Node Name: Agility Boost
- Level 1: Atk +5.
- Level 2: Atk +10.
- Level 3: Atk +15 | Agility +10.
- Level 4: Atk +20 | Agility +20.
- Level 5: Atk +25 | Agility +30 | Physical DMG +3.6%.
- Level 6: Atk +30 | Agility +40 | Physical DMG +6%.

Node Name: Strength Boost
- Level 1: Atk +5.
- Level 2: Atk +10.
- Level 3: Atk +15 | Strength +10.
- Level 4: Atk +20 | Strength +20.
- Level 5: Atk +25 | Strength +30 | Ignore Armor +11.5%.
- Level 6: Atk +30 | Strength +40 | Ignore Armor +18.8%.

Node Name: Elite Strike
- Level 1: Adaptive Atk +5.
- Level 2: Adaptive Atk +10.
- Level 3: Adaptive Atk +15 | Adaptive Main stat +10.
- Level 4: Adaptive Atk +20 | Adaptive Main stat +20.
- Level 5: Adaptive Atk +25 | Adaptive Main stat +30 | Increase the DMG done to Elite or stronger +3.9%.
- Level 6: Adaptive Atk +30 | Adaptive Main stat +40 | Increase the DMG done to Elite or stronger +6.6%.

Node Name: Special Attack
- Level 1: Adaptive Atk +5.
- Level 2: Adaptive Atk +10.
- Level 3: Adaptive Atk +15 | Adaptive Main stat +10.
- Level 4: Adaptive Atk +20 | Adaptive Main stat +20.
- Level 5: Adaptive Atk +25 | Adaptive Main stat +30 | Special attack elemental DMG +7.2%.
- Level 6: Adaptive Atk +30 | Adaptive Main stat +40 | Special attack elemental DMG +12%.

Node Name: Intellect Boost
- Level 1: Magic Atk +5.
- Level 2: Magic Atk +10.
- Level 3: Magic Atk +15 | Intelligence +10.
- Level 4: Magic Atk +20 | Intelligence +20.
- Level 5: Magic Atk +25 | Intelligence +30 | Magic DMG +3.6%.
- Level 6: Magic Atk +30 | Intelligence +40 | Magic DMG +6%.
Defensive Nodes

Node Name: Extreme Final Protection
- Level 1: Max HP +600.
- Level 2: Max HP +1200.
- Level 3: Max HP +1800 | Strength +20.
- Level 4: Max HP +2400 | Strength +40.
- Level 5: Max HP +3000 | Strength +60 | You gain 2% Damage Reduction, if the HP are below 70% , gain an additional 2.4% for every 20% HP after the threshold missing. Stacking maximum to 3 times.
- Level 6: Max HP +3600 | Strength +80 | You gain 3.5% Damage Reduction, if the HP are below 70% , gain an additional 4% for every 20% HP after the threshold missing. Stacking maximum to 3 times.

Node Name: Armor
- Level 1: Armor +80.
- Level 2: Armor +160.
- Level 3: Armor +240 | All elemental Atk +5.
- Level 4: Armor +320 | All elemental Atk +10.
- Level 5: Armor +400 | All elemental Atk +15. | Physical DMG Reduction +3.6%.
- Level 6: Armor +480 | All elemental Atk +20. | Physical DMG Reduction +6%.

Node Name: Resistance
- Level 1: Endurance +30.
- Level 2: Endurance +60.
- Level 3: Endurance +90 | Max HP +1%.
- Level 4: Endurance +120 | Max HP +2%.
- Level 5: Endurance +150 | Max HP +3% | Magical DMG Reduction +3.6%.
- Level 6: Endurance +180 | Max HP +4% | Magical DMG Reduction +6%.
Support Nodes

Node Name: Extreme First Aid
- Level 1: Magic Atk +10.
- Level 2: Magic Atk +20.
- Level 3: Magic Atk +30 | Intelligence +20.
- Level 4: Magic Atk +40 | Intelligence +40.
- Level 5: Magic Atk +50 | Intelligence +60 | When Dropping to 50%, receiving DMG heals your self and 10 allys for 7.2% HP every second for 5 seconds. 30 Cooldown.
- Level 6: Magic Atk +60 | Intelligence +80 | When Dropping to 50%, receiving DMG heals your self and 10 allys for 12% HP every second for 5 seconds. 30 Cooldown.

Node Name: Extreme Life Condense
- Level 1: Adaptive Atk +10.
- Level 2: Adaptive Atk +20.
- Level 3: Adaptive Atk +30 | Adaptive Main stat +20.
- Level 4: Adaptive Atk +40 | Adaptive Main stat +40.
- Level 5: Adaptive Atk +50 | Adaptive Main stat +60 | When HP is above 50%, for every 5% HP your healing strength is increased by 0.66%.
- Level 6: Adaptive Atk +60 | Adaptive Main stat +80 | When HP is above 50%, for every 5% HP your healing strength is increased by 1.1%.

Node Name: Healing Enhance
- Level 1: Magic Atk +5.
- Level 2: Magic Atk +10.
- Level 3: Magic Atk +15 | Intelligence +10.
- Level 4: Magic Atk +20 | Intelligence +20.
- Level 5: Magic Atk +25 | Intelligence +30 | Expertise Skill healing +7.2%.
- Level 6: Magic Atk +30 | Intelligence +40 | Expertise Skill healing +12%.

Node Name: Healing Boost
- Level 1: Magic Atk +5.
- Level 2: Magic Atk +10.
- Level 3: Magic Atk +15 | Intelligence +10.
- Level 4: Magic Atk +20 | Intelligence +20.
- Level 5: Magic Atk +25 | Intelligence +30 | Special attack healing +7.2%.
- Level 6: Magic Atk +30 | Intelligence +40 | Special attack healing +12%.