


Introduction
Consortium Co-op Battle (commonly known as Guild Coop) is a semi-competitive cooperative PVE game mode exclusive to Consortiums, CounterSide’s equivalent to player guilds. Guild Coop sees consortiums challenge seasonal bosses for rewards, as well as compete against other consortiums for leaderboard ranking.
Guild Coop Overview
For every week of the season, consortium members will each get 5 arena attempts and 5 boss attempts that can be used to enter their respective stages.
Arenas
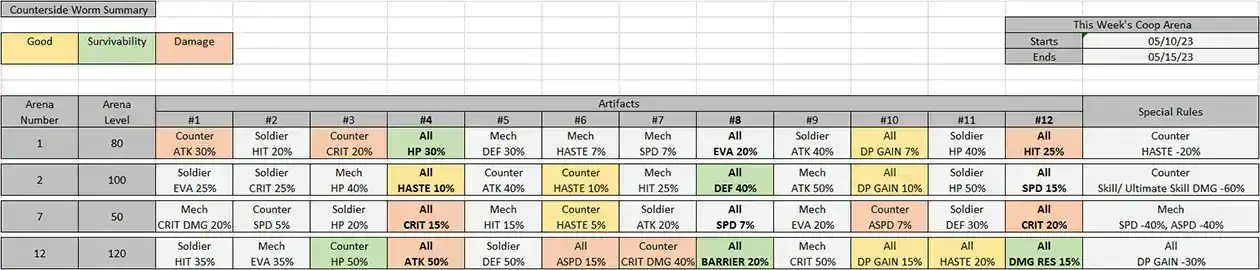
Each week, four arenas will be made available. Arenas can be broken down into three components:
- The arena stage: Arenas are a single stage that can be cleared repeatedly. The stages are fairly trivial and all can be cleared with a decently geared team.
- The special rules: Arenas come with arena-specific debuffs that affect how you approach the stage. Arena 12, the hardest arena, will always have the same DP Gain -30% debuff.
- The artifact track: Every arena comes with an artifact track, which rewards the consortium with artifacts for repeatedly clearing the arena.
- Artifacts are buffs applied to all consortium members when they attack the boss.
- The artifact track is advanced depending on the medals received for clearing the respective arena. There are three medal types Gold, Silver, and Bronze which grant 30%, 20% and 10% progress towards an artifact respectively.
- Each arena comes with 12 artifacts.
Players are encouraged to coordinate with their guilds to determine which arenas to hit to obtain the best combination of buffs from the given week’s artifacts. A summary sheet has been provided below to more easily visualize the above:

Guild boss
There are a couple items to keep in mind regarding the guild boss:
- Availability: The guild boss can be attacked from the moment the week resets. However, as mentioned above, players are encouraged to coordinate and collect arena artifacts with their consortiums to maximize the buffs they have available when they challenge the guild boss.
- Boss level: Defeating the boss will reset the health bar and increase the boss stage.
- Progressing the boss stage increases the boss’ base stats and introduces new mechanics.
- There are a total of 15 boss stages but all rewards can be obtained by defeating stage 6 weekly.
- Damage dealt to bosses will not carry forward into the next stage; killing the boss will end the attempt, regardless of the time remaining.
- Positioning: Guild boss fights take place on a significantly larger map with looser deployment restrictions, allowing you to place characters in front and behind the boss.
- Boss specific mechanics: Each guild boss comes with its boss specific mechanics. These will be discussed in greater detail below.
Rewards
Players are incentivized to participate in Guild Coop for the numerous opportunities to earn seasonal rewards. These include:
- Total Participation track: Using your entry attempts will progress the Total Participation track, which will issue rewards at regular intervals.
- Kill Points track: Consortium damage on the boss will progress the Kill Points track, which will issue rewards at regular intervals.
- Boss kill rewards: Consortium members receive consortium tokens depending on the number of boss stages they clear, and info depending on the number of artifacts they collect.
Guild Boss Strategy
Demolition Worm
Worm introduces new mechanics at stages 3, 5 , 7, and 8. However, the general strategy for the boss fight does not change until stage 8.
| Stages | Enhanced Attack | Bladesaw Skill | Laser Skill | Other |
|---|---|---|---|---|
| 1-2 | Not used | 1 Roar | Ult used after 90s. Can't be canceled. | Boss is immune to ASPD debuffs |
| 3-4 | Used | 2 Roars | Ult used after 2 Bladesaw skills. Can be canceled by dealing 0.01% of total HP. Boss gains 40% Res during the check. | Boss is immune to ASPD debuffs |
| 5-6 | Used | 2 Roars | Ult used after 1 Bladesaw skill. Can be canceled by dealing 0.01% of total HP. Boss gains 60% Res during the check. | Boss is immune to ASPD debuffs |
| 7 | Used | 1 Roar | Ult used after 2 Bladesaw skills. Can't be canceled. | Boss is immune to ASPD debuffs |
| 8-15 | Used | 1 Roar | Ult used after 2 Bladesaw skills. Can't be canceled. | Boss is immune to ASPD debuffs. It also gains: 20% Res, 100% CC Res, Immunity to Silence and Skill Haste debuffs. |
Stage 1-6 Basic Strategy
Worm is vulnerable to skill cooldown reduction, skill seal, and silence for the first 7 stages. These debuffs can be used to prevent Worm from ever using its ultimate, trivializing the boss fight. The units used for this strategy are:


- Jin Bora: Jin Bora applies +1s skill cooldown for targets hit by her basic attack. Jin Bora prevents the boss from casting any special or ultimate skills.
- Mone: In the absence of Jin Bora, Mone can be used instead to achieve a similar effect. Mone is slightly less consistent than Jin Bora but she was historically the go-to character for the content.
- Mone + Mason: Mone can be supplemented with John Mason if Mone alone is too unreliable.


Stage 7+ Basic Strategy
The new mechanics introduced at stage 8 are:
- Immunity to skill cooldown reduction and skill seal: Instead of ignoring the raid mechanics by preventing the boss from casting, strategies will now need to account for the impact of the boss’ various skills.
- 50% debuff resistance: debuff resistance reduces the effectiveness of offensive debuffs (DEF shred) by halving the effect and duration of debuffs applied.
Team Building Considerations
These new mechanics are covered by characters that fulfill specific roles. These roles are:
- Ship defender
- Battery
- Healer
- Shielder
Ship defender
Ship defender units are used to kill the waves of mobs the boss summons thus protecting your ship. Units used for this role must have the ability to live through the bosses two map wide attacks that can hit them. Typical units for this role are: Awakened Lee Sooyeon, Awakened Rosaria, Awakened Horizon*, and Awakened Chris*.


*Awakened Horizon and Awakened Chris survive the boss’ mapwide attacks by i-framing the damage using the manual ultimate function.
Battery
Battery units are used to accelerate DP generation, allowing you to get the full team of 16 out in a reasonable amount of time. This role is fulfilled by Lin Xien.

Healer
Healers are needed to sustain your team through damage. The better healers will also provide some form of buff/ debuff utility to provide more than just healing. Notable healers are: Yang Harim, Rearmed Chinatsu, and Evelyn Keller.


Shielder
Shielders are used to clear Demolition Worm’s boss mechanic. The second variation of the boss’ ultimate skill, the “burrow”, flings all characters to your ship and rams them for a lethal amount of damage. It is impossible to eat the damage head-on. To tank this attack, players will need to protect their units with barriers, which each absorb an infinite amount of damage. The unit that covers this role best is Awakened Hilde with her Alternium Reactor.

If a player does not have her reactor, you may use Awakened Hilde in combination with the base form of Kaci Bins to achieve the same effect.

Once these roles are fulfilled, the remaining slots are filled with damage dealers and buffers to maximize damage.


Example run:
Tyrant Gigas
The general strategy for the boss fight does not change until stage 7.
Stage 1-6 Basic Strategy
The first 6 stages of Tyrant Gigas can be cleared without any special consideration. Of note, Tyrant Gigas’ phase change at ~55s remaining kills all melee units in range that do not have some form of damage cap (i.e. MDL, HP gates).

Stage 7+ Basic Strategy
Starting from stage 7, Tyrant Gigas’ ultimate skill becomes buffed with new properties. The ultimate skill damage is now changed to true damage, it cancels barriers, and the damage scaling increases the ultimate skill damage to absurd levels. In short, it cannot be directly tanked.
To survive the ultimate, you will need to protect your team with non-cancellable shields. These come in the form of:
- Awakened Hilde (with alternium reactor)
- Villetta Nu/ Sigma*


*Both Villetta and Sigma provide shields, but Villetta is slightly better because her simpler operator proc order means teams aren’t forced to bring a defender to trigger the skill effect, losing a team slot in the process.
As of writing, there is currently a bug with Gigas’ ultimate where it only checks the most recent shield layer for the non-cancellable property so using units like Awakened Shin Jia before it has performed all ultimate attacks can cause seemingly random deaths.
Team Building Considerations
These new mechanics are covered by characters that fulfill specific roles. These roles are:
Example run:
- Battery
- Healer
- Shielder(s)
Battery
Similar to Britra raids, all backline units need to outrange the boss to avoid its attacks. As Lin Xien is a melee range unit, she tends to die. As such, the battery role is typically fulfilled by Sigma and Choi Ina.

Healer
The Healer role is fulfilled by a smaller subset of units; Rearm Chinatsu, and Carmen are the only healers that outrange the boss’ attacks.

Shielder(s)
As mentioned above, shielders with non-cancellable shields are needed to tank the boss’ ultimate skill. This role can only be fulfilled by Awakened Hilde, Villetta Nu (operator), and Sigma (operator).
Once these roles are fulfilled, the remaining slots are filled with damage dealers, buffers, and debuffers to maximize damage.

Example run: