
About the game
Wuthering Waves is a game that features open world exploration with rich and diverse narrative and a high degree of freedom of combat. Players act as Rovers, who awake after a long period of slumber, embark on adventures in the whole wide world made up of new era, new environment and new technology.
Wuthering Waves is developed by Kuro Game, the creators of Punishing Gray Raven. The game features the best action RPG combat in the mobile genre and now it will be translated to an open world in the style of Genshin Impact.
And here's the official introduction:
Welcome aboard, roving voyager. Upon the shores lay the silent embers of a world during the Ebb Tide. Desolated by the Lament, the erstwhile creations and earthly beings are left static. But they strike back, strong enough to penetrate the silence. Humanity has risen anew from the ashes of the apocalypse.
And you, Rover, are poised for an adventure of Awakening. Companions to meet, enemies to conquer, new powers to gain, hidden truths to unveil, and unseen spectacles to behold... A vast world of endless possibilities awaits. The choice rests in your hands. Be the answer, be the leader, and follow the sounds to arrive at a new future. As Wuthering Waves echo endlessly, mankind set sail on a new journey.
Rise and embark on your odyssey, Rover.
System Requirements
Wuthering Waves will be available to play on PC, and Android / iOS devices. While the developers confirmed that there are plans to release Wuthering Waves for consoles, it won't be available at the launch of the game on the 22th of May.
PC - minimum system requirements
- OS version: Windows 10 64bit or Windows 11 64bit
- CPU: intel i5 (9th Gen) / Ryzen 2700
- Memory: 16GB
- GPU: GTX 1060 / RX 570
- Storage: 30GB
PC - recommended system requirements
- OS version: Windows 10 64bit or Windows 11 64bit
- CPU: intel i7 (9th Gen) / Ryzen 3700
- Memory: 16GB and Above
- GPU: GTX 2060 / RX 5700XT and Above
- Storage: 30GB
Supported Languages
Audio: Chinese (Simplified), Japanese, Korean, English.
Text: English, Chinese (Simplified), Chinese (Traditional), Japanese, Korean, French, German, Spanish (Spain), Thai.
Exploration
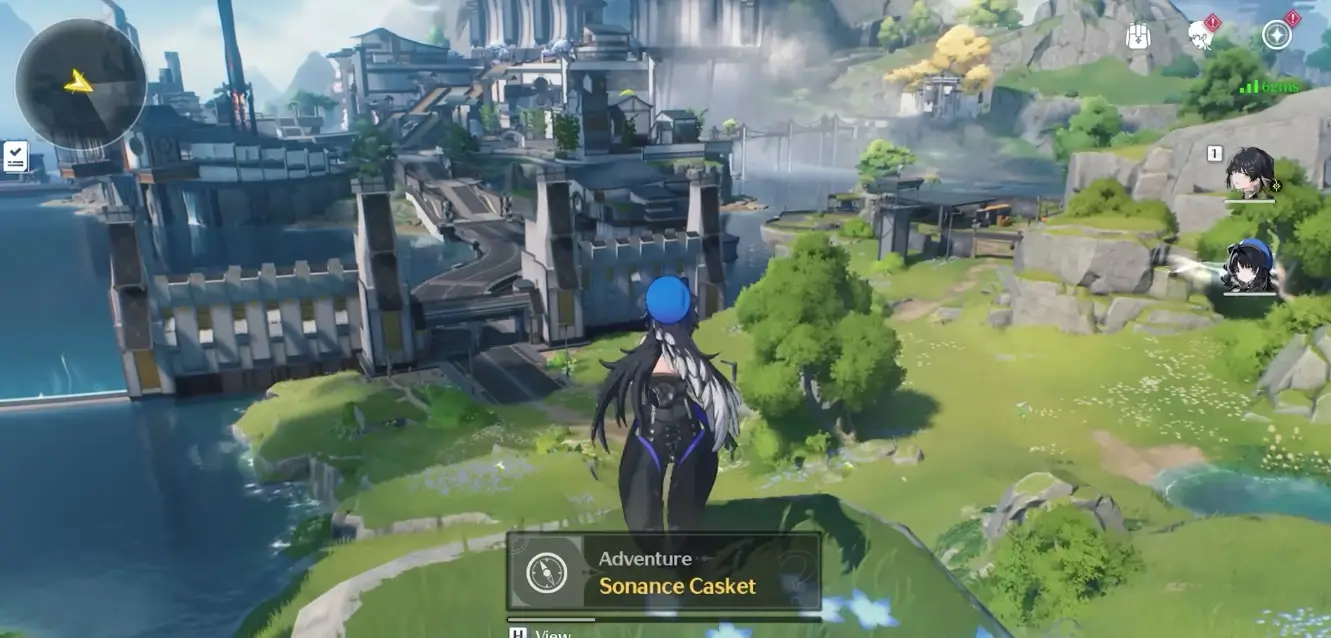
Exploration is very important part of Wuthering Waves. Players are able to roam around and explore the various areas of the Wuthering Waves map for treasure chests, enemies, puzzles, and more. It is important to explore the map as much as possible for faster progression as opening chests, doing side quests and beating bosses for the first time will reward you with Union level exp, Astrite and other goodies.
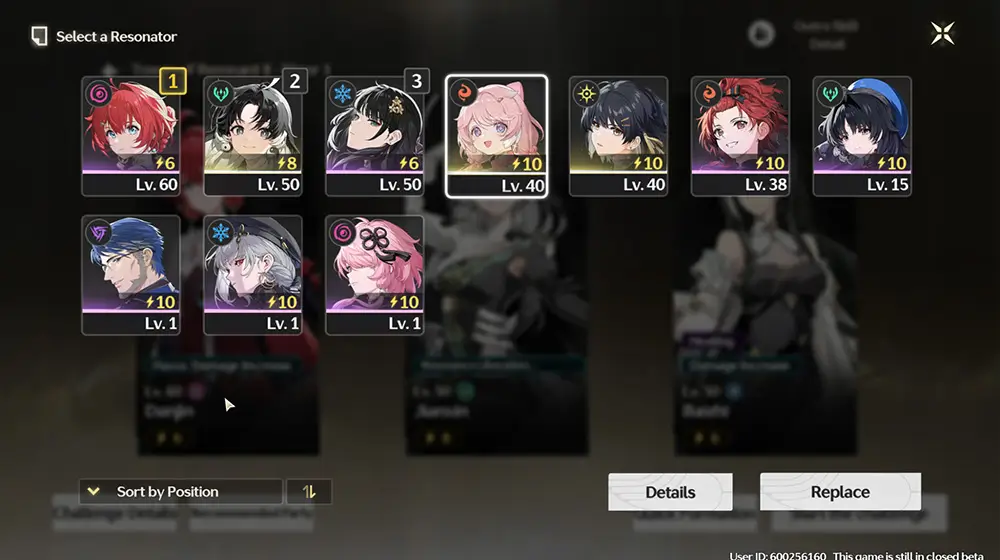
When exploring the world, you will select one resonator out of the three in your team to be your active character. The active resonator is the one on screen that you control. You can switch the active resonator anytime.
Outside of the town areas, there will be enemies roaming around the map that will aggro and chase you if you get too close to them.
Combat
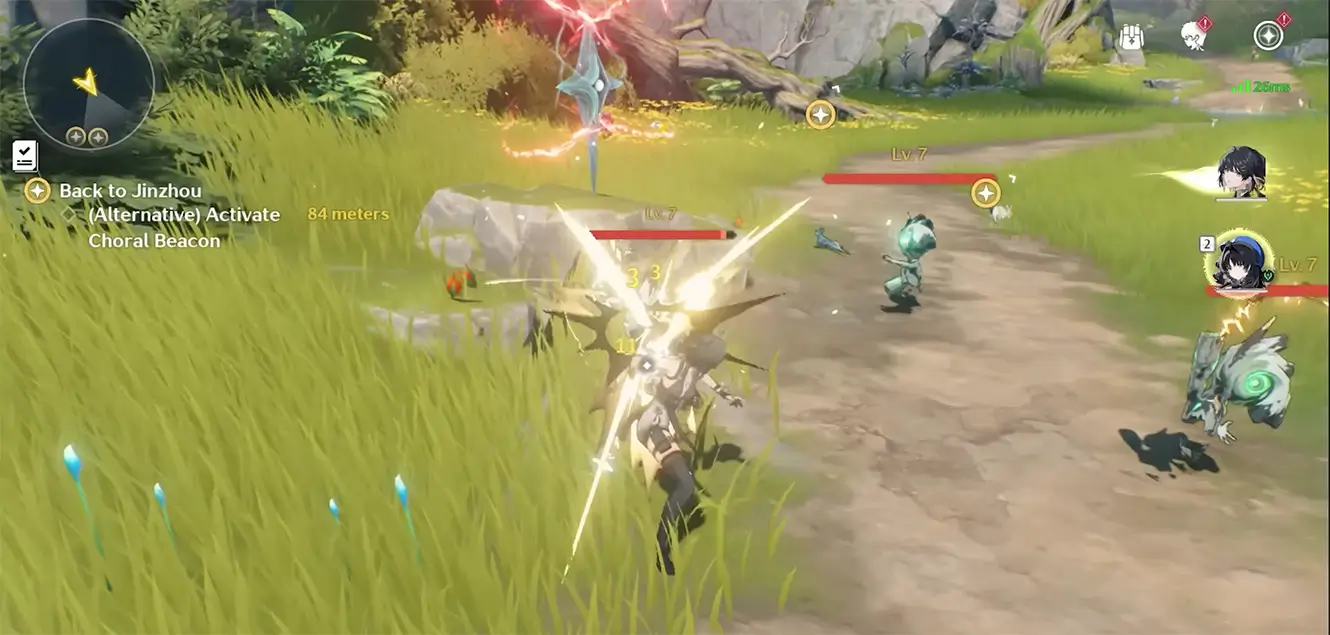
Combat in Wuthering Waves is very dynamic. While you can build teams made out of 3 Resonators (characters), only one will be available on the field, but you can switch between them at any time. And the switch mechanic is actually integrated into the characters kits as each has an Intro and Outro skill that activate when they appear on the field or leave it (more about them later).
Overall, it's better to showcase the combat, rather than try to explain it using words, so here's a video for you:
One thing not mentioned within this video is the new mechanics introduced in Version 2.0 and 3.0 respectively: Negative Status and Off-Tune.
Certain abilities can apply Negative Status to the enemies, which will have different effects based on the Negative Status. These can stack multiple times to enhance their effects, and certain Resonators have interactions with Negative Status within their kit.
As for Off-Tune, it is a more complex system. Each attack will apply a certain level of Off-Tune to the enemy, and once their Off-Tune is fully built up they will enter the Mistune state. When a target is within the Mistune state, a Resonator will be able to perform a Tune Break Skill on the target. Certain resonators have unique interactions with Tune Break Skills, called Tune Rupture and Tune Strain. Certain Resonators can apply Tune Rupture/Strain - Shifting on targets, which will transform into Tune Rupture/Strain - Interfered for 8 seconds after a Tune Break Skill is performed on the target. Tune Rupture - Interfered will cause another instance of damage alongside the Tune Break Skill (with the strength of the Tune Rupture being dependent on the character themselves), while Tune Strain will increase the character's Final DMG based on the amount of Tune Break Boost they have and the amount of stacks of Tune Strain - Interfered there are on the target.
Gacha system
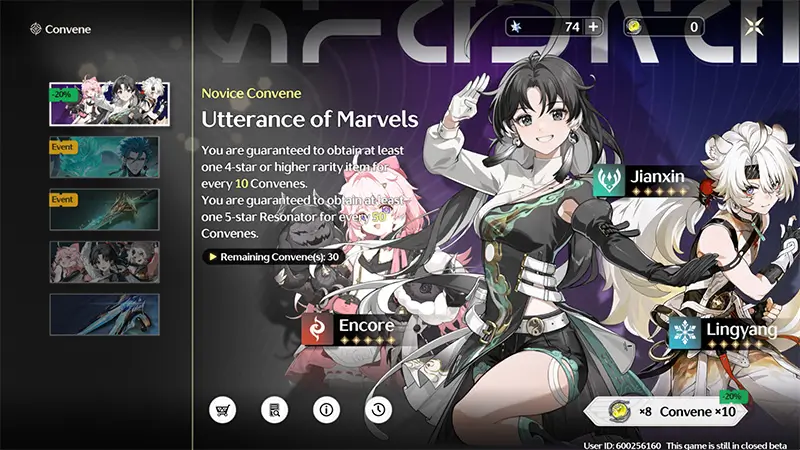
Wuthering Waves is a gacha game which means that to obtain new characters and weapons, you will have to 'pull' them using in-game currency (which can also be purchased using real life money). The rate for pulling the highest rarity character (5★) are pretty low - sitting at 0.8%, so do expect a lot of grinding to obtain who you want.
You can find more information about the gacha system here:

Resonators
Resonators are the playable units in Wuthering Waves. They are mainly obtained via Convenes, the game's gacha system. However, some Resonators can be obtained for free via in-game missions or events.
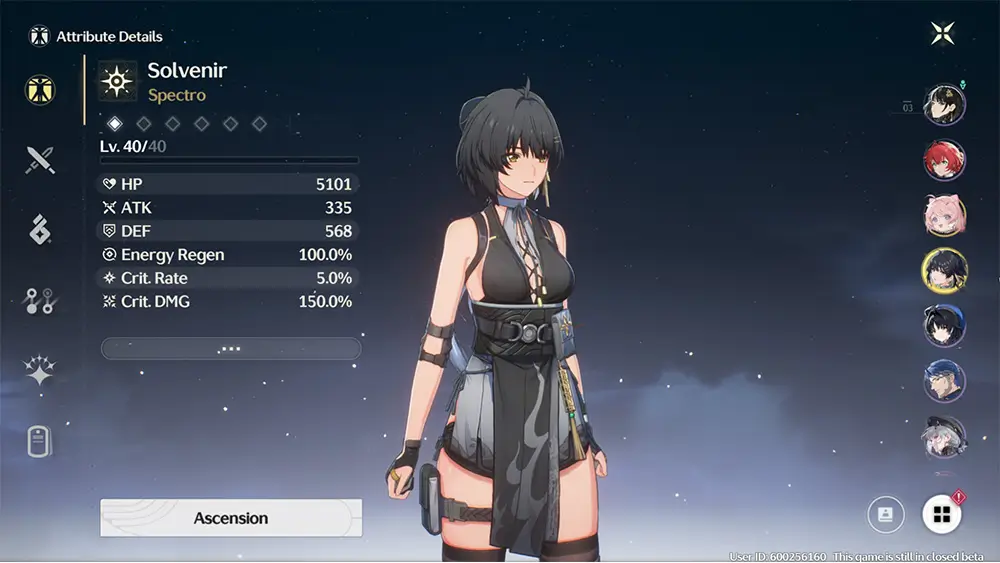
Resonator Stats
- HP - How much damage a Resonator can take before dying,
- ATK - How much damage a Resonator deals,
- DEF - Reduces the damage a Resonator takes,
- Tune Break Boost - Increases damage of Tune Break Skills,
- Max Stamina - Determines how many continuous stamina using actions (dashing, dodging, climbing, swimming and some attacks use stamina) you can take before being forcibly stopped,
- Crit Rate - How likely it is for the Resonator to land a critical hit,
- Crit DMG - Determines the damage multiplier when landing a critical hit,
- Energy Regen - Determines how fast a Resonator charges energy for their Resonance Liberation (Ultimate),
- Off-Tune Buildup Rate - Increases the Off-Tune applied to enemies,
- Resonance Skill DMG Bonus - Increases the damage of Resonance Skill,
- Basic Attack DMG Bonus - Increases the damage of Basic Attacks,
- Heavy Attack DMG Bonus - Increases the damage of Heavy Attacks,
- Resonance Liberation DMG Bonus - Increases the damage of Resonance Liberation (Ultimate),
- Elemental DMG Bonus - Increases all damage a character deals. Note that there are six different elements in the game and each element has its own separate Elemental DMG Bonus stat,
- Elemental DMG RES - Reduces the damage a Resonator takes from a specific Element,
- Healing Bonus - Increases the amount of healing a Resonator provides.
Resonator Elements & Weapons
Each Resonator in Wuthering Waves has an Element associated with them. A Resonator's Element determines the damage type of their attacks.
There are currently 6 Elements in the game:
- Glacio
- Fusion
- Electro
- Aero
- Spectro
- Havoc
Each Resonator in Wuthering Waves uses a specific Weapon type. A Resonator's Weapon type will give you a general idea as to how they fight as well as which Weapons they can equip.
There are currently 5 Weapon types in the game:
- Broadblade
- Gauntlets
- Pistols
- Rectifier
- Sword
Resonator Skills
Each Resonator in Wuthering Waves has 7 different abilities that define their playstyle.
- Basic Attack is a Character's auto-attack and is always available. You can also activate Heavy Attack by long-pressing the Basic Attack button or use an Aerial Attack by casting a basic attack in the air.
- Resonance Skill is a combat ability that a Resonator can use with effects ranging from dealing damage to healing your allies. This ability usually has a cooldown and can not be used back to back. They are usually also a large source of Concerto Energy and Resonance Energy.
- Resonance Liberation is generally their strongest combat ability. To use Resonance Liberation, it must first be charged by dealing damage to enemies using the Resonator's abilities. It must also be recharged after every use. In almost every case it pauses challenge timers during the animation.
- Forte Circuit is a gameplay defining ability that is unique for every Resonator. It is represented by a gauge above the health bar. Once it is available, it will change into the color of that Resonator's Element and will gain a waveform-like appearance. It can be activated by using the right abilities while it is available. Resonators can have multiple forte bars to represent different meters that have different effects.
- Outro and Intro Skills are abilities that activate upon switching Resonator once the current Resonator has filled the Concerto Energy. It is represented by a gauge to the left of the health bar. Upon switching, the current Resonator will activate their Outro Skill, buffing the next Resonator you are switching into. While Intro Skills are unique attacks that the next Resonator will perform.
- Tune Break Skills can be used on enemies once their Mistune bar has been filled out fully. The damage output of these skills is not affected by stats like ATK or CRIT DMG. Instead it is entirely based on the Resonator's Tune Break Boost and the Enemy Class. These, much like the Resonance Liberation, will pause challenge timers during its animation.
Resonator Progression
Upgrading your Resonators in Wuthering Waves will enhance their combat capabilities, allowing you to challenge and overcome the more difficult content that the game offers.
The main ways for a Resonator to grow stronger in Wuthering Waves are:
- Increasing the Resonator level
- Upgrading the Resonator's Fortes
- Unlocking the Resonator's Sequence Nodes
- Equipping Weapons
- Equipping Echoes
Character Level and Ascension
Each Resonator in Wuthering Waves has a Resonator Level ranging from 1 to 90 and gains additional stats as they level up.
Once a Resonator reaches certain level milestones, they will need to be ascended in order to increase their level further. Resonators start with a base max Level of 20. Each time you ascend a Resonator, their level cap will increase by 10 up to a maximum of 90. To ascend a Resonator, you will need to gather materials from Boss Challenges and collect materials from enemies and plants in the overworld.
Also, note that your Union Level (Account Level) will also determine how many times you can ascend a Resonator. Even if you have all of the required ascension materials, you will not be able to ascend a Resonator past a certain Level unless your account is also of the appropriate Union Level.
Fortes
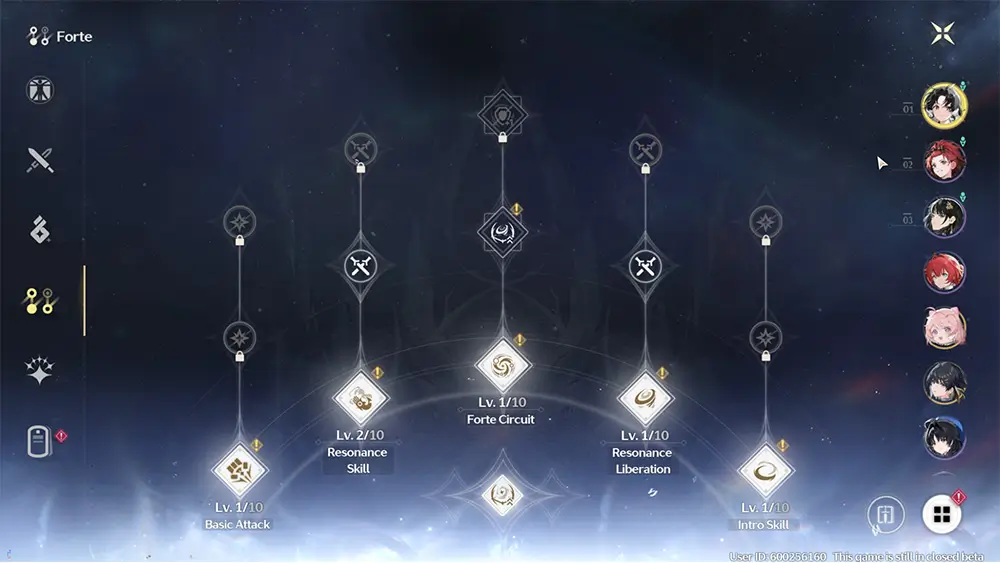
Fortes are a skill upgrade tree that each Resonator has. Unlocking and upgrading the various nodes in a Resonator's Forte will provide them with stat bonuses, extra passive abilities, and enhancements to their 5 Skills.
Fortes can be upgraded by using materials obtained by completing Forgery Challenges, Weekly Challenges, and killing overworld enemies. Also, note that the ability to upgrade Fortes is tied to your Resonator's Ascension, so you will need to level your Resonator first before being able to upgrade their Fortes.
Sequence Nodes/Wavebands
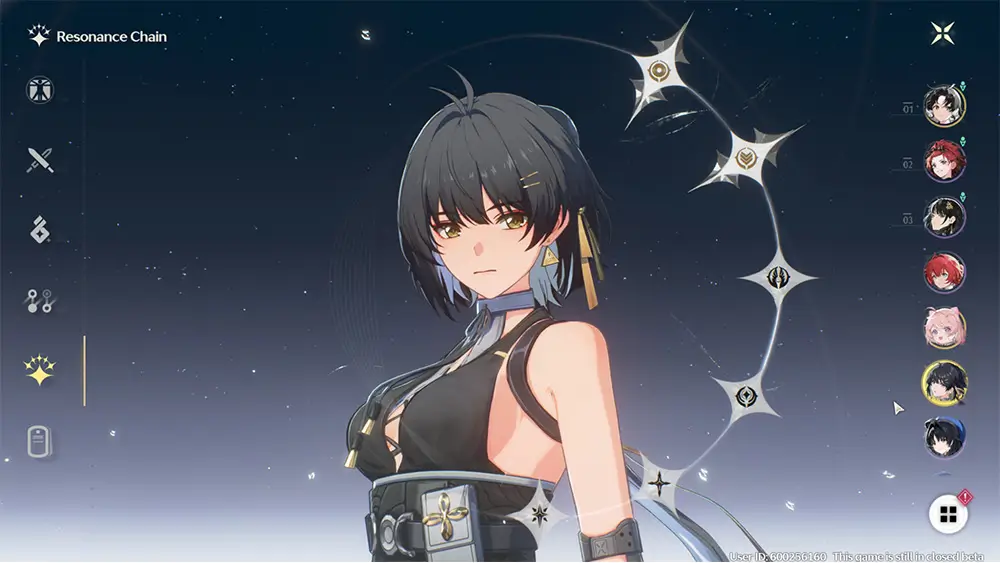
Sequences enhance a Resonator's abilities or provides them with new passive bonuses. Each Resonator has 6 Resonance Chain upgrades with each upgrade providing a different bonus.
Sequences can be unlocked by obtaining duplicate copies (called Wavebands) of the Resonator from Convenes (the gacha system) or through in-game missions and events. Though compared to other games, you can also buy Wavebands from the in-game shop using a currency you obtain from pulling - but the shop limits the amount of Wavebands you can buy to 2 per character (and this includes the current rate-up characters).
The only exception to this is the Main Character. You can obtain their Wavebands via in-game missions and Relic Merchant rewards.
Weapons
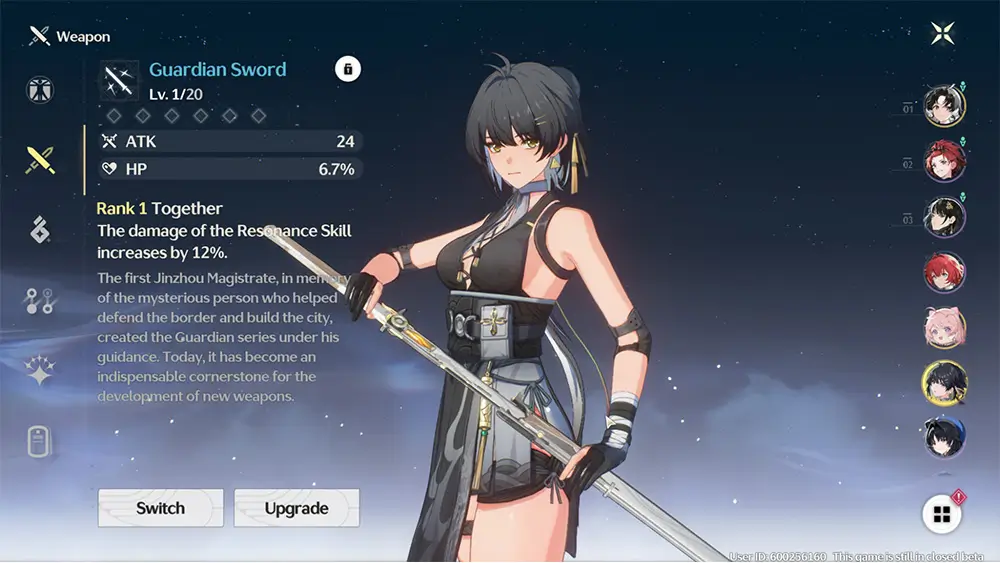
Weapons are a type of equipment that all Resonators can equip and they provide stat bonuses to the Resonator and a new passive. Similar to Resonators, Weapons also have a Level ranging from 1 to 90 . They can be leveled up and ascended as well. Doing so will increase the stat bonus that they provide to the equipped Resonator.
Each Weapon also has a Weapon ability which is a passive bonus. A Weapon Ability starts at Rank 1 and can be upgraded to Rank 5 by using the Synthesis function.
To use the Synthesis function, you will need to expend duplicate Weapons of the one that you are upgrading. Each duplicate Weapon that you use will increase the Weapon's Ability Rank by 1. Note that any Weapons used as a Synthesis material will be consumed and destroyed. Increasing the Rank of a Weapon Ability will enhance some or all of the numerical portion of the bonus that it provides.
Keep in mind that Weapons can only be equipped if the Resonator can use that weapon type.
Echoes
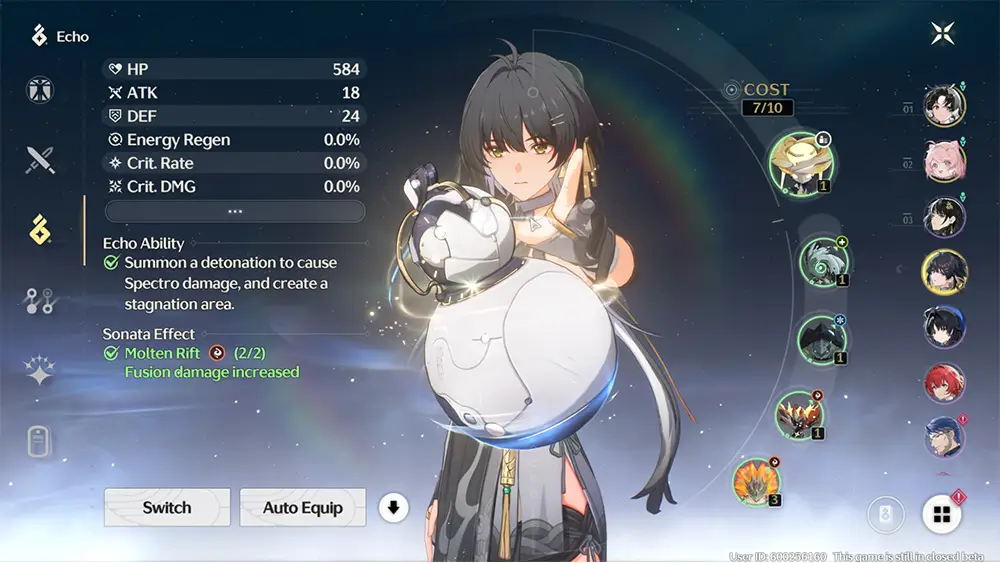
Echoes are the other type of equipment in this game and serve the function of armor and accessories in a traditional RPG game. Equipping Echoes to your Resonator will provide them with a variety of stat increases from HP to ATK to Energy Regeneration. Echoes will provide your Resonators with the main bulk of their stat increases.
- Every Echo has an active Echo ability.
- There are 5 total Echo slots. The Echo equipped in the first slot will have its active Echo Ability available for you to use. The order of the rest does not matter.
- Each Echo comes with a COST requirement that ranges between 1 to 4 depending on the Echo's Class. Each Resonator has a COST limit of 10 at the start and it is possible to upgrade it to 12 through Data Dock upgrades. Resonators can only equip Echoes up to the COST limit.
There are 4 different Echo Classes:
- Common Class (1-COST)
- Elite Class (3-COST)
- Overlord Class (4-COST)
- Calamity Class (4-COST)
Each Echo has 2 main stats and up to 5 sub-stats. Primary main stats differ while secondary main stats are set for each Echo Class. Depending on the Echo Class, the possible primary main stats are:
- Common Class - HP%, ATK%, DEF%
- Elite Class - HP%, ATK%, DEF%, Energy Regen%, Elemental Damage Boost*
- Overlord Class - HP%, ATK%, DEF% Crit Rate%, Crit DMG%, Healing Bonus%
- Calamity Class - HP%, ATK%, DEF% Crit Rate%, Crit DMG%, Healing Bonus%
*Note that Elemental Damage Boost will be one of the 6 possible elements. It is not an All Elemental Damage Boost.
Depending on the Echo Class, the set secondary main stats are:
- Common Class - Flat HP
- Elite Class - Flat ATK
- Overlord Class - Flat ATK
- Calamity Class - Flat ATK
To learn more about Echoes, Echo Stats and Echo Sets, check our other guides:


Collecting Echoes
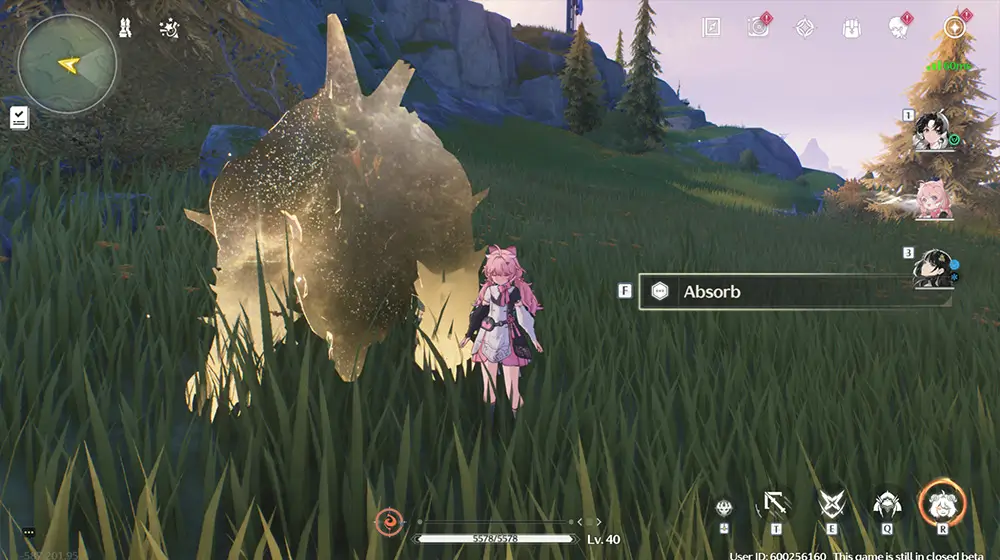
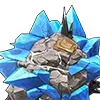
When a Tacet Discord (monster enemies) is defeated, there is a chance that it will leave an Echo behind for you to absorb. The drop rate and the rarity of the Echo absorbed depends on your Data Bank level.
Enemies in the world will reset daily. This timer is unique to each world so it is possible to join another person's world to farm more Echoes (keep in mind that co-op unlocks at Union Level 30). The loot in co-op is personal so every player in the instance has a chance to get an Echo after a kill. This means that you can infinitely and more effectively farm Echoes by grouping up with other players and rotating worlds.
Game Systems
Information about various systems available in Wuthering Waves.
Union Level
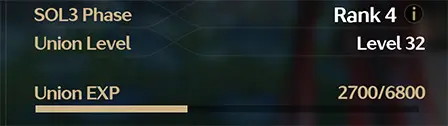
Union Level is your overall account level and can be increased by obtaining Union EXP. Union EXP can primarily be earned by completing in-game missions and events as well as spending Waveplate (the game's stamina system).
As your Union Level increases, you will unlock more game functions such as Daily Activities as well as increasing the number of times that you can ascend your Resonators and Weapons, increasing their level cap. Additionally, the difficulty of the enemy in the overworld will also increase once you reach certain Union Level milestones. The maximum Union level is 60.
As Union Level increases, the SOL3 Phase also increases, making enemies more challenging while also increasing rewards. SOL3 Phase increases every 10 Union Level. You can change your SOL3 Phase between the ones you unlocked every 24 hours.
Waveplate
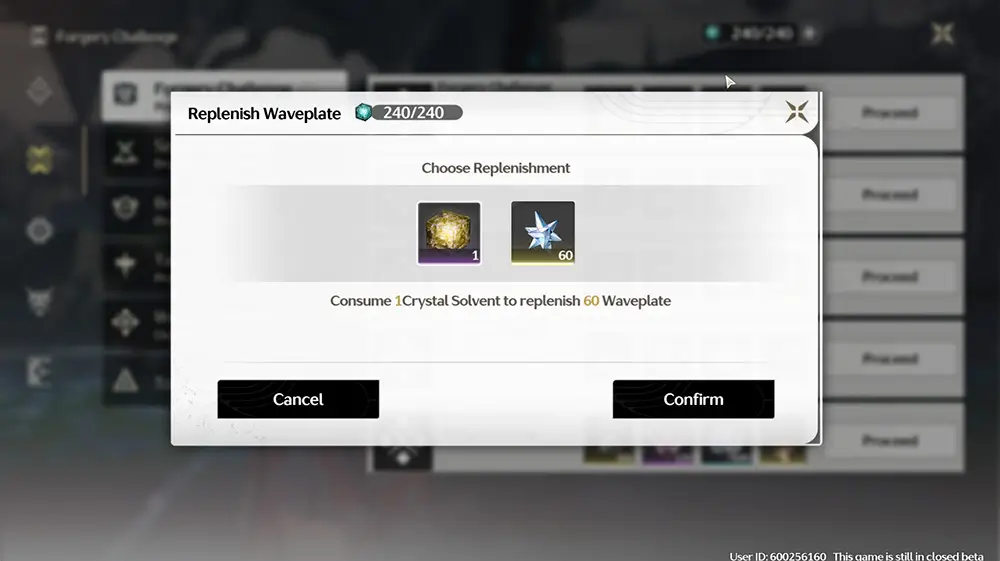
Waveplate is the stamina system of Wuthering Waves. It is primarily used to obtain resources and upgrade materials from the various resource and boss dungeons in the game. Waveplate is generated at a rate of 1 per 6 minutes. You can store up to a maximum of 240. A total of 240 Waveplate can be generated every day.
You can also replenish your Waveplate by using Crystal Solvent (reward from various missions) or Astrites. Crystal Solvent is an in-game consumable that when used will give you 60 Waveplate immediately.
If you are currently at 240 Waveplates, you will begin replenishing Waveplate Crystals instead. These generate once every 12 minutes, which is twice as slow as the regular Waveplates. These essentially function as an overcapping system, meaning you are punished less if you don't log on every day. This kind of Waveplates has a maximum of 480.
Quests
Quests in Wuthering Waves come in a couple of different variety:
- Main:
- They are denoted with a yellow color in your quest log and on the mini map.
- They reward Astrites, the game's gacha currency, and huge amounts of Union EXP.
- Companion:
- Companion Quests are side quests for specific Resonators. These are generally missions that will provide you with more background and lore on the Character that they are centered on. They are denoted with a purple color in your quest log and on the mini map.
- They reward Astrites and Union EXP.
- Side:
- These are Side Quests as the name suggests. They are denoted with a blue color in your quest log and on the mini map. Some will reward Astrites.
- Exploration:
- Exploration Quests are regional quests. These introduce you to new regions while providing lore. They are denoted with a green color in your quest log and on the mini map.
- Activities:
- Activities are your daily missions.
- You will receive a semi-randomized set of 7 Activities every day.
- Each Training mission will provide you with 10 or 20 Activity Points and you need to gather 100 in total to obtain all daily rewards which includes a total of 60 Astrites as well as some upgrade materials.
Drifting Inscription
Drifting Inscription is a set of beginner missions that are designed to guide the player's progression at the start of the game. Completing these missions will reward you with various resources.
There are 6 pages of beginner missions in the Drifting Inscription.
Trophies
As the name suggests, Trophies are a collection of tasks that the player can complete to earn a varying amount of Astrites
Pioneer Podcast
Pioneer Podcast is the battle pass of Wuthering Waves. It has a free and premium (that can be unlocked with real money) path. Players can get rewards from these paths by completing daily, weekly, and periodical missions. Pioneer Podcast resets periodically (most likely every 6 weeks).
The price of the Premium version (called Insider Channel) was set at $10, and you also were able to buy an advanced version that unlocked some of the rewards early for $20. Furthermore, the Insider Channel comes with a 4★ weapon selector and those weapons can only be obtained from it (so it's the same as in Honkai: Star Rail). Buying the advanced version will also give you the option between one Gilded Ginko or one Skyhunter's Feather. These materials could be used to upgrade the refinement of the battle pass weapons. Gilded Ginko will be used for the Golden Eternal weapons, and the Skyhunter's Feather will be used for the Skyhunter's Growl weapons.
Game Modes
In addition to exploring the overworld and doing missions, Wuthering Waves also offers a number of other game modes for the player to enjoy as well.
Resource/Boss Stages
Throughout the overworld in Wuthering Waves, you will encounter a number of dungeon type entrances or special fields that you can enter to farm resources and materials to progress your account. However, Waveplate (stamina) must be expended in order to obtain the rewards for completing these stages.
The different stages are:
Simulation Field
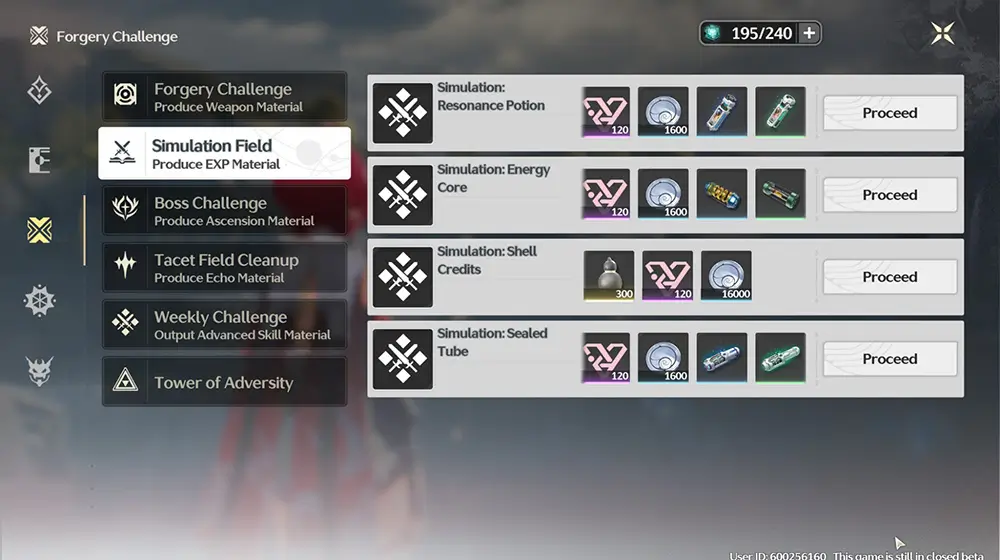
These are your basic resource stages and provide one of the following material depending on which Simulation Field you are farming:
- Simulation: Resonance Potion - Resonator EXP Material
- Simulation: Energy Core - Weapon EXP Material
- Simulation: Shell Credits - Shell Credits(in game money)
- Simulation: Sealed Tube - Echo EXP Material
It costs 40 Waveplate to do one Simulation Field.
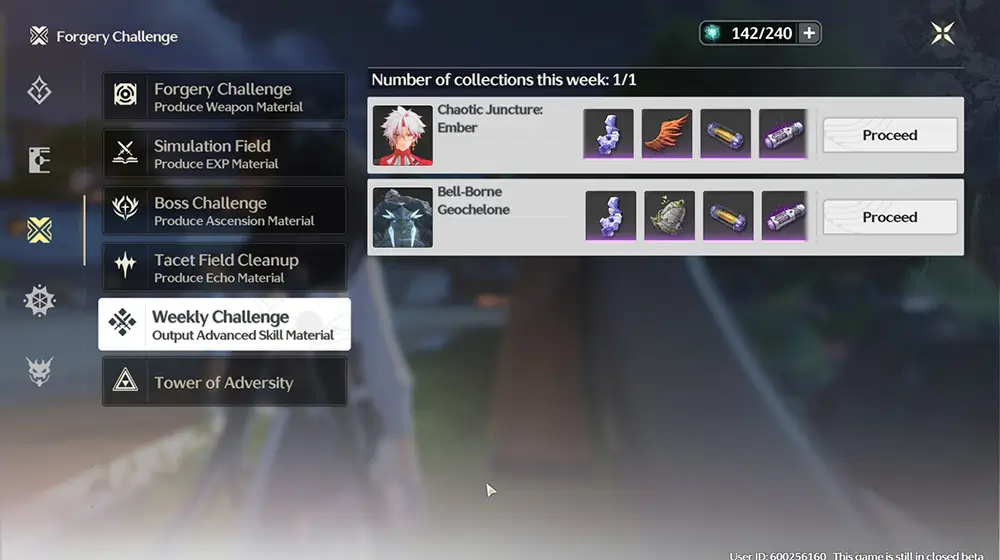
Forgery Challenge
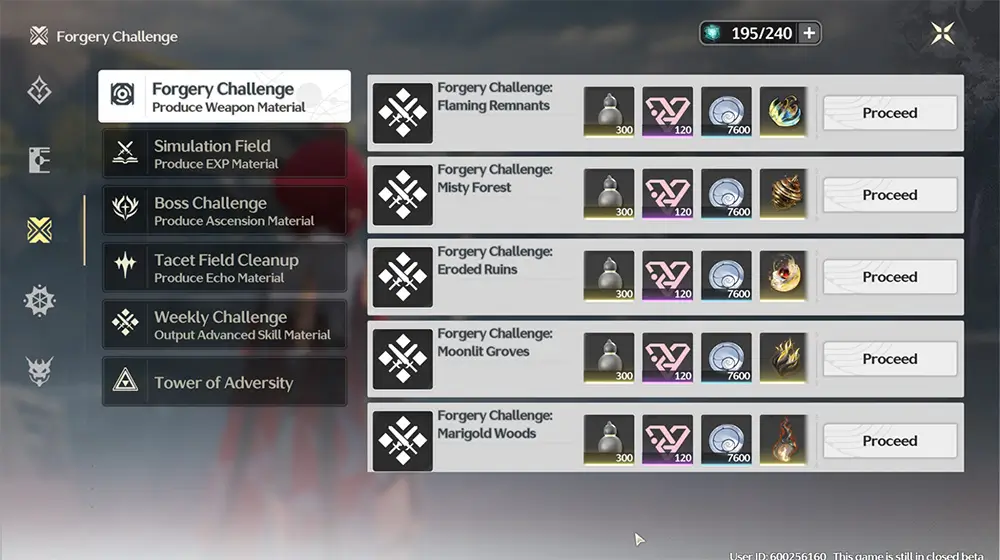
These stages reward Weapon Ascension/Forte Upgrade materials. There are 5 stages that drop different materials in correspondence with the 5 different Weapon types, so make sure to check your Resonator page to see which one you need.
It costs 40 Waveplate to do one Forgery Challenge.
Boss Challenge
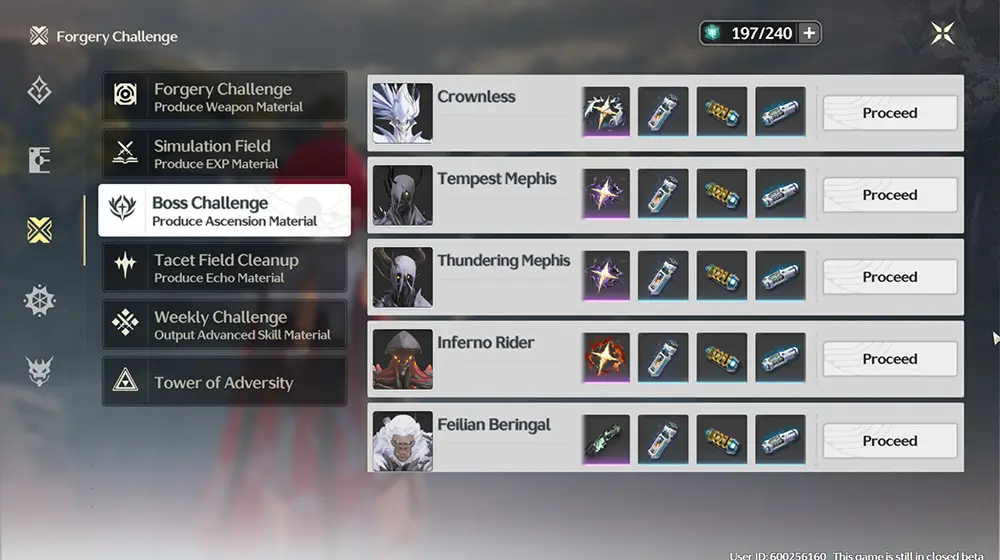
These are Bosses that reward Resonator ascension materials. Each boss drops a different ascension material, so make sure to check your Resonator page to see which one the Resonator you are ascending needs.
Bosses will respawn 3 minutes after being defeated.
It costs 60 Waveplate to claim rewards from Boss Challenge one time.
Tacet Suppression
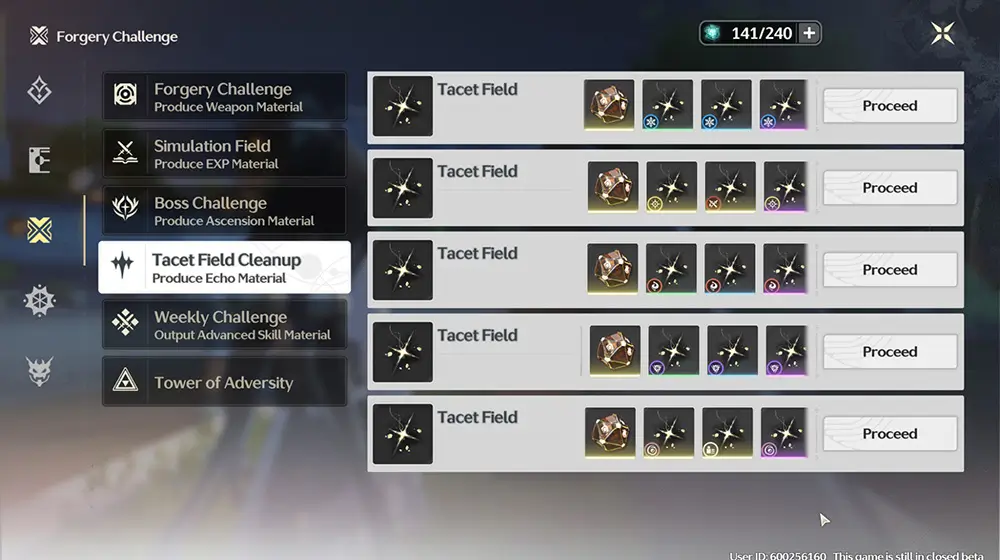
These fields reward Echo Tune-up materials, Echoes, and Echo EXP materials. Each field reward Echoes with different Sonata(Set) Effects so make sure pick the ones with the Sonata Effects you want.
It costs 60 Waveplate to claim rewards from Tacet Field Cleanup one time.
Nightmare Purification
There are 2 kinds of Nightmare Purification, Nightmare Nests and Grim Nightmares. Nightmare Nests reset once every day and let players defeat up to 36 Tacet Discords from a 3 piece Sonata Set. Grim Nightmares are unlocked after a certain amount of Dream Patrol's in the area, and allow players to fight a Nightmare Boss, which feature a different Echo drop compared to the original boss.
It costs 60 Waveplate to claim rewards from Tacet Field Cleanup one time.
Weekly Challenge
These are weekly bosses that reward special Forte upgrade materials, standard weapon molds (used for weapon crafting), Weapon EXP materials, and Echo EXP materials.
You can only claim rewards from these bosses once a week.
It costs 60 Waveplate to claim rewards from Weekly Challenge once.
Tacet Discord Nest
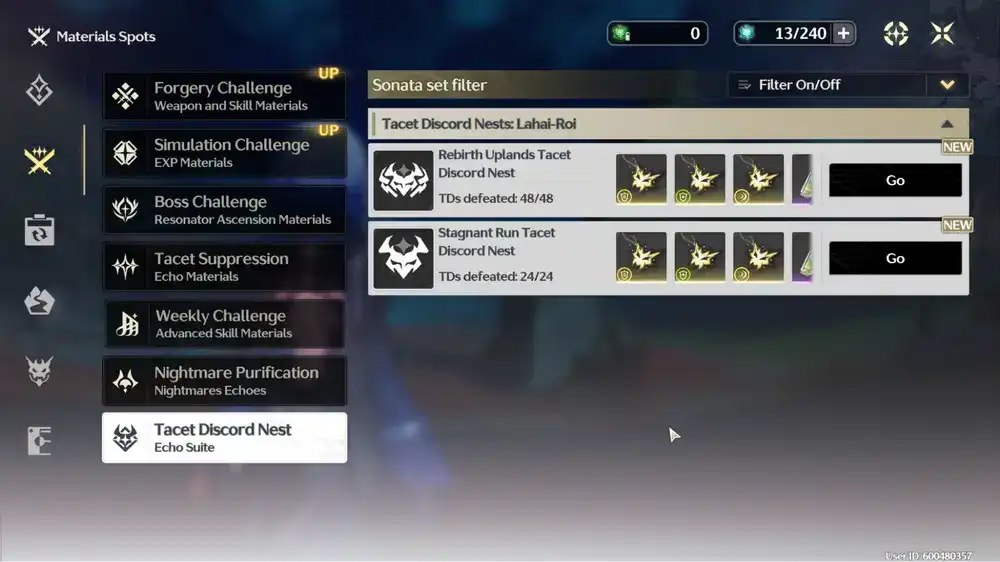
There are 2 kinds of Nightmare Purification, Nightmare Nests and Grim Nightmares. Nightmare Nests reset once every day and let players defeat up to 36 Tacet Discords from a 3 piece Sonata Set. Grim Nightmares are unlocked after a certain amount of Dream Patrol's in the area, and allow players to fight a Nightmare Boss, which feature a different Echo drop compared to the original boss.
Tower of Adversity
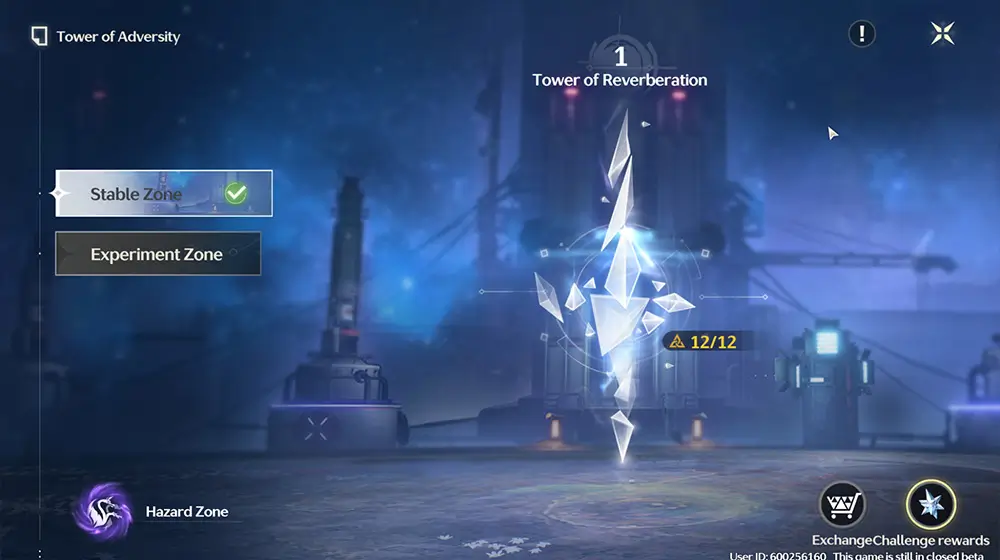
Tower of Adversity is a game mode where the objective is to defeat a group of enemies as fast as possible. After completing a Tower of Adversity stage you will be awarded between 0 to 3 crests for that stage depending on how long it took you to defeat the enemies in that stage. The more crests that you are awarded, the better the rewards you receive.
It is a more challenging game mode with the final stages being considered as end game content.
Tower of Adversity is divided into three parts: Stable Zone, Experimental Zone, and Hazard zone.
- Stable Zone consists of 4 stages and provides a one time reward of Astrites upon completion.
- Experimental Zone consists of 8 stages and also provides a one time reward of Astrites upon completion.
- It is not possible to clear all stages using the same Resonators due to Vigor limitations (explained below).
- Hazard Zone consists of 12 stages and reward Astrites upon completion.
- Hazard Zone stages are more challenging than other zones.
- Hazard Zone stages reset periodically, allowing the player to complete them again for additional Astrites.
Basically, this mode is the Wuthering Waves equivalent of Abyss from Genshin Impact or Memory of Chaos from Honkai: Star Rail.
Vigor
Vigor is a stamina system unique to every zone in the Tower of Adversity.
- Each Resonator starts with 10 Vigor.
- Each stage in a zone has a Vigor cost requirement. Selected Resonators' Vigor will be reduced by the stage's Vigor cost upon completing the stage.
- Resonators that don't have enough Vigor for a stage cannot be selected for that stage.
Whimpering Wastes
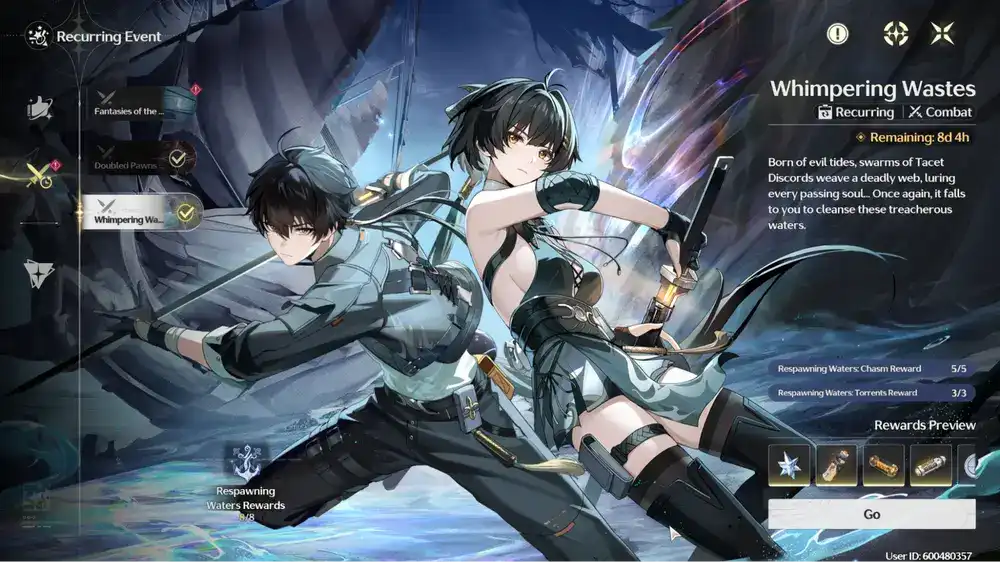
Whimpering Wastes focuses primarily on defeating a near infinitely spawning horde of enemies. After defeating a stage you will be awarded a letter based rank depending on the score you got, with the score being dependent on how many enemies you defeated within the 2 minute time limit. While the ranking itself does not decide your rewards, your score does, which means that in a roundabout way you do want to have a high rating.
Whimpering Wastes is divided into 3 zones. Each zone combines the total score you obtained throughout its individual stages to determine the amount of rewards you will obtain.
- Forbidden Waters consists of 6 stages.
- Forbidden Waters requires a total of 9600 points to obtain full rewards.
- Forbidden Waters does not reset and thus gives rewards only one time.
- Respawning Waters: Chasm consists of 5 stages.
- Respawning Waters: Chasm requires a total of 15000 points to obtain full rewards.
- Respawning Waters: Chasm does reset and thus gives rewards every time the gamemode resets.
- Respawning Waters: Torrents consists of 1 stage, meaning you are not able to compensate for bad performance on one stage with good performance on another.
- Respawning Waters: Torrents requires a total of 4500 points to obtain full rewards.
- Respawning Waters: Torrents does reset and thus gives rewards every time the gamemode resets.
Whimpering Wastes requires a total of 2 teams to be used at the same time, thus forcing each character in use to have their own gear. This conflicts with Tower of Adversity, where only one team is used at a time.
Tokens
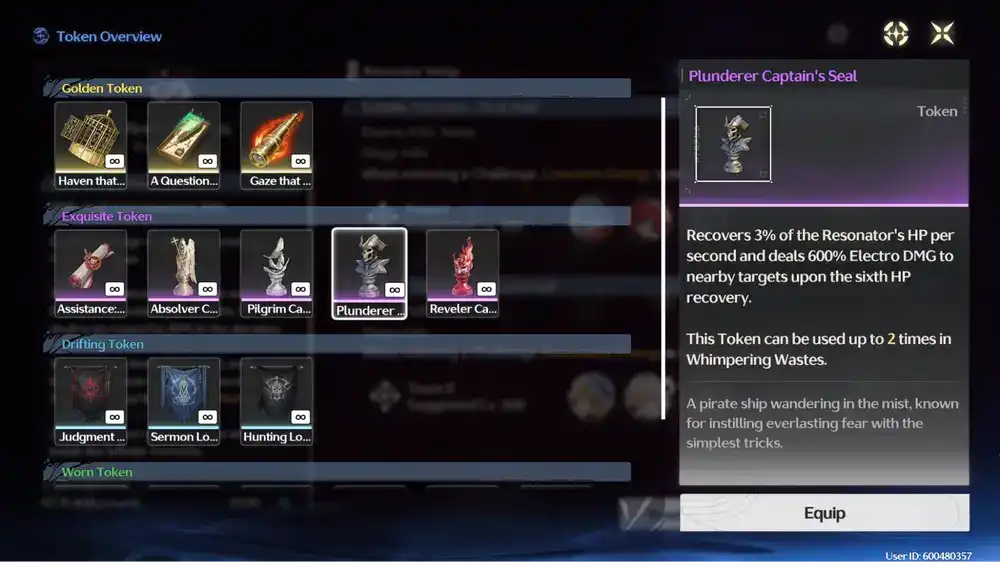
Whimpering Wastes also gives Tokens to aid you in battle. Each one of your 2 teams can select 1 token at a time, and these tokens do not have to be the same one. Each Token costs 1 charge to use at a time, with the amount of available Charge being tied to each Zone. So if you fully consume a token within Respawning Waters: Chasm, you will be able to use it again in Respawning Waters: Torrents. There are 4 classes of Tokens: Worn, Drifting, Exquisite and Gold. Gold tokens will change during each reset, while all other tokens will stay the same.
To keep up with the Honkai: Star Rail comparisons, this is best compared to Pure Fiction.
Doubled Pawn Matrix: Pilot
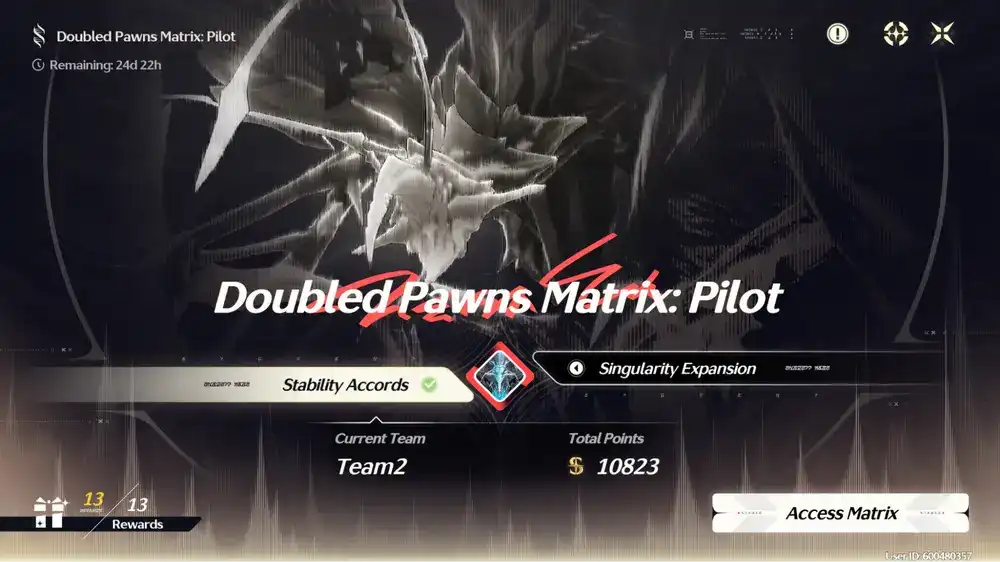
Doubled Pawn Matrix (or DPM for short) is an endgame gamemode entirely focused on defeating as many bosses as possible using a theoretically infinite number of teams. The player will be able to select a team of Resonators to deal as much damage as possible while fighting Boss enemies, within a 2 minute time limit. Each team will gain a certain score depending on how much damage they dealt, which decides the rewards the player will be able to obtain.
DPM has 2 modes, Stability Accords and Singularity Expansion.
- Stability Accords goes up to a maximum of 4 boss fights.
- Stability Accords requires a total of 10.000 points to obtain all rewards, which equates to defeating all 4 bosses.
- Stability Accords only gives you a maximum of 3 teams at a time, meaning you must defeat all 4 bosses with just 3 teams.
- Each character has 1 Vigor, except for universal supports (Baizhi, Verina, The Shorekeeper, Buling, Mornye), who have 2.
- Stability Accords will reset with each Version update.
- Singularity Expansion has an infinite amount of Rounds.
- Singularity Expansion requires a total of 21.000 points to obtain all Asterite rewards, while requiring 58.000 to obtain every reward.
- Additionally, you must use 4 teams that get an individual score of 5000 to obtain all Asterite rewards, with this going up to 6 teams for all rewards.
- Singularity Expansion allows you to use as many teams as physically possible to obtain as much score as you can.
- Each character has 1 Vigor, except for universal supports (Baizhi, Verina, The Shorekeeper, Buling, Mornye), who have 2.
- After defeating each boss, the challenge will progress into the next round. This does not change the gameplay of the mode, rather it simply increases the HP of boss enemies
- Since score is determined by damage output and not the percentage of HP that has been dealt to the boss, higher rounds will still give a similar amount of score as lower rounds.
- Singularity Expansion will reset with each Version update.
DPM is by far Wuthering Waves's hardest Endgame Content to fully complete, requiring 4 well invested teams for just the Asterite rewards alone.
Tactical Hologram
Tactical Holograms are 1-time boss challenges with increasing levels of difficulty.
- Wuthering Waves consistently adds more Hologram Challenges every update.
- Clearing these boss challenges for the first time will reward you with various Echo related materials and Drill Data Sets.
- You can use these Drill Data Sets in store to obtain more Echo related materials and Astrites!
Fantasies of the Thousand Gateways

Fantasies of the Thousand Gateways is a roguelike gamemode where the player will select a team of 3 Resonators to explore a dreamscape filled with enemies. When the player first enters, they are prompted to select a Sigil, which will buff things from Echo Skill DMG to Intro Skill DMG. Attacking enemies will grant Dreamscape energy, which can grant an enhanced state based on your Sigil.
After completing a challenge, players will obtain Metaphors and Dream Fragments. Metaphors will grant the player buffs to their stats or Sigils, while Dream Fragments can be used in the store to purchase specific Metaphors.
Fantasies of the Thousand Gateways will grant weekly rewards based on the score obtained, and each week players will be able to claim the equivalent of 2 Tacet Suppression runs for free.