


Beat Performer - Concerto is one of the classes available in Blue Protocol: Star Resonance. They fulfill the Support role while wielding a Guitar as their weapon of choice. Find their best build and how to play them properly in our guide. Difficulty:
Beat Performer has also access to a second spec - Dissonance - and if you're looking for a guide to that spec, check here.
Last guide update
24.01.2026
Overview
Best Skills
Talents
Gear
Rotation & How to Play
Spec Overview
The Concerto Spec aims to fully embrace the supportive aspect of the Beat Performer class, with large and frequent burst healing effects. It relies on Critical Heals, which in turn refund large cooldowns for continuous healing uptime.
The core buff of Concerto is one provided by Healing Melody. This ability empowers allies’ main stats based on a percentage of our own Intellect stat. Our party members can have their main scaling stat (Strength, Agility, or Intelligence) increased by 8%, 16% or even a large 32% depending on the condition fulfilled.
Pros
- Huge stat buffs.
- Strong burst AoE healing for emergencies.
- Very simple to play and straightforward rotations.
Cons
- Ideal rotation relies on stat breakpoints.
- Needs most talent points in order to function effectively.
- Low healing over time.
Note
These recommendations assume you have Level 140/150 Set Gear and a Level 150 Relic Weapon.
Pieces marked in Orange will be your recommended stats if you use Set pieces. Purple lines are only applicable for non-set gear. Additionally, the Relic weapons will not have Purple Lines or Reforges.


Stat Tuning
We are aiming for high Crit, Haste is our secondary priority. Reaching a good amount of haste also makes the build feel nicer, Versatility it’s the last stat of choise.
We are aiming for 40% Crit and 30% Haste
Recommended Imagine Combo


More information on imagines in the Gear Section.
Optimal Season 1 Endgame Gear
Note
These suggestions assume you have level 80 Gear and a level 90 Weapon.
Pieces marked in Orange will be your recommended stats if you use Set pieces. Purple lines are only applicable for non-set gear. Additionally, the Relic weapons will not have Purple Lines or Reforges.
Stat Tuning
Our primary stat goals are maximizing Crit and Versatility. The Haste needed for the Build will be easily reached with just the set pieces. Luck can be used as a substitute for Versatility in case of being unlucky, and it is used to be splashed for additional heals and damage. I can be substituted for Haste for having slightly lower animations and being easier to play, though it provides inferior benefits.
Since our modules make the gains from Healing Intensity and Magic Attack nearly identical, we have the flexibility to choose whichever of those two stats you prefer on purple lines.
Recommended Imagine Combo

For alternative options, check the Gear tab.
Level 60/70 setup
For level 60/70 gear information, open the box below.
Note
These suggestions assume you have level 60 Gear and a level 70 Weapon.
Pieces marked in Orange will be your recommended stats if you use Set pieces. Purple lines are only applicable for non-set gear. Additionally, the Relic weapons will not have Purple Lines or Reforges.
Stat Tuning
Our primary stat goals are maximizing Crit and Versatility. The Haste needed for the Build will be easily reached with just one substat aside the one provided by the Set pieces and weapon. If necessary, Luck can be used as a substitute for Versatility in case of being unlucky, though it provides inferior benefits. Since our modules make the gains from Healing Intensity and Magic Attack nearly identical, we have the flexibility to choose whichever of those two stats you prefer on purple lines.
Recommended Imagine Combo
For alternative options, check the Gear tab.
Best Skills
Basic ATK

Skill
Healing Beat
Ultimate
Concert Circuit
Slot 1 - Mandatory
Slot 2 - Mandatory
Slot 3 - Mandatory
Slot 4 - Mandatory


Performance Energy - Performance Energy is our energy bar, which we will consume to use our major healing ability, Heroic Melody. We have a base amount of 50 Energy and a regeneration rate of 1 per second, but both values can be increased in our talent tree. Energy is very important for this Spec because our goal is to maintain Healing Melody.


Performance Passion - Performance Passion is another resource, this time required for using certain abilities of this class, both damage-oriented and healing. At a baseline, we have 5 notes and regenerate 1 every 5 seconds.
Fixed Skills
- - Our 4-part Basic Attack, useful for activating additional healing and damage effects between ability casts. It also helps us reset our Healing Beat Special, making it essential to weave in during the downtime of the abilities.String Strike
![Imagine]()
- This ability can be enhanced, evolving into Piercing Strike when certain talents trigger.
- Healing Beat - Replaces our Special Skill in the Concerto Spec, a healing ability that has no cooldown but must consume Performance Passion to be activated. Will gain several reset effects and buffs in our Spec’s talent tree.
- - Our Ultimate heals nearby allies and attacks nearby enemies on top of letting us hit 12 Performance Passion points momentarily. We will instead opt to use the enhanced version “Concert Circuit" once the key talent is activated, which improves our damage and healing frequency scaling on the number of allies or enemies hit. This improved ability also lets us move during casting.Rock the Stage
![Imagine]()
Mandatory Skills
- - A high hit count ability and the skill with our highest healing output. It also cleanses our allies’ debuffs. This ability and all of its effects are repeated byFivefold Crescendo
![Imagine]() ’s Speaker mechanic.Healing Melody
’s Speaker mechanic.Healing Melody![Imagine]()
- The only damaging ability of Concerto Spec with several tiers, gained from channeling the ability and which has different effects. This ability will be mostly used in its Tier 1 mode rather than others because of its fast cast time, allowing us to instead prioritize performing more actions within our rotations. There is also an enhanced version of this ability with a talent node that deals damage over time from an instant cast rather than a channel.Passion Burst
![Imagine]()
- - Our most important ability, thanks to effects granted later in the Spec’s talent tree. At its base, it will summon a Speaker in the battle, which will continuously heal all allies. The Speaker also has a powerful mechanic of repeating all healing abilities cast by you when nearby (Healing Melody
![Imagine]() , Healing Beat,Rock the Stage
, Healing Beat,Rock the Stage![Imagine]() ).Fivefold Crescendo
).Fivefold Crescendo![Imagine]()
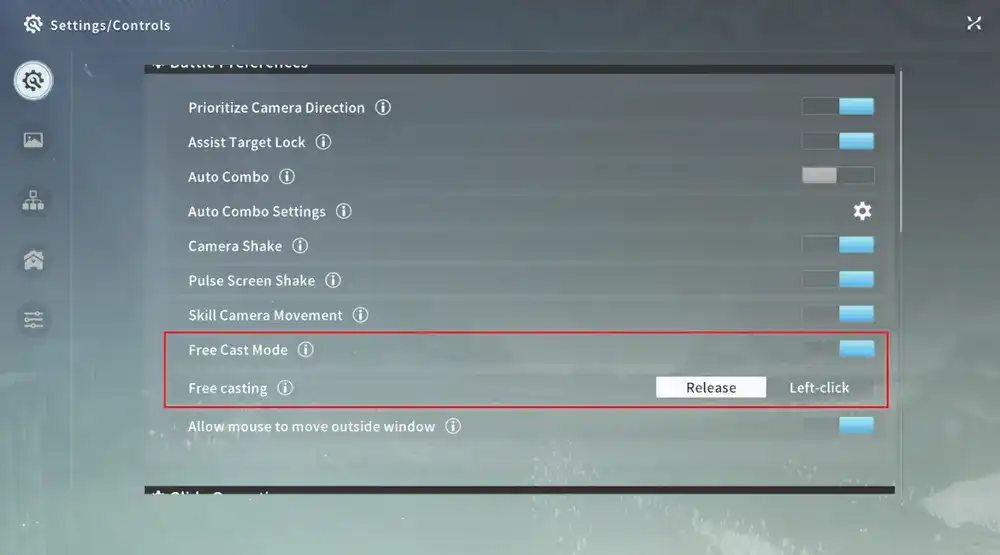
- As explained later, it’s recommended to enable Free Cast mode in Settings to allow us to place the Speaker manually.
- - While this buff is active, we deal additional damage to enemies and provide additional healing to allies (prioritizing the lowest HP ally). This will also grant Super Armor to 10 allies, protecting them from knockback caused by enemies. Later talent nodes significantly enhance its utility and cement it as a mandatory ability.Encore
![Imagine]()
Skill Priority
> Healing Beat >Fivefold Crescendo>Healing Melody=Rock the Stage>Encore=Passion BurstString Strike
For skill advancement, we recommend starting with
- Overclock Shock: Releases an energy wave, interrupting all targets within 5m and silencing them for 5s.
- Provides us with an interrupt to stop elites from casting annoying skills and interrupt some raid and dungeon boss mechanics.
- Renewal Prayer: Revives the nearest ally within 3m and applies weakness. Weakness: Unaffected by same type of effects for 60s (Weakness effects are enhanced in party dungeons in Nightmare mode).
- A great defensive option to use when we know we will take a big hit.
- Life Barrier: Immediately grants the caster and up to 10 nearby allies (party members prioritized) a shield equal to 20% Max HP, and while the shield persists, increases 15% additional Resistance for 10s.
- A good tool to use when the tank is pulling enemies in a dungeon to avoid drawing aggro to yourself.
- Silent Command: Dispels negative effects from up to 10 allies within 25m (party members prioritized).
- A good tool for situations when you need to dodge often or chase after high movement enemies.
Talents
Important!
Embedded is our recommended core max-level Concerto talent tree containing all the specs' top talents alongside 2 flex points you can spend on player choice talents you like most.
Gameplay Altering Talents:
Below is an outline of all the gameplay-altering effects you need to be aware of in the Concerto spec.
Beat Performer Tree
- String Expansion - Upgrades the Performance Passion resource’s maximum points from 5 to 6, which is also taken into account by the Ultimate’s doubling effect (for up to 12).
- Melody Chord - Increases the generation speed of Performance Passion based on our Haste% at a 1% : 1% Haste to REG SPD ratio.
- Passion Surge - nts us occasional free uses of our Special Attack (no Performance Passion consumed) when our Melody is active.
Concerto Tree
- Concerto Spec - Replaces our Special with Healing Beat, an AoE healing skill. Also reduces the cooldown of andFivefold Crescendo
![Imagine]() by 1 second every second thatPassion Burst
by 1 second every second thatPassion Burst![Imagine]() is active. Our goal to maintain this Melody effect is reinforced as it will now drastically cut powerful ability cooldowns.Healing Melody
is active. Our goal to maintain this Melody effect is reinforced as it will now drastically cut powerful ability cooldowns.Healing Melody![Imagine]()
- Stat Resonance, Stat Resonance Crit and Stat Resonance Overload - The backbone of this Spec, which scales excellently into the late game. While is active, it provides allies with a buff equal to 8% of our Intellect, with the buff being the allies’ primary scaling stat between Agility, Strength, or Intelligence. Due to being a percentage buff, it starts out weak but becomes potent once we max out our gear and talent tree.Healing Melody
![Imagine]()
- With “Stat Resonance Crit”, the buffs will be doubled (8% → 16%) for 10 seconds after (either version) is cast, making it essential to use it every 10 seconds.Passion Burst
![Imagine]()
- “Stat Resonance Overload” additionally multiplies these buffs for 15s after casting . With all effects combined, we get a massive scaling of 32% of our Intellect towards allies’ primary scaling stat.Encore
![Imagine]()
- Brilliant Charge - Provides Performance Passion when Healing Beat or critically hits on heals or damage. This helps our Passion generation significantly for our spender abilities.Passion Burst
![Imagine]()
- Passion Burst: Fervor - Empowers whenever we consume 10 Performance Passion, allowing us to move while casting the ability. On top of that, damage is instead inflicted over time with no channeling required. It can still be canceled if needed to use other abilities.Passion Burst
![Imagine]()
- Crit Charge Rhythm - The most important node for Passion Energy generation. It makes andFivefold Crescendo
![Imagine]() now generate Energy every time they Crit, whether through heals or damage. This node is essential for keeping up our Healing Melody permanently.Healing Melody
now generate Energy every time they Crit, whether through heals or damage. This node is essential for keeping up our Healing Melody permanently.Healing Melody![Imagine]()
- Sonic Verdict - Required so that can deal damage, which will happen whenFivefold Crescendo
![Imagine]() is active. This ability’s new means of dealing damage can now activate previous and future talent effects that rely on crit damage.Healing Melody
is active. This ability’s new means of dealing damage can now activate previous and future talent effects that rely on crit damage.Healing Melody![Imagine]()
- Concert Circuit - Empowers our Ultimate, enhancing the number of hits and letting us move during casting. We unfortunately lose the Shield provided by the base ability version, but trade it for stronger healing and damage
- Tower Resonance - Makes Encore permanent for ourselves, boosting our Encore String proc rate. It additionally reduces the cooldown of every Expertise ability by 1s every time an Encore String is triggered. Very impactful for reducing the cooldown of important abilities like orFivefold Crescendo
![Imagine]() so that we may maintain maximum party buff power.Passion Burst
so that we may maintain maximum party buff power.Passion Burst![Imagine]()
- Crit Healing - A very simple talent that buffs Crit Healing by 25%. Despite its simplicity, it is a very rare bonus that increases our total healing by around 10%, making it a must-pick-up talent.
- To reach it, we have to sacrifice a few talent points by pathing through the “Vitality Unleashed” node, which we cannot make use of at all in our build.
- Encore Chain - Doubles the activation amount of Encore String, meaning double the damage and double the healing!
- Critical Encore - Increases our chance of triggering Encore Strings based on our Crit Rate stat. Unfortunately, it does not work with the Crit gained by on-hit effects of the ability, such as the one provided by “Crit Scale”.
- Encore Chain - Massively improves the Encore Strings we can activate within 10 seconds of casting by making every Expertise Skill cast in this time trigger the effect. Synergizes extremely well with all previous Encore String based talent nodes.Encore
![Imagine]()
Player Choice Talents
- Intellect Nodes - Despite not granting any new effects, each node will grant 10 Intellect, or 20 if using both talent points. This boosts our party buff slightly, which therefore makes it a viable option for our flex points.
- Rhythm Spirit - Helps with the regeneration of Performance Passion in content with packs of enemies. This talent node also paths through one additional 1 Intellect node.
- Multi-Target Heat Amp - Empowering the strength of when hitting more enemies. Fine in AoE situations or the tower.Passion Burst
![Imagine]()
Recommended Concerto Build
If you want to create your own Talent tree, check our tool:

Gear
Important!
All gear & talent related info is based on extensive in-game testing, parsing, theory crafting and simulations. If you want to learn more about how damage works to understand our decisions, check out our Damage Formula Guide.
Main Stats
- Crit Rate - Our most important stats for the following reasons:
- Many of our Encore Strings triggers are based on Crit Chance
- The regeneration of Performance Energy on Crit of Fivefold Crescendo and Healing Melody.
- Our goal is to have as much crit as possible, with a minimum of 1850 points. The suggested amount is any value between 40% to 50% crit. Every excess point should also be placed in this stat.
- Haste - Haste is an essential stat for reducing the time between healing intervals in Healing Melody as well as decreasing the animation time for our abilities. It’s strongly advised to reach 20% Haste (1140 Haste); however, this stat also scales badly from this breakpoint onwards and is not recommended to further invest into.
- This Class it’s based on Attack speed, with most of the ability animation scaling it with. Meanwhile “Fivefold Crescendo” and “Concert Circuit” being Casting ability scales on cast speed. Since those can be canceled we will prioritize having attack speed buffs in case rather than Cast speed buffs.
- Versatility - This stat is always beneficial, providing an extra multiplicative boost on top of everything else to healing. Stats suffer diminishing returns, so building a bit of Versatility can help a lot more for damage than overcommitting to one or two other stats.
- Luck - An okay choice as it can empower our healing by a more significant margin than if we overinvested in Versatility. It is still a low priority versus previous stats, due to us having no other benefits to taking Luck.
- Mastery - A very particular stat, which, for our Spec, will slow down Healing Melody’s Performance Energy consumption, at a ratio of 0.35% for 1% of mastery. It is great in the early game when our Crit is on the low end, but it is weak in the late game once we have reached satisfactory amounts of more optimal stats.
Bonus Stats
In gear slots you’re not using Set Gear in and which aren’t taken up by your class's signature Class weapon (if you have it), prioritize the following Purple Stats:
Helmet, Armour, Gloves, Boots
Intellect%
Weapons & Accessories
MATK% = Healing% > Cast Speed%
Set Gear
Concerto’s 2P and 4P set bonuses are both definitely worth equipping as soon as you’re able to complete Raids and are better than Purple Bonuses. Here is what they do:
2-piece SET
The Healing of Healing Beat +20%.
4-Piece SET
When the
Class weapon
Our Class Weapon is also definitely worth using over purple stats. Instead of a purple stat, it grants:
- 15% Crit Heal .
- Increased stats .
Note!
The percentage value shows the impact of the module compared to not having any module equipped (each module is calculated based on it being +6).
Here are the best modules for Beat Performer - Concerto - listed in priority order:
Lvl 3: +0.84%
Lvl 6: +10.43%
Provides Magic Attack and INT - two great stats. It also boosts our healing capabilities from Expertise abilities. Our biggest burst heals are from Expertise skills, making this our best option.
Intellect share gain: +1.73%
Lvl 3: +0.45%
Lvl 6: +5.94%

The Crit buffs are powerful, benefitting both our healing and damage. This is a very welcome contribution to our kit.
Lvl 3: +0.84%
Lvl 6: +3.29%

Provides Magic Attack and INT, two great stats. It also boosts most of our healing capabilities from Specials. Our second-best choice, due to how often we will be casting Healing Beat.
Intellect share gain: +1.73%
Lvl 3: +0.84%
Lvl 6: +2.48%

A good module for additional Magic Attack, along with some INT, which increases our party buffs slightly. Even if it appears on the DPS nodes, it is still worth considering till we unlock Extreme modules.
Intellect share gain: +1.73%
Lvl 3: +0.45%
Lvl 6: +2.25%

Grants us some Luck Dmg% and Luck Healing% as well as some extra DMG%. Since we lack Luck it's not a good option.
Lvl 3: +0.68%
Lvl 6: +1.69%

Grants Magic Attack, along with Attack Speed that is very valuable for reducing Fivefold Crescendo and Healing Beat animation. We prefer this over Cast focus due to the casting ability being something we can cancel earlier. The QoL provided while using it it’s minimal but it does exist.
Attention!
We have divided the Imagines into 2 different categories: one for amplifying the team's damage, and one for survivability/quality of life. The first category is our general recommendation, for its team-wide buffing capabilities, but the second can’t be underestimated.
Premium Offensive

Premium Defensive


Top Imagines - Universal
- - Tina is the best supportive Imagine in the game and is usually expected to be run by sustains. Tina grants the party a 50% cooldown reduction for 20 seconds. This allows us and our party to regain their cooldowns more quickly, improving survivability, healing, and most importantly, group damage significantly.Tina
![Imagine]()
- Once a party member is affected by this effect, they can’t be affected again for 60 seconds.
Top Imagines - Party Damage
- - Grants us a permanent 10% Intellect with an additional 20% during its activation effect. This significantly enhances our ally buffing power through the Intellect conversion and makes it our best Imagine option, whilst also being cheaper than most. Be sure to try to time your 32% damage buff while the +20% INT buff is active.Inferno Goblin Mage [A5]
![Imagine]()
- - Providing a general Elemental buff for 10s up to 10 allies, since both Elemental Damage are very scarce and the duration is pretty good, if used during the bust can empower the team damage by a significant margin. Making this Imagine one of the overall best Imagines as support. It’s suggested to always have 2 copies and no more for a 20 main Raid.Basilisk
![Imagine]()
- - This Imagine pulses damage in a large area, applying up to an 8% generic damage taken debuff on enemies hit for the whole party. This debuff isn’t that strong as it only lasts 8 seconds, and stacks additively with all other sources of non-elemental DMG%, resulting in it usually being heavily diluted. Due to Brigand Leader not stacking and being a priority for other classes in 20-man content; it’s suggested to prioritize this Imagine. Brigand Leader will perform better in 5 main raids but we can’t recommend the farming of 2 Golden Imagines due to the existence of Tina and Inferno Goblin Mage.Venobzzar Incubator
![Imagine]()
- - Brigand Leader increases your and your team’s Attack %, allowing for more damage. It also scales very well with Luck. Every Lucky Strike will now apply a DoT, with the catch being that DoT will immediately tick every Luck application, allowing it to serve as an on-hit effect as well. Despite not stacking luck, it is still good to time using the active of this Imagine to maximize your party's damage. .Brigand Leader
![Imagine]()
- The ATK buff is unique and cannot be stacked, meaning in high party count content, you may want to use a variety of support Imagines.
- - This Imagine converts our abundant Healing in damage done, and it also heals and does damage with his active. Since our healing are very strong and consistent it makes this Imagine overall the best purple option aside Inferno Goblin.Goblin Shaman
![Imagine]()


Top Imagines - Defensive
- - When cast, summons Airona who performs a short prayer before reviving up to 4 downed teammates. Airona is powerful in standard play to resurrect teammates and can be used as a part of resurrection cheese strategies as well. While very useful, this Imagine is frequently run on tanks, meaning you won't always need to run it unless you’re running strategies that require 2 or more Airona.Airona
![Imagine]()
- Allies resurrected by Airona can’t be resurrected by her again for 60 seconds
- - Upon use, Muku King joins the battle and provides healing and 10% healing received for up to 10 allies and dispels debuffs from them during his channel duration. Passively, he provides an 8% Healing buff and a shield that triggers when allies are healed. The shield is based on our attack and is relatively small. However, it is one of the only ways we can provide shielding to our teammates for extra effective HP.Muku King
![Imagine]()
Class
| Name | Description | Notes |
|---|---|---|
| 1 Intellect | When current HP is above 80%, Intellect +265; loses effect when HP is below 80% | Allow us to share stronger buffs with a good uptime |
| 2 Encore | Encore Dream DMG triggered by yourself or teammates +23.3% | Buffing the most damage we do |
| 3 Passion Burst | Dream DMG of Passion Burst and Passion Fury +87.5% | Amplifies the damage we do with the only damaging ability |
General Offensive
| Name | Description | Notes |
|---|---|---|
| 1 Special Attack | Intellect +75; Intellect +2% | Our scaling stats for everything including the buffs |
| 2 Crit +, Mastery - | Crit gained in any way +10%, but Mastery gained in any way –6% | Helps us reach a very good threshold of crit sacrificing a useless stat. |
| 3 Element | All Element +212 | Empowers our Fire bonus for stronger heals and damage |
| 4 Versatility | For 6s after casting an Expertise Skill, Versatility +120, stacking up to 5 times | Even if the uptime is not perfect it helps us staking more heals |
General Defensive
| Name | Description | Notes |
|---|---|---|
| Class - Fivefold Crescendo | When you cast Fivefold Crescendo, 65% of the overhealing will continuously recover over 10s | Distributing our strongest heals as Heal over time and allowing better sustain |
| 1 Damage Reduction | When incoming damage exceeds current HP, that damage is reduced by 35% (up to once every 30s) | Allows us to proc Life Wave in moments where we aren’t getting hit. |
| 2 Max HP | Max HP +6000; Max HP +1.5% | Helps with survivability. |
| 3 Endurance | Endurance +300; Endurance +2.4% | Contributes towards our small HP pool. |
Oblivion Dream: Applies Oblivion Dream, inflicting Oblivion on enemies within 5m.
- Oblivion: Atk -20%, Dream Damage Taken +10%, Move Speed -20%
We take this node for amplifying the damage of our allies through the Dream damage buffs and stats provided with this path that largely buff our team.
Culinary
- Bearcut Patty / Hearty Stewmix - The most Magic ATK we can get from a food buff, empowering both the damage and the healing we can do.
- Seabreeze Special - This provides a bit less healing, but gives us a little more damage on elites and bosses.
Alchemy
- Fire Serum - The best and only choice for our Alchemy consumable when aiming for maximum healing and damage.
- Crit - This is the best sigl pick, as we will always benefit from additional Crit Rate.
- Intelligence - An alternative option for other gear is to pick more intellect for high buff share.
Rotation & How to Play
Our first goal is to maintain Healing Melody and the Passion Burst bonus constantly during the fight. During the burst windows of our allies, we additionally want to activate Encore for an even larger share of the party buff effect ( 32% of our Intellect ).
Using Encore again when up results in around a 50% uptime of this buff.
Imagines
Note
Our Imagines are not always needed, as some provide certain utility rather than helping the team deal more damage. Buff-oriented Imagines (like
) should be preserved for DPS burst windows rather than activating them whenever. Survivability-oriented Imagines, on the other hand, should only be used defensively. If we are lacking Performance Energy or missing impactful ability cooldowns, then you can use these to help bridge the gap.Inferno Goblin Mage [A5]
Opening Rotation during Burst
- Use Available Imagines
- Activate if not upHealing Melody
![Imagine]()
- Encore
![Imagine]()
- Passion Burst
![Imagine]()
After opening our rotation with these abilities, we then want to follow a set of rules rather than a fixed rotation. Here is the priority system:
- Position our Speaker from near the boss or allies. Deactivate it during scenarios where damage or healing isn’t possible.Healing Melody
![Imagine]()
- Prioritize using in coordination with DPS burst windows.Encore
![Imagine]()
- should be used every 10 seconds. Always use the Tier 1 form for a faster cast.Passion Burst
![Imagine]()
- The enhanced version of doesn't share a CD with the base version, and can also be canceled for a short animation if needed to keep this 10s buff up.Passion Burst
![Imagine]()
- has to be used on cooldown to refill Performance Energy. Keep one Performance Passion ready for this ability, for 3 total when considering other generation effects.Fivefold Crescendo
![Imagine]()
- Healing Beat and its discounted version can be used between the usage of other abilities to heal. It can also provide Performance Passions points while critting, making this positive gain if it does land a crit while discounted.
- , whilst enhanced as “Concert Circuit”, can be used for burst healing in dire situationsRock the Stage
![Imagine]()
- s if doing nothing elseString Strike
![Imagine]()
Gameplay Tip
By enabling the Free Cast Mode in Settings, we’ll be able to use the

Can Concerto be played on auto?
When playing Concerto on Autoplay, there are a variety of problems. It is not recommended to do this when trying to heal the party effectively. Concerto Beat Performer focuses a lot on pressing the right buttons at the right time to help out the party with buffs and heals. The autoplay has no regard for this and will just press everything as soon as it comes up. We also need to use our camera to face towards enemies when casting enhanced Passion Burst, which the autoplay will never do.
There isn’t a good way to play semi-auto to help resolve this, either, since if you were to disable all of the skills that contribute to the big buff, you would simply be playing manually.