


Stormblade - Iaido Slash is one of the classes available in Blue Protocol: Star Resonance. They fulfill the DPS role while wielding a Reaper Scythe as their weapon of choice. Find their best build and how to play them properly in our guide. Difficulty:
Stormblade has also access to a second spec - Moonstrike - and if you're looking for a guide to that spec, check here.
Last guide update
10.02.2026


Overview
Best Skills
Talents
Gear
Rotation & How to Play
Spec Overview
Iaido Slash Spec (Iaido for short) leans further into Thunder Sigil usage and has a very big focus on burst damage. The Spec also grants access to evolved forms of multiple “spender” abilities via the talent tree (they are currently seen as unviable for endgame content, however).
- → Thunder CutIaido Slash
![Imagine]()
- → DracoflashFlash Strike
![Imagine]()
- → Phantom SlashRaijin Dash
![Imagine]()
Specializing in Iaido Slash Spec will grant “Iaido slash” passive benefits such as %damage increases and CC immunity, on top of its talent tree granting benefits such as increased maximum sigil count and full cooldown resets. This spec also focuses on the skill
Pros
- Exceptional burst damage.
- Fantastic endgame scaling.
- Very High maximum damage potential.
Cons
- Low damage outside of burst.
- High reliance on Crit Rate to be consistent.
- No party buffs and lower utility than other classes.
- Burst rotation can be interrupted when Crits are missed.
- Not auto-friendly.
- Requires raid/dungeon knowledge for when to use cooldowns.
Note: Although the bulk of Iaido strikes damage is considered Ping reliant. (Lower Ping = faster resets during Volt Surge = more damage) People playing with moderate to high Ping can set up the auto battler to operate during burst windows to bypass the Ping issue. Making the issue of Ping on Iaido strike almost entirely irrelevant.
Note
These recommendations assume you have Level 140/150 Set Gear and a Level 150 Relic Weapon.
Pieces marked in Orange will be your recommended stats if you use Set pieces. Purple lines are only applicable for non-set gear. Additionally, the Relic weapons will not have Purple Lines or Reforges.


Stat Tuning
We must first maximize our Crit as much as possible, reaching about 60%. After hitting that cap, the focus shifts to finding the optimal balance between Versatility and Mastery. The final step is allocating a small amount of Haste to gain the benefit of quicker animations, it’s suggested go go for about 60% As max or 30% haste.
Recommended Imagine Combo


More information on imagines in the Gear Section.
Optimal Season 1 Endgame Gear
Note
These suggestions assume you have level 80 Gear and a level 90 Weapon.
Pieces marked in Orange will be your recommended stats if you use Set pieces. Purple lines are only applicable for non-set gear. Additionally, the Relic weapons will not have Purple Lines or Reforges.
Stat Tuning
We must first maximize our Crit as much as possible. After hitting the 60% cap, the focus shifts to finding the optimal balance between Haste and Mastery. The final step is allocating a small amount of Versatility to deal a bit more damage.
We are aiming for 30% attack speed, which can be achieved with ~15% Haste and the module if you have no purple lines, and a bit less if you do. If you’re able to reach the desired attack speed without attack speed purple lines, then focus on getting Attack % instead.
Recommended Imagine Combo

For alternative options, check the Gear tab.
Level 60/70 setup
For level 60/70 gear information, open the box below.
Note
These suggestions assume you have level 60 Gear and a level 70 Weapon.
Pieces marked in Orange will be your recommended stats if you use Set pieces. Purple lines are only applicable for non-set gear. Additionally, the Relic weapons will not have Purple Lines or Reforges.
Stat Tuning
We must first maximize our Crit as much as possible. After hitting that cap, the focus shifts to finding the optimal balance between Versatility and Mastery. The final step is allocating a small amount of Haste to gain the benefit of quicker animations.
Recommended Imagine Combo
For alternative options, check the Gear tab.
Best Skills
Basic ATK
Skill
Ultimate
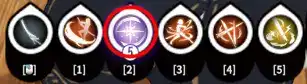
Slot 1 - Mandatory
Slot 2 - Mandatory
Slot 3 - Mandatory
Slot 4 - Flex


Thunder Sigil - Thunder Sigils (Sigils for short) are our main resource, which we need in order to use our most powerful abilities, “Spenders”. Spenders can be used as soon as you have at least 1 Sigil, but have their ATK scaler multiplied by 25% per Sigil consumed. Because of this, our abilities are at their strongest when used with maximum Sigils.
Note
Here is how the math of Sigils works on a 150% ATK scaler ability: 150% x (1 + (25% x Sigils Spent)). Sigils do not multiply the flat damage of abilities.


Blade Intent - Blade Intent, Stormblade’s energy bar, it's only useful for increasing the attack speed of our spenders through their inherent abilities and talents. You always want Blade Intent, but it’s also generated for free without doing anything in our rotation, so you can ignore it.
Fixed Skills
- - Stormblade’s basic attack is only useful for Iaido during downtime in order to trigger one of the class's core talent effects, Piercing Slash. You’ll be spamming it during downtime for this effect, but nothing more.Judgment Cut
![Imagine]()
- (Evolved: Thunder Cut) - Our best Sigil spender that makes up a huge amount of our damage, it has a 1-second cooldown and can be instantly cast at 100 blade intentIaido Slash
![Imagine]()
- The skill can evolve into Thunder Cut, but we don’t use that talent currently.
- - Our ultimate deals solid AoE damage and generates maximum Sigils after use. It also pulls all eligible enemies in front of you to your position, serving as a grouping tool. Use it to gather enemies or whileOblivion Combo
![Imagine]() is on cooldown and there are no stacks of piercing slash.Volt Surge
is on cooldown and there are no stacks of piercing slash.Volt Surge![Imagine]()
Mandatory Skills
- - Our baseline Sigil generator that generates a measly 1 Sigil on use but has 5 charges. Used to kick start our combo during Volt Surge for maximum Sigils, or after triggering Piercing Slash, which upgrades its generation from 1 to 3 during downtime. Usually not worth using outside of these cases. It can be animation cancelled and is highly recommended to significantly speed up rotations and reduce downtime.Overdrive
![Imagine]()
- - Responsible for our godlike burst damage and the majority of our DPS. Causes all Sigil generation to instead generate the maximum amount for 12 seconds. Also provides Flat ATK, %ATK, and Super Armor. With the right talents and enough crit rate, Volt Surge allows us to spam 6 sigil spenders back to back continuously.Volt Surge
![Imagine]()
- (Evolved: Dracoflash) - Our other Sigil spender, which while weaker than Iaido Slash, is crucial to use during our Volt Surge combo to fill in gaps during Iaido Slash’s 1-second cooldown. Despite its 15-second cooldown, there are talents that in most cases completely bypass its cooldown via resets and quickcasting.Flash Strike
![Imagine]()
- The skill can evolve into Dracoflash, but we don’t use that talent currently.
Flex Skills (Choose 1)
- (Evolved: Phantom Slash) - An optional alternative spender to Scythe Wheel that deals considerable damage in multi-target situations. Has a huge 25-second cooldown, but this can also be completely bypassed with talents. This ability is not preferred for a majority of content due to its lengthy animation time, but can optionally be used for AOE in content such as Stimen Vaults and Adept Trials.Raijin Dash
![Imagine]()
- The skill can evolve into Phantom Slash, but we don’t use that talent currently.
- - Our sole defensive tool. Grants full immunity for roughly 2 seconds on use. If hit during this period, you will counter, with the option to recast for an extra attack that maxes out your Sigil count.True Sight
![Imagine]()
- Note: The most useful flex slot given proper mastery of the content its used in and recommended over all other flex slots in master dungeons
- - Summons a spinning scythe for 35 seconds to continually strike enemies. The damage from this ability isn’t impactful but the extra hits it provides can help keep certain Imagines and effects active such as Muku Scout. If you’re using Muku Scout you can use Scythe Wheel to boost its consistency.Scythe Wheel
![Imagine]()
- Tip: Can be summoned before combat. Also the direct damage portion of this ability is negligible and can/should be cancelled by using a dash during its animation. Doing this saves time but will still summon the spinning blade to achieve our goals.
Skill Priority
>Iaido Slash>>>Flash Strike>Volt Surge=Judgment Cut>Oblivion Combo>Overdrive/True SightScythe WheelEnsure all abilities you’re using are levelled to 30 - only advancement requires consideration.
Focus on advancing
- Overclock Wave: Releases an energy wave, interrupting all targets within 5m.
- Provides us with an interrupt to stop elites from casting annoying skills and interrupt some raid and dungeon boss mechanics.
- Unyielding Spirit: Grants 35% additional Resistance for 5s. This skill can store 2 charges.
- A great defensive option to use when we know we will take a big hit.
- Master of Stealth: Conceals the caster's presence to prevent Aggro generation and cleanses all debuffs from the caster for 10s.
- A good tool to use when the tank is pulling enemies in a dungeon to avoid drawing aggro to yourself.
- Energy Reflux: Instantly recovers 50% Stamina and increases Movement Speed by 15% for 5s.
- A good tool for situations when you need to dodge often or chase after high movement enemies.
Talents
Important!
In order to utilize this talent tree to its maximum potential, it is assumed that you have 50% Crit rate minimum when standing in town.
Gameplay Altering Talents
Below is an outline of all the gameplay-altering effects you need to be aware of in the Iaido Slash spec.
Base Stormblade Tree
- Iai Thunder Dance - Every 3 Sigils generated causes your next Special Attack to deal its damage twice. This talent is double damage for and grants it 2 chances to Crit instead of 1, making our rotation far more consistent. Further incentivizes only using spenders with a high Sigil count.Iaido Slash
![Imagine]()
- Keen Strike - Grants Basic Attacks a 10/20% chance per hit (scaling with enemies and number of hits) to trigger Piercing Slash, dealing damage and causing our next to generate 3 Sigils instead of 1. A must have for Sigil generation whileOverdrive
![Imagine]() is on cooldown, consume Piercing Slash during downtime as soon as available.Volt Surge
is on cooldown, consume Piercing Slash during downtime as soon as available.Volt Surge![Imagine]()
- will glow purple when enhanced by Piercing Slash.Overdrive
![Imagine]()

- Swift - Improves our Haste% → ATK SPD% scaling from 1:0.6 → 1:1.6, making Haste a far more valuable stat to build, despite the fact it isn’t one of our “thumbs up” stats.
Iaido Slash Tree
- Flash Frenzy Blade - Upon critically striking with , gains a fixed chance to reset the cooldown ofIaido Slash
![Imagine]() / Raijin Dash based on how many Sigils are consumed. Enables the ability to form chains of alternatingFlash Strike
/ Raijin Dash based on how many Sigils are consumed. Enables the ability to form chains of alternatingFlash Strike![Imagine]() es andIaido Slash
es andIaido Slash![Imagine]() s, which make up the backbone of our burst combo.Flash Strike
s, which make up the backbone of our burst combo.Flash Strike![Imagine]()
- Zen Moment - Allows us to consume and immediately regain our Blade Intent on Crit, maintaining a constant 100 with enough Crit Rate, improving our attack speed.
- Thunder Sigil Rewind - Boosts Sigil generation by refunding after consumption. When combined with ’s ability to convert any Sigil gained into 6, this becomes incredibly potent.Volt Surge
![Imagine]()
- Dual Blade Intent - Massively accelerates and Raijin Dash animation while at 100 Blade Intent. Also improves the Crit Rate of both abilities and their evolutions by 10%. The speed gain from this talent makes it a must-have.Flash Strike
![Imagine]()
- Does not cause any of these abilities to consume Blade Intent.
- Duel Awareness - Doubles the chance for Thunder Sigil Rewind to trigger during but halves our Sigil Multiplier from 25% to 12.5%. Hurts our damage ceiling but is what allows us to spam exclusively 6 sigil spenders during our burst window, making our average rotation much more consistent in power.Volt Surge
![Imagine]()
- Vacuum Slash - With the recent balance patch buffing the animation speed of this ability, it is a great option to take to deal extra damage.
- Thundrage / Thunder Might - These talents make up the “evolution” playstyle that is currently not considered optimal due to evolved abilities not benefiting from Blade Intent speed bonuses. Without it, these abilities take far longer to cast and cause the playstyle to fall behind a pure -focused build.Iaido Slash
![Imagine]()
- Wind Assault I & II - These talents grant a crit rate increase and a luck decrease. They are a must since we are so reliant on crit and luck does nothing to contribute towards our kit.
Iaido Slash Crit DMG Variant
If you want to create your own Talent tree, check our tool:

Gear
Important!
All gear & talent related info is based on extensive in-game testing, parsing, theory crafting and simulations. If you want to learn more about how damage works to understand our decisions, check out our Damage Formula Guide.
Main Stats
- Crit Rate - Crit is Iaido’s most important stat to stack for the following reasons:
- We possess multiple Crit DMG talents that provide damage only on CRITs.
- Critically striking on certain abilities is required to perform the best rotations, as it regenerates our Blade Intent and also resets Flash Strike’s cooldown. Missing Crits interrupts our burst rotation.
- The goal is for 1 of the 2 hits from Iaido Slash to always Crit to recover our Blade Intent and reset Flash Strike. Build towards 70-80% Crit Rate on Iaido Slash (after including all talents) in endgame to start with. Aim for more than this at higher gear levels.
- Stat goal: 2500+ flat Crit Rate.
- Mastery - Mastery adds an additional multiplier to the Sigil multiplier at a rate of 2.5% Multiplier per 1% Mastery. This multiplier is additive with the Sigil bonus and will always be active in a static amount regardless of how many Sigils are consumed (minimum 1).
Note
Here is how the math works on a 150% ATK scaler ability: 150% x (1 + (25% x Sigils Spent) + Total Mastery Multiplier)
- Haste - Thanks to the Swift talent, we possess incredible Haste scaling; stacking it grants absurd ATK SPD%, accelerating our rotation, allowing for more abilities per Volt Surge.
- Versatility - This stat is always beneficial as it provides an extra multiplicative boost on top of all other DMG increases. Stats suffer diminishing returns, so a small amount of versatility is recommended.
- Luck - Whilst not a completely dead attribute, Luck does not scale with anything major in the Iaido Spec; avoid it if you can.
Bonus Stats
In gear slots you’re not using Set Gear in and which aren’t taken up by your class's signature Class weapon (if you have it), prioritize the following Purple Stats:
Helmet, Armour, Gloves, Boots
Agility%
Weapons & Accessories
ATK SPD% > Melee DMG% = DMG% vs. Bosses = ATK%
Set Gear
Iaido’s 2P and 4P set bonuses are both definitely worth equipping as soon as you’re able to complete Raids and are better than Purple Bonuses. Here is what they do:
2-piece SET
When your Class Skill deals Crit DMG to the current target, Crit DMG +2% for 5s, stacking up to times.
4-Piece SET
While Volt Surge is inactive, Overdrive yields +1 Thunder Sigil.
Class weapon
Our Class weapon is also definitely worth using over purple stats. Instead of a purple stat it grants:
- 15% CRIT DMG.
- Increased stats.
Note!
The percentage value shows the impact of the module compared to not having any module equipped (each module is calculated based on it being +6).
Here are the best modules for Stormblade - Iaido Slash - listed in priority order:
Lvl 3: +0.98%
Lvl 6: +8.35%

Since Iaido Slash, a Special Attack, makes up a massive share of our damage, meaning a Special Attack Elemental DMG% increase is one of the best gains we can hope for.
Lvl 3: +0.98%
Lvl 6: +8.11%

A great module for damage, since we are often fighting at least one Elite or higher-level enemy. Not active outside of Elites/Bosses.
Lvl 3: +0.98%
Lvl 6: +7.57%

Providing Agility and General Physical Damage once at the max level, making it the strongest buff overall.
Lvl 3: +0.84%
Lvl 6: +6.45%

Falls behind our top three options, but still a reasonable choice if it’s all you can assemble, thanks to its ATK SPD% increase. We can also opt for having Atk% lines instead of Attack Speed, since this node can cover the amount needed.
Lvl 3: +0.37%
Lvl 6: +6.36%

CRIT DMG is a powerful stat, but having one portion of this module's stats be defensive holds it back. Roughly as strong as the Attack Speed module.
Lvl 3: +0.63%
Lvl 6: +5.28%

Even if it provides strength that is not useful, it does provide Def ignore once at the maximum level. Unfortunately, this is not enough to make it a very competitive option.
Lvl 3: +0.37%
Lvl 6: +1.60%

It provides Luck DMG Multiplier, but since the majority of our abilities can’t Lucky Hit, it's not a good option.
Premium

F2P
Universal
- - This imagine is overall the best DPS imagine that we can ask for, providing a 10% unique multiplayer during his active and a stacking 1.2% bonus added to that multiplayer based on hits done up to 5 times. Those buffs last essentially for 35s due to the extension properties this imagine has, providing essentially a 16% final multiplayer that is very strong and makes this imagine the best overall on every DPS. Additionally this imagine provides 1% lifesteal and has 2 Charge making it able to be used roughly every 60s instead of 120s as others, Making it having an almost perfect uptime on burst windows.Rorola
![Imagine]()
Top Gold Imagines
- - Muku Chief provides passive +%CRIT DMG alongside a powerful active ability that grants even more +%CRIT DMG as well as +Flat Crit Rate. Furthermore, it has two charges, allowing superior uptime compared to other Imagines. Chief not only boosts our damage but also boosts the consistency of our combo as well.Muku Chief
![Imagine]()
- - Phantom Arachnocrab grants passive +Flat Mastery and additional +%Mastery on use. Mastery boosts the damage of our finishers, which we’ll be spamming constantly during Volt Surge, making the crab a great choice.Phantom Arachnocrab
![Imagine]()

Top Purple Imagines
- - This Imagine offers substantial flat Mastery through its passive effect and additional Mastery% when activated, enhancing our mastery scaling and making it stronger than the A2 or lower Arachnocrab.Blackfire Foxen [A5]
![Imagine]()
- - Brigand Scout Leader grants 10% Agility passively and a further 20% temporarily on use, which together form a tremendous damage increase. While powerful for Agility classes, it is specific to exactly that attribute, making it a less flexible investment than more generic options.Brigand Scout Leader [A5]
![Imagine]()
- - Muku Scout 5 grants us a passive 15% ATK, provided we are consistently hitting attacks. Upon activation, it doubles the stacks, giving a tremendous 30% ATK buff, amplifying the entirety of our damage. A generic, accessible, and exceptionally strong option.Muku Scout [A5]
![Imagine]()
- While numerically our best option, the passive of Muku Scout is harder to keep active on Iaido Slash than other specs (although it’s still very doable). If you’re struggling or worried consider Brigand Scout Leader instead or using Scythe Wheel to boost hit count.
- - It provides fluctuating Critical Damage that averages around 15% CRIT DMG. When active, it grants bonus CRIT DMG and Crit points that scale with the equipped "Cabbage series" emblem. This makes it one of the strongest alternatives thanks to its high uptime and power.Gloomy Cabbage [A5]
![Imagine]()
- - Boarrier Tyrant is a Special Attack-centric Imagine, making it a great choice for amplifying our Iaido Slash damage. On top of this, you can receive a few copies of this Imagine’s Will for free through the new player rewards. Not as strong as Imagines above, but still solid.Boarrier Tyrant [A5]
![Imagine]()


Class
| Name | Description (Lvl 10) | Note |
|---|---|---|
| 1 - Iaido Slash | Iaido Slash Dream DMG +5% | A good buff to our most frequently used ability. |
| 2 - Thunder Cut | Thunder Cut Dream DMG +8.35%; Increases the Casting SPD of Thunder Cut | Amazing buff to thunder cuts viability, making triple flashing more accessible. (ping dependant) |
| 3 - Flash Strike | Flash Strike, Raijin Dash Dream DMG +7% | A boost to our other sigil consumption abilities. |
| 4 - Volt Surge Sigil | When Volt Surge is not active, gains 1 Thunder Sigil every 5s, and when Iaido Slash deals damage to the current target, there is a fixed 16.2% chance to trigger Piercing Slash. | It is possible to run this alongside the talent “Flash Sharp Strike”, but it does not save us many Overdrive casts. |
General Offensive
| Name | Description (Lvl 10) | Note |
|---|---|---|
| 1 Element | All Element + 212 | We don’t build luck, so this is a decent increase to mastery without any disadvantage. |
| 2 Agility | Agility +75; Agility +2% | Increase to our main stats which is nice. |
| 3 Special | Special Attack Dream DMG +6.5% | Since a majority of our damage is special attack damage, this is a good choice. |
Defensive
| Name | Description (Lvl 10) | Note |
|---|---|---|
| Class - Volt Surge | During Volt Surge and Stormflash, restores 8% Max HP per second | A decent option for us, giving us some HP regen during our burst window. |
| 1 Damage Reduction | When incoming damage exceeds current HP, that damage is reduced by 35% (up to once every 30s) | Helps with survivability. |
| 2 Max HP | Max HP +6000; Max HP +1.5% | Contributes towards our small HP pool. |
| 3 HP Stack | If no damage is taken for 8s, Max HP +3.5% for the next 10s, stacking up to 3 times | This factor is a must have if you are using the Life Wave module, helping to maintain its uptime. |
Mirage Dream: When Basic Attack or Special Attack deals 12 hits to the main target (melee skills count +1), triggers Mirage Dream for 8s, stacking up to 10 times .
- Mirage Dream: ATK +18 per stack (up to +50, scaling with season level).
- Split Nodes: Battlestart - Rare -> Rapid Assault Stacks -> Class DEF -> Beauty of Refinement -> Immortal Stance
While most other classes that use this Psychoscope would opt for the 13 stacks, we opt for 8 max stacks but starting every fight at maximum due to being a burst class. It is also helpful to reach the stack max more quickly for the 5% extra crit if we are unable to upkeep the buff due to boss mechanics. We also opt for the attack speed over the def shred due to having some in our kit already.
Culinary
- Fresh Soup - Grants Elite/Boss DMG% as well as a strong amount of ATK, making it the superior choice.
- Golden Double-Meat Burger / Sizzling Salted Fish - More ATK than Fresh Soup, but without the Elite/Boss DMG%, it is less powerful.
Alchemy
- Electrolytic Lizard Spine Reagent - Usually the best choice for our Alchemy consumable when aiming for maximum damage.
- Starshine Oil - Provides a strong buff to our Physical damage with roughly 10% Phys Boost, but this will often come just shy of beating the Light Damage bonus.
- Crit - The best choice to ensure smooth comboing.
Rotation & How to Play
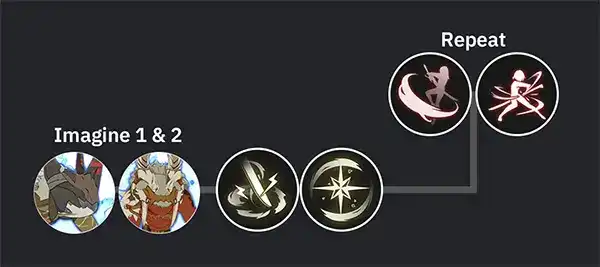
Burst Rotation
Our goal with our burst rotation is to execute as many 6 Sigil finishers as possible. Open fights with this combo and execute it as frequently as you can throughout battle.
Start your burst rotation by using any available Imagines, then activate
- if not at maximum Sigils.Overdrive
![Imagine]()
- Use / Vacuum SlashIaido Slash
![Imagine]()
- Use when Iaido Slash is on cooldown, and try to use it 2-3 times after using Vacuum Slash.Flash Strike
![Imagine]()
- Use as filler if you miss an Iaido Slash crit, or towards the end of the Volt Surge window to spend more sigilsRaijin Dash
![Imagine]()
- End the burst window with to capitalize on all of the sigils we just spent.Oblivion Combo
![Imagine]()
When performing your alternating combo of
Tip
If you accumulate 6 Sigils before using
you can skip out on having to use the first Overdrive.Volt SurgeIf you are playing on moderate to high ping, consider using auto combat for your burst window as it is not affected by ping, because playing on moderate to high pings can make resets come ever-so-slightly slower which is ultimately a damage loss.

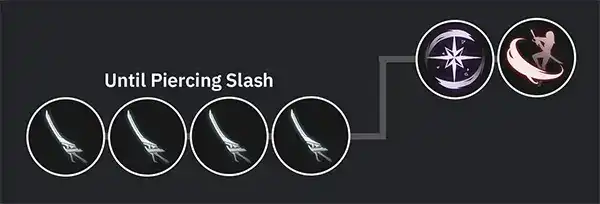
Downtime Rotation
While waiting for Volt Surge’s cooldown, fill the spare time with your Downtime Rotation. Our Downtime rotation deals substantially less damage but still generates a respectable amount of Sigils for us to spend on less powerful Iaido Slashes.
Follow up your Burst Combo by dumping any remaining Sigils you have into
- Use until Piercing Slash activates.Judgment Cut
![Imagine]()
- Overdrive to consume Piercing Slash Buff.
- Spend Sigils on Iaido Slash
![Imagine]()
Continue this priority order until

Can Iaido Slash be played on auto?
Iaido Slash cannot be played on full-auto; it must be played manually in a majority of cases. This is due to the AI not understanding the maximum range for Iaido Slash and walking towards the target after each Flash Strike (if it's small). It is possible to play on semi auto where the AI uses Flash Strike, Overdrive and Raijin Dash, and the player presses everything else.