About the game
Lost Sword is a 2D anime-style gacha RPG developed by Code Cat (the Developers of Sword Master Story) and published by WeMadeConnect., blending Arthurian legends with isekai tropes and idle combat mechanics.
For more information, Check out:
Gacha
There are following Gacha Banners available in Lost Sword.
- Character Pick-up: Features a Rate-up character with 2% rate and total rate of 3%. Costs 2000 Gems per 10 pull.
- Pet Pick-up: Features a Rate-up Pet with 2% rate and total rate of 3%. Costs 1000 Gems per 10 pull.
- Character Permanent Banner: Features 3% rate for SSR characters. Costs 2000 Gems per 10 pull.
- Pet Pick-up: Features 3% rate for SSR Pet. Costs 1000 Gems per 10 pull.
Every Banner features a 120-pity guarantee that does not reset even if you obtain a 5-star unit mid-pull.
Currently, no units are truly limited. Banner units enter the standard pool immediately upon release and can be obtained from any standard pull, including 10x Tickets and 5★ Random Tickets. They are simultaneously added to selector tickets and the standard roster.
Check out our Reroll Guide on who to pull for:
Basic Team Composition
The game allows you to use up to 5 characters in a team. Each character has a unique formation bonus and class archetype, adding strategic complexity despite the auto-battler nature.
There is no single team composition effective for every stage, but a basic setup includes at least a Healer, Tank, and DPS. As stages increase in difficulty, you may need to adjust your composition—such as using more healers with fewer DPS, or employing more DPS without a tank.
Character Grade
Characters come in 3☆, 4☆, and 5☆ rarities. Each has a different base max level. The Round Table system, unlocked at Swordbringer level 60, further increases this cap. This progression system makes 5☆ characters essential for late-game content due to their highest potential max level.
- 5☆ - Level 200 Max
- 4☆ - Level 120 Max
- 3☆ - Level 80 Max
Formation Bonus
As mentioned before, each character has a unique formation bonus, granting them bonus Attack or Defense when placed in the correct position.
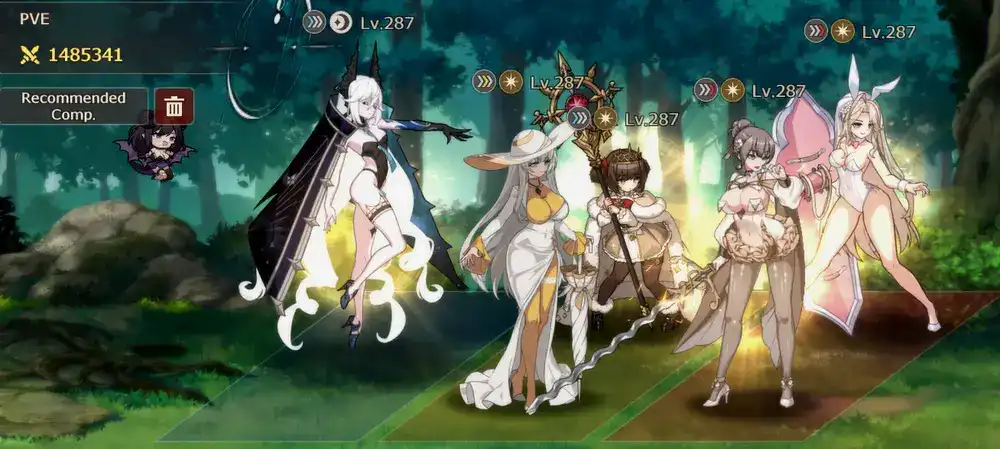
- Front Row +20% Defense
- Center Row +20% Attack
- Rear Row +20% Attack
Archetypes / Classes
Each class has a different attack type that scales their damage or healing output:
- Knight: Scales with Melee Attack (except Lancelot)
- Archer: Scales with Ranged Attack
- Wizard: Scales with Magic Attack
- Healer: Scales with Magic Attack
Elemental Advantage
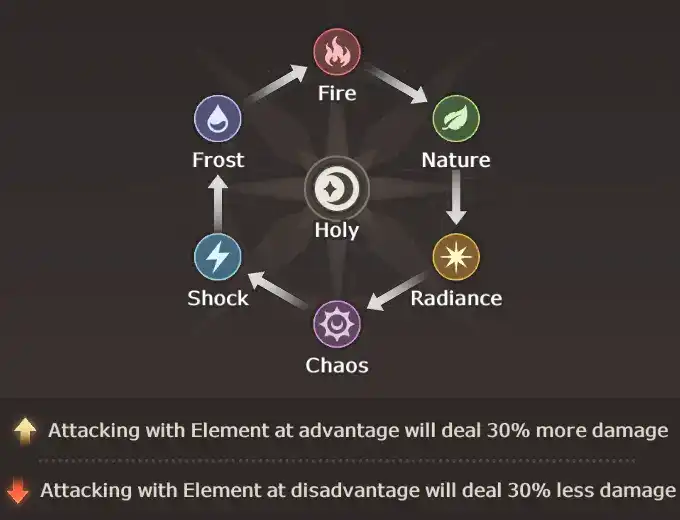
The combat system features elemental affinities for both characters and enemies. Holding an elemental advantage boosts damage dealt by 30% and decreases damage received by 30%. Suffering from an elemental disadvantage penalizes the attacker, reducing damage output while increasing damage taken.
For more information, Check out:
Main Stats
While characters possess numerous stats, this section details the most significant ones requiring further explanation:
Offensive Stats
- Attack (ATK): The primary damage/healing stat. Its damage type (Melee, Ranged, or Magic) depends on the character's class.
- Critical Hit Chance (CRIT Rate): Increases the chance of landing Critical Hits. Reduced by enemy Critical Hit Resistance. (Note: Healing spells cannot critically hit.)
- Critical Damage (CRIT DMG): Amplifies damage dealt by Critical Hits.
- Additional Damage: Increases final damage output after other calculations.
- Boss Attack (Boss ATK): Grants a flat Attack increase specifically against Boss-type enemies.
- Ignore Damage Reduction (IDR): Reduces the enemy’s Damage Reduction value. Only useful on enemies with innate Damage Reduction buffs like Urien and Castle Walls.
Defensive Stats:
- Critical Resistance (Crit Res): Reduces the effectiveness of the enemy’s Critical Hit Chance, lowering their ability to land critical strikes.
- Defense (DEF): Increases the character's Damage Reduction ratio.
- Damage Reduction (DMG RED): Directly reduces Damage Taken. (Maximum 50%).
- Block Chance: Grants a chance to partially block an incoming attack. A successful Block reduces damage taken by 50%. (Note: Critical Hits cannot be Blocked.)
- Status Effect Resistance: Increases the chance to resist negative status effects (e.g., Petrify, Stun, Freeze, Fear).
- Healing Received Increase: Boosts the final amount of Healing Received by the character.
Specialized Stats:
- Priority (PVP): Determines Skill activation order when cooldowns align in PvP. The unit with higher Priority acts first.
- Divine Power (Star Reincarnation): Exclusive to Star Reincarnation mode. Increases ATK, DEF, and HP.
Equipments
Equipment in Lost Sword can be farmed from various sources, including Adventure mode, Treasure Exploration, Stonehenge, Raids, and the Labyrinth. It comes in different rarities, ranked as follows: Legendary > Heroic > Rare > Uncommon > Common.
Each equipment piece has specific potential sub-stat rolls depending on its slot (e.g., Weapon, Helmet, Armor). The maximum values for flat sub-stats increase with the item's level. When progressing, We recommend upgrading gear only to +5 initially, unless it's Legendary. Upgrading beyond +5 consumes significantly more resources, which can be wasteful for early-game gear that you will quickly replace.
Currently, percentage-based sub-stats generally provide a much greater impact than flat values. However, this balance may shift when significantly higher item levels become available.
Weapon
- ATK 100~300+
- ATK% 15%-30%
- Ignore Damage Reduction 5.5%~10%
- Critical Damage Increase 15%~30%
- Priority 20~30
Armor
- Defense 100~250+
- DEF% 10%~30%
- Block Chance Increase 6%~8%
- Crit Resistance Increase 4%~8%
Accessory
- HP 1000~3000
- HP% 15%~30%
Runes
- ATK 100~300+
- HP 1000~3000
- HP% 10%~30%
- DEF 100~300+
- Crit Damage Increase 15%~30%
- Priority 20~30
Refinement
Refinement further boosts your Legendary equipment. Each piece has a different refinement bonus, but the maximum value remains consistent. Each refinement level increases its bonus by 0.3% per level, up to 30% at Lv100. Refinement requires Refinement Stones, obtainable from Crafting, Event Shop, and Soul Shop. We recommend refining only equipment with exceptional substat rolls or pieces you'll use long-term to conserve resources.
- Weapon - 0.3%~30% ATK
- Armor - 0.3%~30% DEF
- Accessory - 0.3%~30% HP
- Rune - 0.3%~30% Crit Damage
For more information and in-depth Gearing Guide, check out:
Cards
Players unlock Cards through Resonance, a process requiring duplicate copies of the specific character. Each card grants unique effects targeting either your entire team, enemies, or the equipped character.
To upgrade cards, you consume Souls. These are obtained by converting duplicate characters after the original character reaches Max Transcendence or automatically after awakening. The most efficient source of Souls is duplicates of 4☆ characters.
Skills
Each character has 4 skills that define their identity. In the early game, the skill pages required to level up skills are very limited, so prioritize upgrading only skills for characters you use frequently. Focus first on skills that benefit your entire team for maximum value. Skill pages can be obtained from the Exchange Shop.
Specialties
Unlocked at Character Lv20, Specializations grant major stat boosts in exchange for Mystic Stones and Gold. Locking specializations consumes more resources, so only lock stats approaching maximum values.
Mystic Stones can be obtained from Adventure, Exchange Shop, Party Dungeon and Crafting.
Stat priority per role:
- Healer: ATK% (5.25% ~ 30%)
- Tank: DEF% / HP% (5.25% ~ 30%)
- DPS: ATK% / Crit DMG% (5.25% ~ 30%)
Use the 'Transfer Trait' button to move all three specialties stats to another character for 100 Diamond.

Transcendence and Awakening
Character duplicates serve a crucial role beyond acquisition.
- Transcendence: Use duplicates to transcend a character. Each transcendence level boosts their base ATK, HP, and DEF. Crucially, reaching Transcendence 3 (T3) and Transcendence 5 (T5) grants a +1 Skill Level, making these major power spikes for character development.
- Awakening: Requires 2 duplicates and provides a flat 20% increase to ATK, HP, and DEF. Due to this relatively modest gain for the significant duplicate cost, awakening is generally only recommended for your primary damage dealers (main DPS).
Pets
Pets are a major factor in your team's overall power. While only the front Pet activates skills, all equipped Pets provide significant stat boosts. For optimal impact, prioritize obtaining at least three Attack-focused Pets at Transcendence 5 (T5).
Growth
Growth Points provide an additional progression system, granting permanent boosts to Attack, Defense, Boss Attack, and HP. These points are obtained through Adventure quest completion and account leveling. For optimal progression, prioritize: Attack > Defense > HP > Boss Attack. Since Boss Attack contributes the least to overall team strength, it should be maximized last.
Chaos Cube
Additional permanent stat boosts! Obtain cubes by dismantling same-rarity equipment. Higher-rarity cubes can be crafted, but require significant gold investment. Prioritize maxing Rare Cubes first, then upgrade Heroic/Legendary as dismantling materials accumulate. Stonehenge Stage 3 is the primary source for Chaos Cubes.
Relic
"How many more stat boosts can there be?" Yet another team-wide stat enhancement system. Each relic provides unique bonuses, but demands substantial Fairy Powder and Gold for upgrades. Obtain Fairy Powder through dismantling equipment. Like Chaos Cubes, Stonehenge Stage 3 is the optimal source for relic upgrades. Prioritize leveling the Holy Grail first, followed by the Lance and Scabbard at a 2:1:1 ratio for maximum efficiency.
Training
Training unlocks at Character Lv. 100, boosting stats for specific characters. Reaching certain ranks within Training grants bonuses to your entire team. You'll need Souls, Rare Souls, and Elemental Stones, obtainable by running Daily Elemental Dungeons.
Daily / Weekly Checklist
Daily Checklist
- Daily Missions
- Colosseum (1 Ticket every hour)
- Gold Goblin Shrine (3 Attempts)
- Elemental Stone Dungeon (3 Attempts)
- Sanctum of Experience (3 Attempts)
- Boss Raid (3 Attempts)
- Party Dungeon (1 Attempt)
- Guild Check-in / Donate
- Character Chat (6 Attempts)
- Events (If there are daily events)
- Chickens in Town (Spawns every 2 hour)
- Stonehenge (Timer can stack up to 2 hour)
- Shop
Weekly Checklist
- Avalon / Star Reincarnation
- Labyrinth
- Secret Cow Queen Dungeon (3 Attempts)
- Shop
Content Unlock
- Pet: Quest: Summon & Form Pet
- Relic: Quest: Activate Relic
- Auto Skill: Stage 1-9
- Event: Swordbringer Lv5
- Mail: Swordbringer Lv10
- Town: Reach Stage 2-1
- Specialities: Character Level 20
- Training: Character Level 100
- Battle: Swordbringer Lv20
- Colosseum: Swordbringer Lv30
- Labyrinth: Swordbringer Lv35
- Star Reincarnation: Swordbringer Lv60
- Tower of Oberon: Clear Chapter 4
- Stonehenge: Clear Chapter 5
- Party Dungeon: Swordbringer Lv30
- Friend: Swordbringer Lv25
- Guild: Swordringer Lv30
- Chaos Cube: Swordbringer Lv40
- Ranking: Swordbringer Lv40
- Craft: Swordbringer Lv50
- Gear Preset: Swordbringer Lv55
- Round Table: Swordbringer Lv60
- Constellation: Swordbringer Lv60
- Cow Queen Dungeon: Unlocked by speaking to the Mysterious Guest in the Lobby (Clear Ch 5-10).
- World Tree Rift: Clear Stage 50 of Tower of Oberon
- Abyss: Clear Stage 50 of World Tree Rift


