Is It Even Worth Rerolling?
Short answer: No.
Long answer: Endfield has one of the longest, most gruesome rerolling experiences known to gacha. We’re talking about an extremely long Prologue, even longer and unskippable tutorials that play slowly, action gameplay that makes it very difficult to multi-instance, low drop rates, a weapon gacha system that “punishes” you for being lucky and the list goes on...
To elaborate further:
- There’s no quick way to reset your data or account, so you need to prepare an email for every try.
- The chance to drop a 6★ Character is a mere 0.8%.
- It takes over 30 minutes to go through the Prologue + Early Chapter 1 until you unlock the gacha.
- If you accomplish your reroll goal, this means you won’t have enough Arsenal Tickets for the Weapon Gacha, since pulling for characters is the main source for it. In other words, either you will need to get many times as lucky and somehow get the weapon in a single multi-pull (only multis are allowed) or virtually give up on the Signature Weapon since you won’t be able to farm enough Arsenal Tickets in time through weeklies
- There’s a Boss Battle in the Prologue.
- Did we mention that the tutorials are many in nature, very long and that you can’t skip most of them?
If you’re still here, then you deserve the obligatory Prydwen Reroll meme:

How to Reroll
Sadly, there's just one. As we mentioned in the warning section, you will need to prepare a ton of dummy emails if you plan to reroll - the salting method is blocked, so there's no other way.
So the rerolling process will look like this:
- Log in with your email.
- Pay all the sins of seven generations of your family while you go through all cutscenes, tutorials, and manual progression.
- Make your ancestors roll on their graves while you roll on the gacha.
- Got lucky? Great! Here’s your reward: You still get punished, because now you won’t have enough tickets to pull for the Signature Weapon or enough ways to get the required Arsenal Tickets within time.
- Didn’t get lucky? Log out of the account and repeat the process with a new one.
Early Game
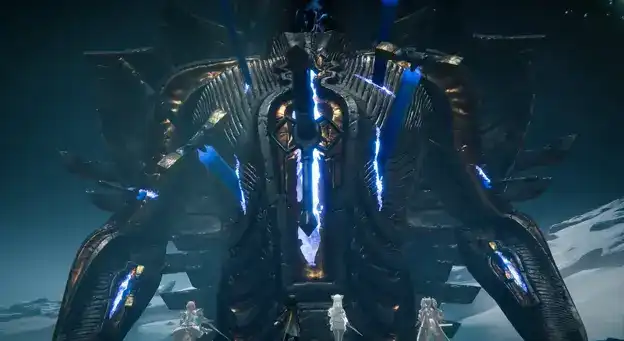
Remember you will have to fight this Every. Single. Time.
Before you get access to Headhunting (aka the gacha), you will have to go through a 15-minute Prologue where you can’t skip anything, featuring a Boss Battle at the end. In addition to however long it takes you to take your first steps at Dijiang, then solve The Hub’s initial crisis.
Note
While Endfield allows for cutscene skip, not all cutscenes can be skipped and the game does a lot of handholding, throwing tutorials at you left and right. The tutorials can be quite slow and disrupt the flow of progression, but if you’re still here, then you’re probably a patient person.
Remember to use your initial resources and level your Operators to make combat easier. During the early game, you will have access to two Operators:
Endministrator andPerlica withChen Qianyu joining soon after, still in this early part.
Headhunting
Where all the Pain and Glory meet.
This section is a work in progress. We don’t know how many pulls we will be able to do per each reroll outside of the pre-registration rewards that give 20x Basic HH Permits.
Who to choose?
ATTENTION!!!
Endfield more than most other gacha’s is a game about team building and establishing specific Elemental Synergies. Because of this, certain characters only work within their designated element, so even if a character is rated higher than another, if you don’t want to play that element, you shouldn’t re-roll for them unless they’re specifically stated as being universal.
Reroll value explanation
- - She's free!
- - The best and most versatile options.
- - Great characters to have on your account.
- - Niche options that require more effort to make work.
She's Free!
Summary
Out of all the Standard banner units, Ardelia is the most universal and would be the best re-roll target thanks to her fantastic damage amplification and sustain. BUT, everyone gets Ardelia and her signature weapon for free, meaning unless you want her Potentials (dupes), you should target a different character instead and avoid pulling Ardelia.
Mini-review
Ardelia is a 6★, Nature, Arts Unit support who specializes in applying long-lasting arts and physical susceptibility to targets by combining her combo and battle skill. This makes her a universal buffer, capable of being useful in almost any team you’re able to consistently activate her combo in. To activate said combo, she requires you land a final strike on a target with no vulnerable or arts infliction stacks, which can either be trivial or quite tricky depending on your team. In teams where you consistently burn through your arts/vulnerable stacks, Ardelia can easily slot in. However, in teams that have lingering stacks, she can end up locked out of her combo for extended periods of the fight, hurting or blocking her ability to do her job.
Assuming you’re playing Ardelia in a team that works for her, she also brings other perks on top of her consistent debuffing. Examples are the ability to spawn healing sheep via her battle skill and ultimate, which, when collected, heal the controlled operator orthe lowest percentage teammate, helping keep your team alive in tougher battles. Ardelia’s combo also forcibly applies Corrosion without the need to trigger it via an arts reaction. Usually, she consumes this herself in order to apply her debuffs with her battle skill, but in some teams, just applying it can be important for enabling combos like Laevatain’s.
As long as your team doesn’t completely lock out Ardelia’s combo, and you have a small amount of SP to commit to her battle skill every so often, she’ll always be a solid choice for damage amplification and survival, no matter the team.
Gold Reroll Value
Summary
Pogranichnik is only useful within the Physical archetype, and if your desired team/s aren’t building [Vulnerable] (the Physical infliction), he shouldn’t be a priority pick for you, regardless of the fact that he’s ranked gold. Although if you are interested in playing Physical teams, now or in the future, Pog definitely holds a high amount of value thanks to his combo of SP recovery, grouping, and his ability to buff through breach. He also has a number of powerful weapons and set options.
Mini-review
Pogranichnik (Pog for short) is a 6★, Physical, Sword support damage dealer who specializes in SP recovery and [Breach], allowing him to support the team from two different angles while also being a capable sub-DPS himself. As the cherry on top, his ultimate is a wide AoE capable of grouping enemies with the press of a button. As good as all that sounds, in order to activate Pog’s combo skill and actually access his ultimate in a timely manner, you’ll need to consume Vulnerable stacks with either Crush or Breach. This effectively locks Pog to teams that factor in some amount of building and consuming of Vulnerable. In other words, he isn’t universally useful in every team.
Pog’s [Breach] is accessed via his battle skill. In physical teams, keeping it applied to priority enemies is often very well worth your time, even if it costs you a crush or two over the course of a fight. Keeping its Physical DMG Taken debuff affecting all your damage is usually worth losing the upfront damage it costs you.
Pog’s SP recovery is present on all three of his non-basic skills, with all of them revolving around the Physical archetype in some way or another. His battle skill grants increasing SP based on the amount of [Vulnerable] stacks it consumes when inflicting [Breach]. His combo skill grants more SP based on the count of [Vulnerable] stacks the [Crush] or [Breach] consumed before triggering it, and his Ultimate grants a large amount of SP, but only after fulfilling yet more physical-related conditions. To sum it up, Pog is a fantastic support damage dealer for the Physical archetype, but definitely won't be at his maximum potential when playing outside the Physical teams.
Summary
If you’re interested in pure Cryo Playstyle focused on aligning buffs for huge burst damage windows, Last Rite might be what you’re looking for. With that said, Last Rite is a character that can split the crowd due to her Ultimate-based playstyle combined with the stricter requirements of her combo skill, which, depending on your team, can take a bit of work to establish. The payoff, though, is that when you have Ultimate available, buffs up, and access to her combo, she can output very satisfying numbers. Last Rite’s slower greatsword basics may not be to everyone’s taste when playing her as a main fielder. Last Rite is also one of the main elemental carries of 1.0, while one of the most SP efficient ways to apply Cryo, even considering the next 3 banners. This makes her valuable for those interested in the Cryo archetype.
Mini-review
Last Rite is a 6★, Cryo, Great Sword damage dealer completely centered around building and consuming Cryo Infliction stacks as fast and frequently as possible. This allows her to deal damage through her Ultimate and Combo skills, which are both the focus of her kit.
What makes Last Rite unique is that she cannot gain energy from her teammates, and her ultimate costs over twice as much as most other characters. Fortunately, Last Rite’s battle and combo skills each grant additional energy, with her combo generating up to half the energy she needs to use her ultimate all at once. Because of this, triggering Last Rite’s combo as much as possible is the name of her game. To do so, enemies must be afflicted with at least 3 Cryo Infliction, something that requires proper team building in order to achieve in a timely manner.
With so much importance on Cryo Infliction, Last Rite generally wants teams specifically built around her with the goal of either helping her generate Cryo Infliction faster or buffing her combo and ultimate damage as much as possible. Her dedication to Cryo also usually rules out playing her in arts reaction teams that combine Cryo with other elements to trigger effects like Solidification, as that’s Cryo that could have otherwise been spent on more combos and ultimates.
Silver Reroll Value
Summary
Lifeng is an alternative pull option to Pogranichnik for those looking to specialize and invest in the Physical archetype. Just like Pog, he can only really be played in Physical set-ups. Where he differs from Pog is that instead of SP generation, grouping, and major buffing, Lifeng focuses more on personal damage, [Vulnerable] stack application, and less impactful, more temporary buffs, such as [Link]. Lifeng isn’t a bad target; his kit is just less stacked and unique than Pog’s, making him easier to substitute with other physical operators.
Mini-review
Lifeng is a 6★, Physical, Polearm support damage dealer with a blend of personal damage and supportive elements within his kit, but notably doesn’t have a way to consume [Vulnerable]. Meaning, he’ll most often want to be played with another character capable of acting as the team's consumer (A [Crush] or [Breach] character). He can also satisfy the requirement of his own combo skill without assistance, allowing him to slot easily into most Physical teams.
The supportive portion of Lifeng’s kit revolves around his ability to apply [Vulnerable] or [Physical Susceptibility] with his battle skill, a stack of [Link] with his combo skill, and further 2 stacks of [Vulnerable] with his ultimate. All while dishing out a strong amount of stagger thanks to [Knock Down].
When it comes to DPS, Lifeng may not be able to consume vulnerable himself, but he still has a lot of damage tools at his disposal. Both of Lifeng’s talents are damage-related, with one boosting his ATK% significantly and the other granting each of his knockdowns an extra damage multiplier. Using Lifeng’s Ultimate to consume Link also causes it to deal almost twice the damage, enabling him to make use of his own [Link] selfishly.
Summary
Ember is a sustain that can work in most teams and functions as an alternative to Snowshine for when survival is a priority. What sets Ember apart and the reason you might want to reroll for her, though, is her ability to apply [Vulnerable] for free with her combo skill. This makes her a much larger asset than other sustains to physical teams. However, if you’re a player who is confident in dodging and doesn’t expect to need the extra sustain of a Defender, or Ember’s [Vulnerable] stacks, you’ll likely be better off rerolling for someone else.
Mini-review
Ember is a 6★, Heat, Great Sword survivalist based unit whose kit primarily focuses on keeping the team alive through healing and shielding. It also has solid utility thanks to both her Combo Skill and Battle Skill having [Knock Down]. This allows her to apply Vulnerable and inflict a sizable amount of stagger, which, when combined with her abilities’ already high base stagger amount, adds up to quite a bit.
Ember’s combo skill heals the controlled operator on use, which is solid but not too crazy when compared to Snowshine, who can do something similar but for the whole team. What makes it strong, though, is its short cooldown and the fact that all it takes to activate is being hit by any attack at any time, meaning it’s almost certain to trigger when you need it. It’s also very easy to trigger forcibly, if you want to ensure it’s being used on cooldown every time.
Ember’s shielding, on the other hand, comes from her Ultimate and grants the entire team a shield based on Ember’s own maximum HP, allowing you to bulk up teammates in a pinch to protect them from large threats.
Ember can slot into pretty much any team, yet despite being a heat unit herself, she’s definitely a higher value unit in Physical teams, thanks to her ability to apply [Vulnerable] with both her battle and combo skill. The latter, being free, is incredibly valuable to physical teams looking to generate as many vulnerable stacks as possible.
Bronze Reroll Value
Currently empty!
Video
You can also watch this video for more information about the reroll targets:


