Is Rerolling Worth It?

If you have the time to do so, you can certainly go for it. CZN’s rerolling process can take a while per reroll, but you don’t need to use salted email accounts since the game allows you to delete user data directly.

  • You can use the same login info to reroll by deleting your user data through the in-game menu.
  • Each reroll takes about 15–20 minutes to play through the entire tutorial.
  • Dialogue has a fast-forward button, but no skip button.
  • You are guaranteed a 5★ Combatant character within the first 50 pulls you do on the Beginner Banner.
How many pulls you're able to do per reroll?

Currently you will receive 20 standard banner tickets from the pre-register rewards + 10 from various emails. On top of that, enough currency to do 10 pulls on the rate up banner.

How do I reroll in Chaos Zero Nightmare?

Guides

Here’s a step-by-step breakdown on how rerolling will go:

  1. Play through the tutorial.
    • Prologue 1: The Blue Pot (Battle Tutorial)
    • Prologue 2: A Promise Unkept (Battle Tutorial)
    • Chapter 1-1: Back to the Blue Pot (Story)
    • Chapter 1-2: Eye of the Storm (Chaos roguelike stage)
  2. Pull on the Standard banner (called Combatant Rescue in-game).
    • After getting a 5★ on the standard banner, you can switch to the the beginner banner (Special Rescue Request) that guarantees a 5★ within 50 pulls - this way you will start with two 5★ (one you rerolled for and one random).
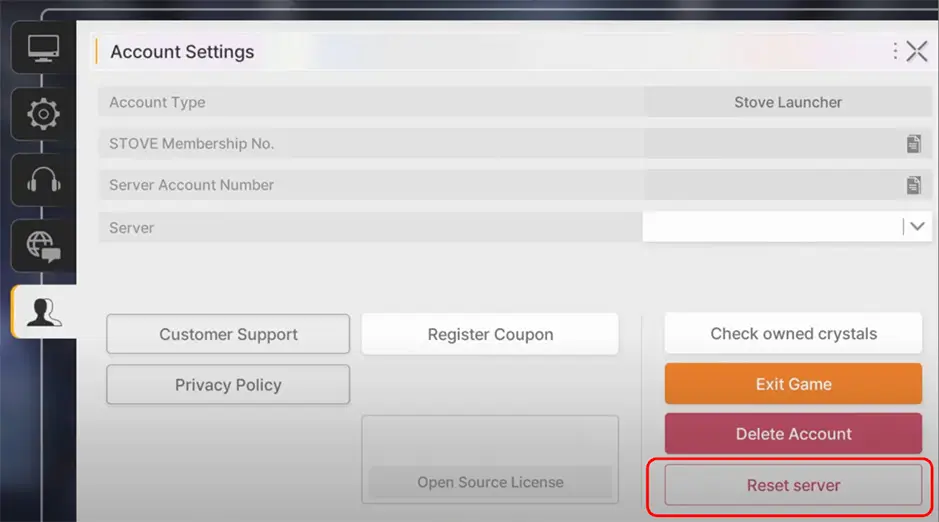
  3. If you don’t get what you want, use the hamburger button ≡ on the top right corner.
  4. Click the gear icon to access Settings.
  5. Click the person icon to access your account settings.
  6. Click Reset Server. This requires you to enter your username.
  7. Repeat.

Check the video below how to do that:

Which 5★ can I get from rerolling?

Reroll value explanation
  • - The best options.
  • - Great options who bring meaningful upgrades to your account.
  • - Niche characters who may require extra support from teammates to truly shine.
Reroll options

The Beginner Banner features ten different 5★ characters and here’s a quick breakdown if you’re wondering which one to focus your reroll attempts on.

Gold Reroll Value
Introduction

Khalipe is an AoE Damage Dealer-Shielder hybrid who's capable enough at both to fill both roles by herself, which grants her incredible team flexibility. Khalipe's cards are incredibly AP expensive, but her best card, Vulture Ejection, can mitigate this with its Celestial tag. Celestial cards are used for free whenever you use another card that costs 2 or more, allowing Khalipe to spend big once and automatically play her most powerful card for free. Outside of this, Khalipe has targeted card draw, decent Tenacity Damage, and some good utility Epiphany upgrades.

Pros & Cons
  • Great single target, AoE damage and Shielding all at the same time.
  • Can cast Vulture Ejection (and Rally Epi 3) for free with Celestial.
  • Awesome targeted card draw.
  • Decent AoE Tenacity damage.
  • Access to even more supportive capabilities through Epiphanies.
  • Requires a 2 AP or higher card to trigger Celestial.
  • Without Celestial activations, she's just left with many high-cost AP cards that often aren't worth their full price.
Performance

DMG [5/5]


Shielding [4/5]


AP Efficiency [2/5]


Utility [3/5]

   
Introduction

Hugo is an Additional Attack Specialist capable of triggering follow-up attacks after every targeted Attack card from himself or allies. This is possible thanks to his Hunt Commence Passive, which is gained via most of his Cards and stacks up to 5 times, with damage increasing as stacks rise. When any targeted Attack card is used, Hunt Commence loses one stack and Hugo immediately launches an Additional Attack. When playing Hugo, expect strong and frequent damage over the whole fight’s duration, making every Attack card a high-power nuke on enemies. Pair him with Tressa to see the magic!

Pros & Cons
  • Absurd sustained single target damage throughout the entire fight.
  • Strong built-in scaling thanks to Hunt Commence's stacking damage multiplier.
  • Incredible card draw options for a DPS.
  • Upgrade-based playstyle - can operate without needing to draw specific combo pieces after being initially established.
  • Limited AoE, only accessible via Ego Skill.
  • Must be paired with allies that attack frequently to maximize Hunt Commence triggers.
  • Hunt Commence does not trigger unless an ability 'targets'.
Performance

ST Damage [5/5]


AoE Damage [2/5]


AP Efficiency [4/5]


Utility [2/5]

  
Introduction

Mei Lin is a single-target damage and break specialist capable of constantly applying Passion Weakness to enemies, ensuring she almost always has an Attribute advantage. Her cards are all low-cost with an emphasis on incredible self-buffing and chaining together long strings of attacks to form potent ramping combos. Her card Unity of Attack and Defense also grants her insane card draw/searching and cost efficiency, and her Ego Skill bolsters the hit count of her basics, the main source of her damage.

Pros & Cons
  • Self card draw and AP cost reductions.
  • Incredible self buffing capabilities.
  • Can apply Passion Weakness on enemies to always deal Tenacity Damage and gain attribute damage bonus.
  • Outstanding burst single target damage.
  • Ego Skill is expensive.
  • No AoE Cards.
Performance

ST Damage [5/5]


AoE Damage [1/5]


AP Efficiency [5/5]


Utility [2/5]

  
Introduction

Veronica is a DPS and Support Hybrid that requires very little AP investment after her initial upgrade cards have been established. The damage portion of Veronica's kit stems from her Ballistas, which are unusable cards that trigger after you end your turn at no cost. Veronica usually generates 1 Ballista for free every turn, but can generate more with Epiphanies and sometimes her Basic Attacks. Her Supportive capabilities take the form of low-cost and very potent card draw cards, which can be upgraded to either draw more, offer discounts, or target specific card types. Veronica can also boost her Ballista damage massively via the stackable Reload buff.

Pros & Cons
  • Phenomenal targeted Card Draw that can become even stronger with Epiphanies.
  • Consistently deals damage every turn with Ballista Cards at 0 AP cost after initial setup.
  • Upgrade-heavy card pool thins out deck size for other combatants.
  • Impressive, mostly passive damage, assuming Reload is kept active.
  • Very limited AoE only accessible via Epiphanies and Ego Skill.
  • Ballistas target enemies randomly.
  • Optimal damage output relies on stacking Reload, which isn’t always easy.
  • Upgrade-based strategy requires upfront AP investment to get going.
Performance

ST Damage [3/5]


AoE Damage [2/5]


AP Efficiency [5/5]


Utility [5/5]

     
Silver Reroll Value
Introduction

Renoa is a single-target specialist whose kit revolves around generating Dirge Bullets, which trigger an Extra Attack when discarded by other cards or at the end of the turn. Most of her cards either focus on generating Dirge Bullets or dealing additional damage when Dirge Bullets are in hand or the discard pile. Her gameplay requires setup time for generating Dirge Bullets, card management, and planning in order to unleash her hardest-hitting attacks at the right time.

Pros & Cons
  • Great single target and burst damage output.
  • Powerful personal damage scaling from Dirge Bullets.
  • Has a few exceptionally strong gameplay-changing Epiphanies.
  • Launches many Multi-Hits and Extra Attacks that scale well with Morale.
  • No AoE Cards.
  • Can clog deck with Dirge Bullets if not careful.
  • Timing Ego Skill alongside Dirge Bullet generation and correct payoff cards requires some effort.
Performance

ST Damage [5/5]


AoE Damage [1/5]


AP Efficiency [3/5]


Utility [1/5]

 
Introduction

Kayron's cards are absurdly expensive but also output incredible single-target and AoE damage while also interacting with his main mechanic—Void. Most of Kayron's cards either create Futility cards or deal more damage from Exhausting them. Futility is a 1-cost Status Ailment card that exhausts when played, with no additional effects at base. Through his Upgrade Oath of Vanity and its Epiphanies, Futility can be upgraded to deal damage and heal. Before this, they do nothing more than burn AP and clog the deck. Kayron's game plan is simple: turn Futility into useful cards through Oath of Vanity, use as many of them as possible to empower Kayron's kit, and work to minimize the cost of his expensive cards through Epiphanies, Exhausts, and team building.

Pros & Cons
  • Incredible single target and AoE damage potential.
  • Has many gameplay-altering Epiphanies - both mechanically and damage-wise.
  • Becomes stronger the longer fights drag on.
  • High AP costs can be bypassed with smart play.
  • Many very AP expensive cards.
  • Main mechanic Futility is not fully functional without Gold card Oath of Vanity.
  • Gains so much power from Epiphanies that his base deck can feel awkward and underwhelming.
  • Hard to play.
Performance

ST Damage [4/5]


AoE Damage [5/5]


AP Efficiency [1/5]


Utility [1/5]

 
Introduction

Rin utilizes the Dark Cloud Stance to enhance her abilities. She enters this stance through specific cards and only exits the stance when another Combatant plays an Attack card. While the stance is active, most of Rin's cards gain additional effects that allow her to deal fantastic single-target damage while also buffing herself, improving AP efficiency, and increasing hit counts, damage multipliers, and more. Playing Rin is all about chaining together attacks and staying in her stance as consistently as possible.

Pros & Cons
  • Fantastic single target damage output (when set up correctly).
  • Self Card Draw.
  • Great self damage scaling while Dark Cloud Stance is maintained and when played with Skill-heavy allies.
  • No AoE Cards.
  • Must maintain Dark Cloud Stance to remain effective.
  • Other Combatants' Attack Cards end Dark Cloud Stance in most cases restrict your team options.
Performance

ST Damage [4/5]


AoE Damage [1/5]


AP Efficiency [2/5]


Utility [1/5]

 
Introduction

Magna is primarily a Shielder but is also capable of solid single-target and AoE damage by stacking and buffing Counter. Outside of shielding and countering, Magna has excellent access to the Vulnerable debuff and can also apply Crystallization for automatic shielding every turn. Magna has many strong cards, but they are very expensive baseline without certain Epiphanies or AP generation.

Pros & Cons
  • Good shielding with reasonable damage output after set-up and when being attacked frequently.
  • Strong access to the Vulnerable debuff.
  • Nice AoE potential while Ice Wall is active.
  • Grants Crystalization for constant shielding without needing to draw or use AP for it.
  • Has many expensive cards and is incredibly AP hungry.
  • Counter Attacks (and damage) are far less effective in fights where enemies hit not often.
Performance

DMG [3/5]


Shielding [4/5]


AP Efficiency [2/5]


Utility [2/5]

  
Introduction

Orlea is the queen of Retain and card generation with her core mechanic, Creations. Orlea can generate 3 different types of Creations through her cards, upgrade them up to two times by merging duplicate Creations of the same level. Creations cost 0 AP, have the Retain tag, and trigger a passive effect when Retained at the end of each turn. The three types of Creations are Toughie, who actively Shields and passively heals; Swiftie, who actively deals damage and passively stacks up damage; and Softie, who actively and passively buffs damage. In addition to her Creations, Orlea has the ability to forcibly trigger her own and her allies' cards’ Retain effects. All around, Orlea has outstanding healing, some shielding, and very high damage for a healer, but she lacks supportive utility when compared to other Supports.

Pros & Cons
  • Capable of decent damage and shielding as well as great passive and active healing.
  • The varied effects and 0 cost of Creations makes Orlea incredibly flexible in teams.
  • Great passive and scaling power thanks to Retain effects.
  • Able to trigger her own and other characters' Retain effects on demand with some cards.
  • Creations and Retain cards can end up clogging your hand when held too long.
  • Limited buffing/debuffing capabilities compared to other supports.
  • No card draw.
  • Can require multiple turns to gain value due to the nature of her Retain strategy.
Performance

DMG [4/5]


Healing [5/5]


Buffs/Debuffs [2/5]


Utility [2/5]

  
Bronze Reroll Value
Introduction

Luke is a stat-reliant single-target card generation and bullet-based damage dealer. Luke's kit revolves around generating 0-cost Bullets and enhancing them via his abilities. The catch is that one of his best generators only does so if it lands Crit Hits. Rapid Fire hits multiple times and generates Bullets per Crit it deals - no Crit, no Bullets. Because of this, Luke requires a high Crit Rate to function.

Pros & Cons
  • Solid single target but must Crit in order to hope to access it.
  • Generates many 0 cost attacks for free with abilities that scale well with Morale.
  • No AoE Cards.
  • Requires Crit investment to function at the highest level.
Performance

ST Damage [3/5]


AoE Damage [1/5]


AP Efficiency [3/5]


Utility [1/5]


Notable 4★ and Dupe Breakpoints

Here are some notable 4★ to look out for while you’re rerolling: