


Let’s Build a Team
In the previous guide, we have recommended you build a team to explore. This time, we go deeper into the details of building a team.
Early Stage - Radial teams
The early stage happens until you reach the 2nd sector. During Beta, Surface Mode only has 4 Sectors, and we will start at Sector 1. It’s relatively easy here so you can focus on exploring the map first.
Let’s start with 2 Basic Teams
Basic Exploration Team
Mode: Surface || Element: All
Characters


About the team
The first basic exploration team. There are a lot of substitutes here, except Anis - There are currently only 4 Nikkes that gives extra MS non - combat area.
Substitutions
-
Basic Exploration Team #2
Mode: Surface || Element: All
Characters

About the team
Another exploration team, this one has no range up but it deals very high damage due to the buff of same weapon (it deals 90% extra damage)
Substitutions
-
Well, it’s not like everyone has every Nikke to fit in those two teams, so we need to work on who to replace. And to do that, you must understand the basic knowledge of team building.

The first button will filter all Strike Nikkes. That’s a random tag, but you only need to remember they excel in exploring (because their skills only activate while you are exploring).
There may be a lot of skills that you need to understand, but most are whatever. Its best to focus on these skills only:
- Attack Up
- Fire Nikkes - Mihara: Bonding Chain (40%) >
![Mihara: Bonding Chain]() Rapi (35%) >
Rapi (35%) >![Rapi]() Rei Ayanami (25%); Electric Nikkes -
Rei Ayanami (25%); Electric Nikkes -![Rei Ayanami]() Harran (35%); Water Nikkes -
Harran (35%); Water Nikkes -![Harran]() Dorothy: Serendipity(35%); Wind Nikkes -
Dorothy: Serendipity(35%); Wind Nikkes -![Dorothy: Serendipity]() Rosanna: Chic Ocean (30%); Iron Nikkes -
Rosanna: Chic Ocean (30%); Iron Nikkes -![Rosanna: Chic Ocean]() Snow White (35%)
Snow White (35%)![Snow White]()
- Damage Taken on Enemies
- Fire Nikkes - Rapi: Red Hood (35%); Electric Nikkes -
![Rapi: Red Hood]() Scarlet (35%); Water Nikkes -
Scarlet (35%); Water Nikkes -![Scarlet]() Viper(20%); Iron Nikkes -
Viper(20%); Iron Nikkes -![Viper]() Raven (25%)
Raven (25%)![Raven]()
- Restore Stamina on Kill
- Fire Nikkes - Soldier OW (15%); Electric Nikkes -
![Soldier OW]() Soldier EG (15%); Iron Nikkes -
Soldier EG (15%); Iron Nikkes -![Soldier EG]() Soldier FA (15%)
Soldier FA (15%)![Soldier FA]()
- +50% Movement Speed (this is tricky because 3 of them are seasonal limited)
- Electric Nikkes - Anis: Sparkling Summer (50%); Water Nikkes -
![Anis: Sparkling Summer]() Neon: Blue Ocean(50%); Wind Nikkes -
Neon: Blue Ocean(50%); Wind Nikkes -![Neon: Blue Ocean]() Mica (50%); Iron Nikkes -
Mica (50%); Iron Nikkes -![Mica]() Mica: Snow Buddy (50%)
Mica: Snow Buddy (50%)![Mica: Snow Buddy]()
- Attack Range +1. Normal Rapture has a range of 1 ~ 2, so lots of them will attack you before you can attack them. This skill normalizes that.
- Leech on Kill: Very lame, Heals a little, only use them if you lack some of the skills above (Substitute)
- Fire Nikkes - Sakura (12.6%); Electric Nikkes -
![Sakura]() Moran (12.6%) >
Moran (12.6%) >![Moran]() Mari Makinami Illustrious (10.5%);Iron Nikkes -
Mari Makinami Illustrious (10.5%);Iron Nikkes -![Mari Makinami Illustrious]() Rapunzel (14.7%),
Rapunzel (14.7%),![Rapunzel]() Misato Katsuragi (8.4%)
Misato Katsuragi (8.4%)![Misato Katsuragi]()


Well, of course, you pick the best Nikke among 1 skill group, for example, among ATK buffers, you pick Mihara - Bonding Chain. Without Mihara, goes for Rapi then (SR version)
Note
Surface content relies mostly on Sync, then OL + Hexacode. You may want to put your surface team on Sync Slot to prevent them from dying so fast.
Nikke with the same effect won’t stack. It means putting Mihara BC and Rapi on the same team won’t make that team gain 35% + 40% = 75%, but 35% or 40% only (depending on the left-most Nikke)
Okay, now you have created your squads, let’s move them out of the base. There’s a tutorial in-game, but if you want reminders on the mechanics of Surface, you can read them here.
- Traveling in Surface mode is moving per grid (tile). Each move will cost you a bit of Stamina, and by the time you move 500 tiles, your Squad will run out of Stamina.
- When a Squad runs out of Stamina, it will be debuffed (-50% ATK, disable all skills).
- To recover Stamina, you must let your Squad stay still. Every 0.5h, you regain 10 of % Stamina back, up to 5h.

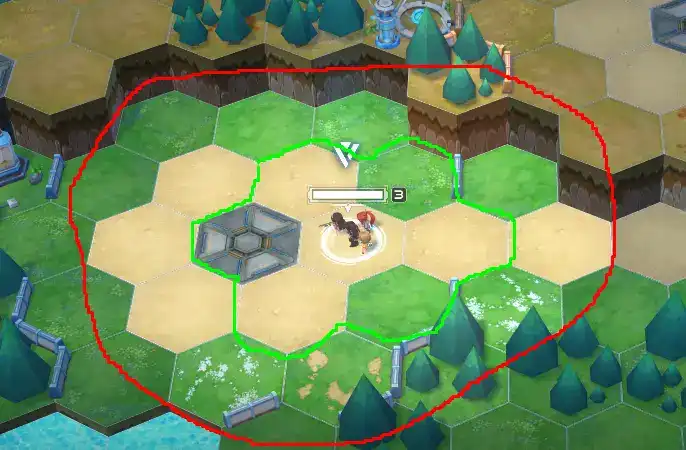
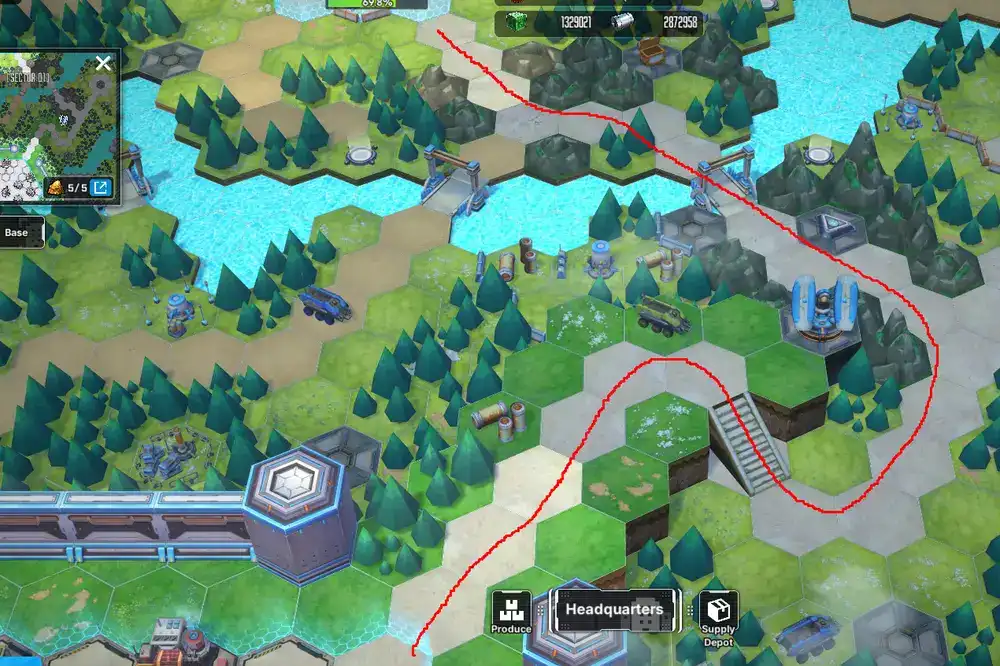
Red Line: You can see 2 tiles from your position. Putting Crow or Soline in the team will +1 more to sight.
Green Line: Default Attack Range. A squad can only attack an enemy on an adjacent tile. Putting Belorta, Diesel or Brid in the team will +1 to Attack Range.
Mechanics
Before trying to attack anything, you need to understand that Surface is an entirely new game. It has different attacking mechanics compared to the main game Nikke, and they are:

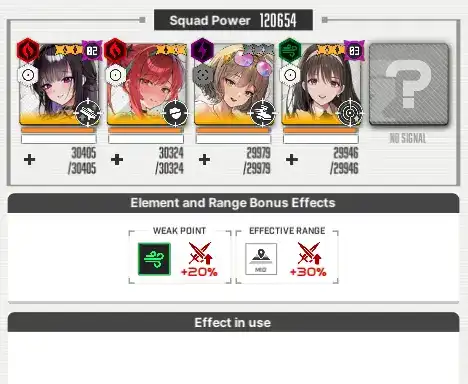
Effective Range

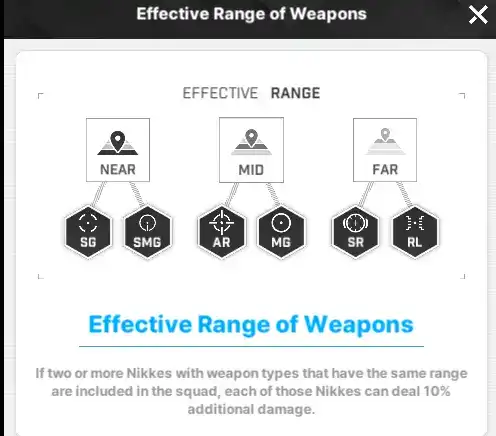
In Nikke, weapon shooting enemies at an optimal range will deal an extra 30% damage. But on Surface, the enemy stays in 1 tile next to you, so Shift Up changes it into:
- Every Weapon starts at 0% bonus damage.
- For every other Weapon that shoots the same range as yours, +10% bonus damage, up to 50% (can be enhanced further by Nikke’s skill - Neon, for example)
This means a team containing 3 RL + 2 SR will deal an extra 50% damage because they all belong in the same “Far” group. Very handy later on if you want to min-max your team.
Element

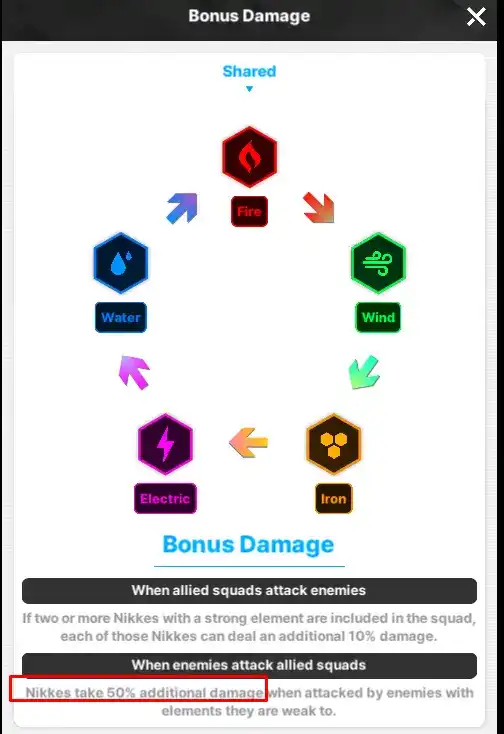
Same as Effective Range, the Nikke will deal extra damage if more than 1 Nikke is sharing the same Element. This one is not as versatile as Effective Range, because Element only matters when you fight Rapture weak to it. Otherwise, it has 0 effect. The max extra damage from Element is also 50% (can be increased further by Nikke’s skill - Privaty, for example).
This is stricter than in Nikke. The rule of counter is still the same, except Rapture always deals 50% extra damage when they counter the Nikkes in your Squad.
Note that this damage is applied only to countered Nikke(s), so there may be some situations where you have 4 Nikkes in a squad at 50% hp, and one Nikke at 20% hp. It’s because the squad just fought a Rapture that countered the specific Nikke, therefore dealing more damage to her.
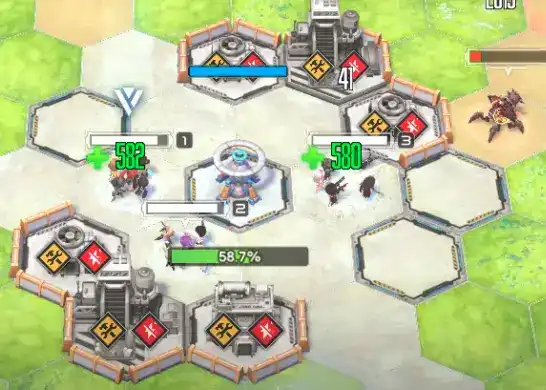
Seize your First Camp

After moving out of your base, let’s head to the first camp. A camp is an abandoned facility on the surface, which needs an Optical Camouflage Generator to seize it. When you go there, click this building to start a defense campaign.

At this point, the game will ask you to build one Optical Camouflage Generator lv 1. Go back to your Base (click the shortcut or press Spacebar), and click Factory => Produce.

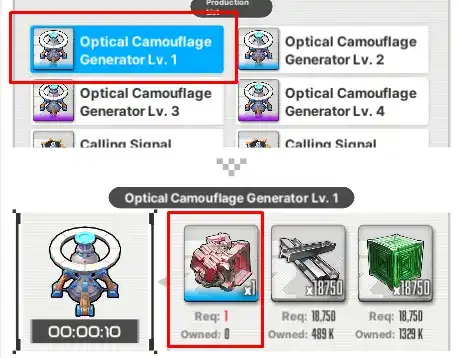
You will notice that to build this Generator, you need a red thingy named Rapture Lite, lv 1. It should be around the road leading to First Camp, so you won’t have any issues collecting it. Good luck on lv 2, 3 and 4 though.
Once your factory finishes creating Generator lv 1, start your first defense then!

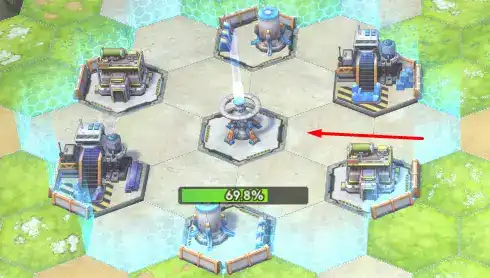
Make sure that during the battle, no Rapture can destroy your Generator. The tiles inside the yellow zone are called “Combat Area,” which will disable all Strike’s skills (yes, your current team(s) won’t have any skills here, but it doesn’t matter much for now), and activate Combat Area skills, which we will explain below.
Once you have survived till the end, you will seize this camp (the blue wall is erected). You can start fixing those facilities to access their functions. The first camp has
- 2 Warehouses: Increase the maximum resources you can store. Overflow one is lost.
- 1 Geonic Plant: Pump more green cube
- 1 Goddesium Plant: Pump more Goddesium - This one is important, prioritize fixing and upgrading it first (both base and here). Goddesium costs the most later on.
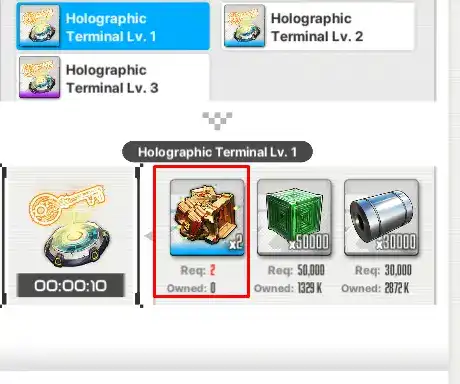
Try exploring the whole sector 1 first before heading to the Gate. You will need a stuff named Holographic Terminal lv 1 to unlock the gate (it’s another defense battle). To build this item, you need your Factory and 2 Holographic Terminals, which are dropped during exploration.

Mid-Game - Combat Teams
After you open the gate, you will be in Sector 2 and that’s when you need to understand the Combat team. Try forming a new team at Base, or move one team back to Base and edit it into.
Basic Combat Team #1
Mode: Surface || Element: All
Characters

About the team
This should be your main strike team, with a taunter, 2 heavy DPS buffers and 1 healer with +1 to heal zone (basic heal range is 1 tile adjacent to you only)
Substitutions
ATK: [MG] Modernia (35%) > [RL] Eunhwa (30%) > [MG] Product 12 (15%) > [MG] Guillotine (35%) > [SR] Product 08 (15%) > [SMG] iDoll Ocean (15%) > [AR] Guillotine: Winter Slayer (35%) > [RL] Emilia (25%) > [RL] Scarlet: Black Shadow (35%) > [AR] Rei: Tentative Name (25%) > [MG] Asuka: WILLE (25%) > [SG] Product 23 (15%) > [SR] Red Hood (35%) > [AR] iDoll Sun (15%)
Damage Taken: [RL] A2 (25%) > [SMG] Miranda (20%) > [SG] Maiden (35%) > [RL] Anchor: Innocent Maid (25%) > [SR] Liberalio (40%) > [RL] Quiry (20%) > [RL] Pascal (20%)
Basic Combat Team #2
Mode: Surface || Element: All
Characters
About the team
This shall be your support team, with only 1 ATK buffer but 4 supporters overall. The fun part is, heal will stack, so the 2 teams will heal each other, keeping both teams healthy
Substitutions
-
Alright, now you must be wondering, why do we have to worry about Combat teams here? Why can’t we just slap our Radial teams to Defend areas?
- Radial teams have 0 skill in the defense zone.
- Enemies become stronger on higher sectors.
So, from Mid to Late Game, having at least 2 Combat Teams will save you a lot of hassle from dying, not to mention bossing lately.
Damage Dealer Team
On your main team, you should focus on those skills
- ATK Buff: This one is good; you can have 1 of them on each team.
- Fire Nikkes - Modernia (35%) >
![Modernia]() Eunhwa (30%) >
Eunhwa (30%) >![Eunhwa]() Product 12 (15%); Electric Nikkes -
Product 12 (15%); Electric Nikkes -![Product 12]() Guillotine (35%) >
Guillotine (35%) >![Guillotine]() Product 08 (15%) =
Product 08 (15%) =![Product 08]() iDoll Ocean (15%); Water Nikkes -
iDoll Ocean (15%); Water Nikkes -![iDoll Ocean]() Guillotine: Winter Slayer(35%) >
Guillotine: Winter Slayer(35%) >![Guillotine: Winter Slayer]() Emilia ( 25%); Wind Nikkes -
Emilia ( 25%); Wind Nikkes -![Emilia]() Scarlet: Black Shadow (30%) >
Scarlet: Black Shadow (30%) >![Scarlet: Black Shadow]() Rei Ayanami (Tentative Name) (25%) =
Rei Ayanami (Tentative Name) (25%) =![Rei Ayanami (Tentative Name)]() Asuka Shikinami Langley: Wille (25%) >
Asuka Shikinami Langley: Wille (25%) >![Asuka Shikinami Langley: Wille]() Product 23 (15%); Iron Nikkes -
Product 23 (15%); Iron Nikkes -![Product 23]() Red Hood (35%) >
Red Hood (35%) >![Red Hood]() iDoll Sun (15%);
iDoll Sun (15%);![iDoll Sun]()
- Damage Taken: Due to the nature of Combat, teams tend to defend a tight area, so you won’t need much of these. Try at max 2 teams with Damage Taken Nikkes.
- Fire Nikkes - A2 (35%)
![A2]() Miranda (20%) =
Miranda (20%) =![Miranda]() Pascal (20%); Electric Nikkes -
Pascal (20%); Electric Nikkes -![Pascal]() Maiden (35%); Water Nikkes -
Maiden (35%); Water Nikkes -![Maiden]() Anchor: Innocent Maid(25%); Wind Nikkes -
Anchor: Innocent Maid(25%); Wind Nikkes -![Anchor: Innocent Maid]() Liberalio (40%) >
Liberalio (40%) >![Liberalio]() Quiry (20%)
Quiry (20%)![Quiry]()
- Taunt: Taunters are good. Your squad will receive 35% less damage. But, similar to damage taken, you only need 2 teams max.
- Fire Nikkes - Kilo (25%); Electric Nikkes -
![Kilo]() Sin (30%); Water Nikkes -
Sin (30%); Water Nikkes -![Sin]() Rei(25%); Wind Nikkes -
Rei(25%); Wind Nikkes -![Rei]() Anchor (25%) ; Iron Nikkes -
Anchor (25%) ; Iron Nikkes -![Anchor]() Centi (30%)
Centi (30%)![Centi]()
- Recovery Skill: If you have 4 teams and they stand next to each other, each team will be healed 4.5% max hp per 5 sec, which is very strong.
- Fire Nikkes - Soda (1.5%);Electric Nikkes -
![Soda]() Flora (1.5%); Water Nikkes -
Flora (1.5%); Water Nikkes -![Flora]() N102(1.5%) =
N102(1.5%) =![N102]() Mary: Bay Goddess(1.5%); Wind Nikkes -
Mary: Bay Goddess(1.5%); Wind Nikkes -![Mary: Bay Goddess]() Pepper (1.5%)
Pepper (1.5%)![Pepper]()
- Support Skill Range Up: Most skills only have 1 tile range effect, so if you put 1 of these Nikkes onto your team, your heal range will reach way more allies.
- Fire Nikkes - Signal (1);Electric Nikkes -
![Signal]() Rouge (1); Water Nikkes -
Rouge (1); Water Nikkes -![Rouge]() Elegg: Boom and Shock(1); Wind Nikkes -
Elegg: Boom and Shock(1); Wind Nikkes -![Elegg: Boom and Shock]() Blanc (1)
Blanc (1)![Blanc]()
- Recovery Skill Level Up: This one will pretty much x2 your heal amount, but you are not a support team, so unless you miss one of the skills (that is not heal, can’t upgrade heal without heal), use it.
- Electric Nikkes - Clay (1); Wind Nikkes -
![Clay]() Dolla;Iron Nikkes -
Dolla;Iron Nikkes -![Dolla]() Ade: Agent Bunny (1)
Ade: Agent Bunny (1)![Ade: Agent Bunny]()


Of course, you just pick the best effect you have within your own roster.

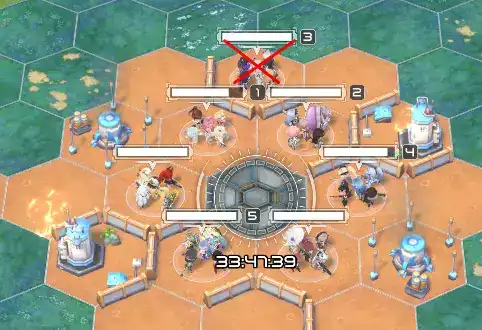
For example, if each team contained 1 healer and 1 skill range up (hypothesis only, there are not even that many buffers right now), then each of the teams except the crossed one would be healed.
Support Team
Going full support is not recommended at mid-game, until you have around 4 - 5 squads. Those skills will help your team.
- Squad Range Up: Just like Diesel in the Radial team, Squad Range Up will increase OTHER squads’ range. Yeah, the support team won’t have a +1 range, so most of the time, they just stand still.
- Fire Nikkes - Yan (1); Electric Nikkes -
![Yan]() Trina (1); Water Nikkes -
Trina (1); Water Nikkes -![Trina]() Mary(1); Wind Nikkes -
Mary(1); Wind Nikkes -![Mary]() Anne: Miracle Fairy (1)
Anne: Miracle Fairy (1)![Anne: Miracle Fairy]()
- Recovery Skill: If you have 4 teams and they stand next to each other, each team will be healed 4.5% max hp per 5 sec, which is very strong.
- Fire Nikkes - Soda (1.5%);Electric Nikkes -
![Soda]() Flora (1.5%); Water Nikkes -
Flora (1.5%); Water Nikkes -![Flora]() N102(1.5%) =
N102(1.5%) =![N102]() Mary: Bay Goddess(1.5%); Wind Nikkes -
Mary: Bay Goddess(1.5%); Wind Nikkes -![Mary: Bay Goddess]() Pepper (1.5%)
Pepper (1.5%)![Pepper]()
- Support Skill Range Up: Most skills only have 1 tile range effect, so if you put 1 of these Nikkes onto your team, your heal range will reach way more allies.
- Fire Nikkes - Signal (1);Electric Nikkes -
![Signal]() Rouge (1); Water Nikkes -
Rouge (1); Water Nikkes -![Rouge]() Elegg: Boom and Shock(1); Wind Nikkes -
Elegg: Boom and Shock(1); Wind Nikkes -![Elegg: Boom and Shock]() Blanc (1)
Blanc (1)![Blanc]()
- Recovery Skill Level Up: This one will pretty much x2 your heal amount, but you are not a support team, so unless you miss one of the skills (that is not heal, can’t upgrade heal without heal), use it.
- Electric Nikkes - Clay (1); Wind Nikkes -
![Clay]() Dolla;Iron Nikkes -
Dolla;Iron Nikkes -![Dolla]() Ade: Agent Bunny (1)
Ade: Agent Bunny (1)![Ade: Agent Bunny]()
- ATK Buff (Substitute)
- Fire Nikkes - Modernia (35%) >
![Modernia]() Eunhwa (30%) >
Eunhwa (30%) >![Eunhwa]() Product 12 (15%); Electric Nikkes -
Product 12 (15%); Electric Nikkes -![Product 12]() Guillotine (35%) >
Guillotine (35%) >![Guillotine]() Product 08 (15%) =
Product 08 (15%) =![Product 08]() iDoll Ocean (15%); Water Nikkes -
iDoll Ocean (15%); Water Nikkes -![iDoll Ocean]() Guillotine: Winter Slayer(35%) >
Guillotine: Winter Slayer(35%) >![Guillotine: Winter Slayer]() Emilia ( 25%); Wind Nikkes -
Emilia ( 25%); Wind Nikkes -![Emilia]() Scarlet: Black Shadow (30%) >
Scarlet: Black Shadow (30%) >![Scarlet: Black Shadow]() Rei Ayanami (Tentative Name) (25%) =
Rei Ayanami (Tentative Name) (25%) =![Rei Ayanami (Tentative Name)]() Asuka Shikinami Langley: Wille (25%) >
Asuka Shikinami Langley: Wille (25%) >![Asuka Shikinami Langley: Wille]() Product 23 (15%); Iron Nikkes -
Product 23 (15%); Iron Nikkes -![Product 23]() Red Hood (35%) >
Red Hood (35%) >![Red Hood]() iDoll Sun (15%);
iDoll Sun (15%);![iDoll Sun]()

Due to the nature of this team, 1 support team is enough to support 5 ~ 6 squads; therefore, you won’t need too many full support teams. Also, if 2 support teams both have +1 Squad range, they won’t stack into +2 range. The same applied to other “buffing lv” skills.
Late Game - Bossing
There are currently 3 Bosses and 1 Defense zone in the late game, once you have explored all 4 Sectors. They are the toughest enemies, and you will need proper teams to deal with them.
If you want a tl;dr of this section, please follow Kosmiu for cooking these teams and testing them out:
In this clip, he defeats three Raid Bosses without, well, moving…
Kosmiu Squads
Kosmiu Wind Team
Mode: Surface || Element: Wind
Characters
About the team
Kosmiu's Team
Substitutions
-
Kosmiu Support Team 1
Mode: Surface || Element: All
Characters
About the team
Kosmiu's Team
Substitutions
-
Kosmiu Support Team 2
Mode: Surface || Element: All
Characters
About the team
Kosmiu's Team
Substitutions
-
Kosmiu Support Team 3
Mode: Surface || Element: All
Characters

About the team
Kosmiu's Team
Substitutions
-
Kosmiu Support Team 4
Mode: Surface || Element: All
Characters


About the team
Kosmiu's Team
Substitutions
-
Kosmiu Electric Team
Mode: Surface || Element: Electric
Characters

About the team
Kosmiu's Team
Substitutions
-
Kosmiu Water Team
Mode: Surface || Element: Water
Characters
About the team
Kosmiu's Team
Substitutions
-
Notice how he only has 1 Damage Taken (Combat) - Maiden and 1 Damage Taken (Free) - Milk from all 7 squads!
So basically, late-game bosses have
- 1 Water Weak
- 1 Wind Weak
- 1 Electric Weak.
It means you should prepare at least
- 1 Water team
- 1 Wind team
- 1 Electric team
To be the main DPS while other teams support your DPS.
When you clear all sectors and upgrade all dormitories, you can have up to 39 Nikkes running on the surface. This means you can have 7 Combat Teams and 1 Explore team (with 4 Nikkes only). Of course, if you split your team here and there, you can even have up to 11 teams.
Note that, currently, bosses are not that hard (yeah, we don’t even know their skills, just stand still and heal back), hence you can draft 4 combat teams + 2 full support teams and you can still achieve the same result as Kosmiu above.
But if you want to prepare for the future once they buff the bosses, craft your specific element teams as below:
Wind Combat Team
Mode: Surface || Element: Wind
Characters
About the team
Strongest Wind team currently, featuring 55% ATK buff, 50% Damage Taken, 95% ele damage. It should melt the Wind weak boss like butter
Substitutions
Try to fit 5 Wind Nikkes as possible, even if it is Noah (Max HP), Mana (extra Attack Speed)...
Electric Combat Team
Mode: Surface || Element: Electric
Characters
About the team
Electric team is not as busted as Wind team, but they have some extra DPS from Cinderella, which may make it up a bit.
Substitutions
If your Wind or Water team doesn't have Damage Taken debuff, you can put Maiden + Ada/Jill to Electric team instead (replacing Cinderella + Sin)
Water Combat Team
Mode: Surface || Element: Water
Characters
About the team
Water version of boss killing team, featuring 3 AR, 2 SMG.
Substitutions
In case your Electric or Wind team doesn't have Damage Taken, replace Rei with Anchor: Innocent Maid.
You should still keep 1 squad as an exploration team to deal with daily - they are treated as radial Rapture. This team only has 4 Nikkes, so you should pack the strongest Nikke there.
The Leftover Explore Team
Mode: Surface || Element: All
Characters
About the team
This team can only have 4 Nikkes (because you can only have 39 Nikkes on Beta mode). It has 4 MG, so extra 40% damage. Once you clear your daily, you can go back to nearest Hospital in Sector 4-B to heal back.
Substitutions
-