Disk 4
ATK% > Crit DMG% = Crit Rate%
Disk 5
ATK% > Electric DMG%
Disk 6
ATK%
Last updated: 14/June/2026

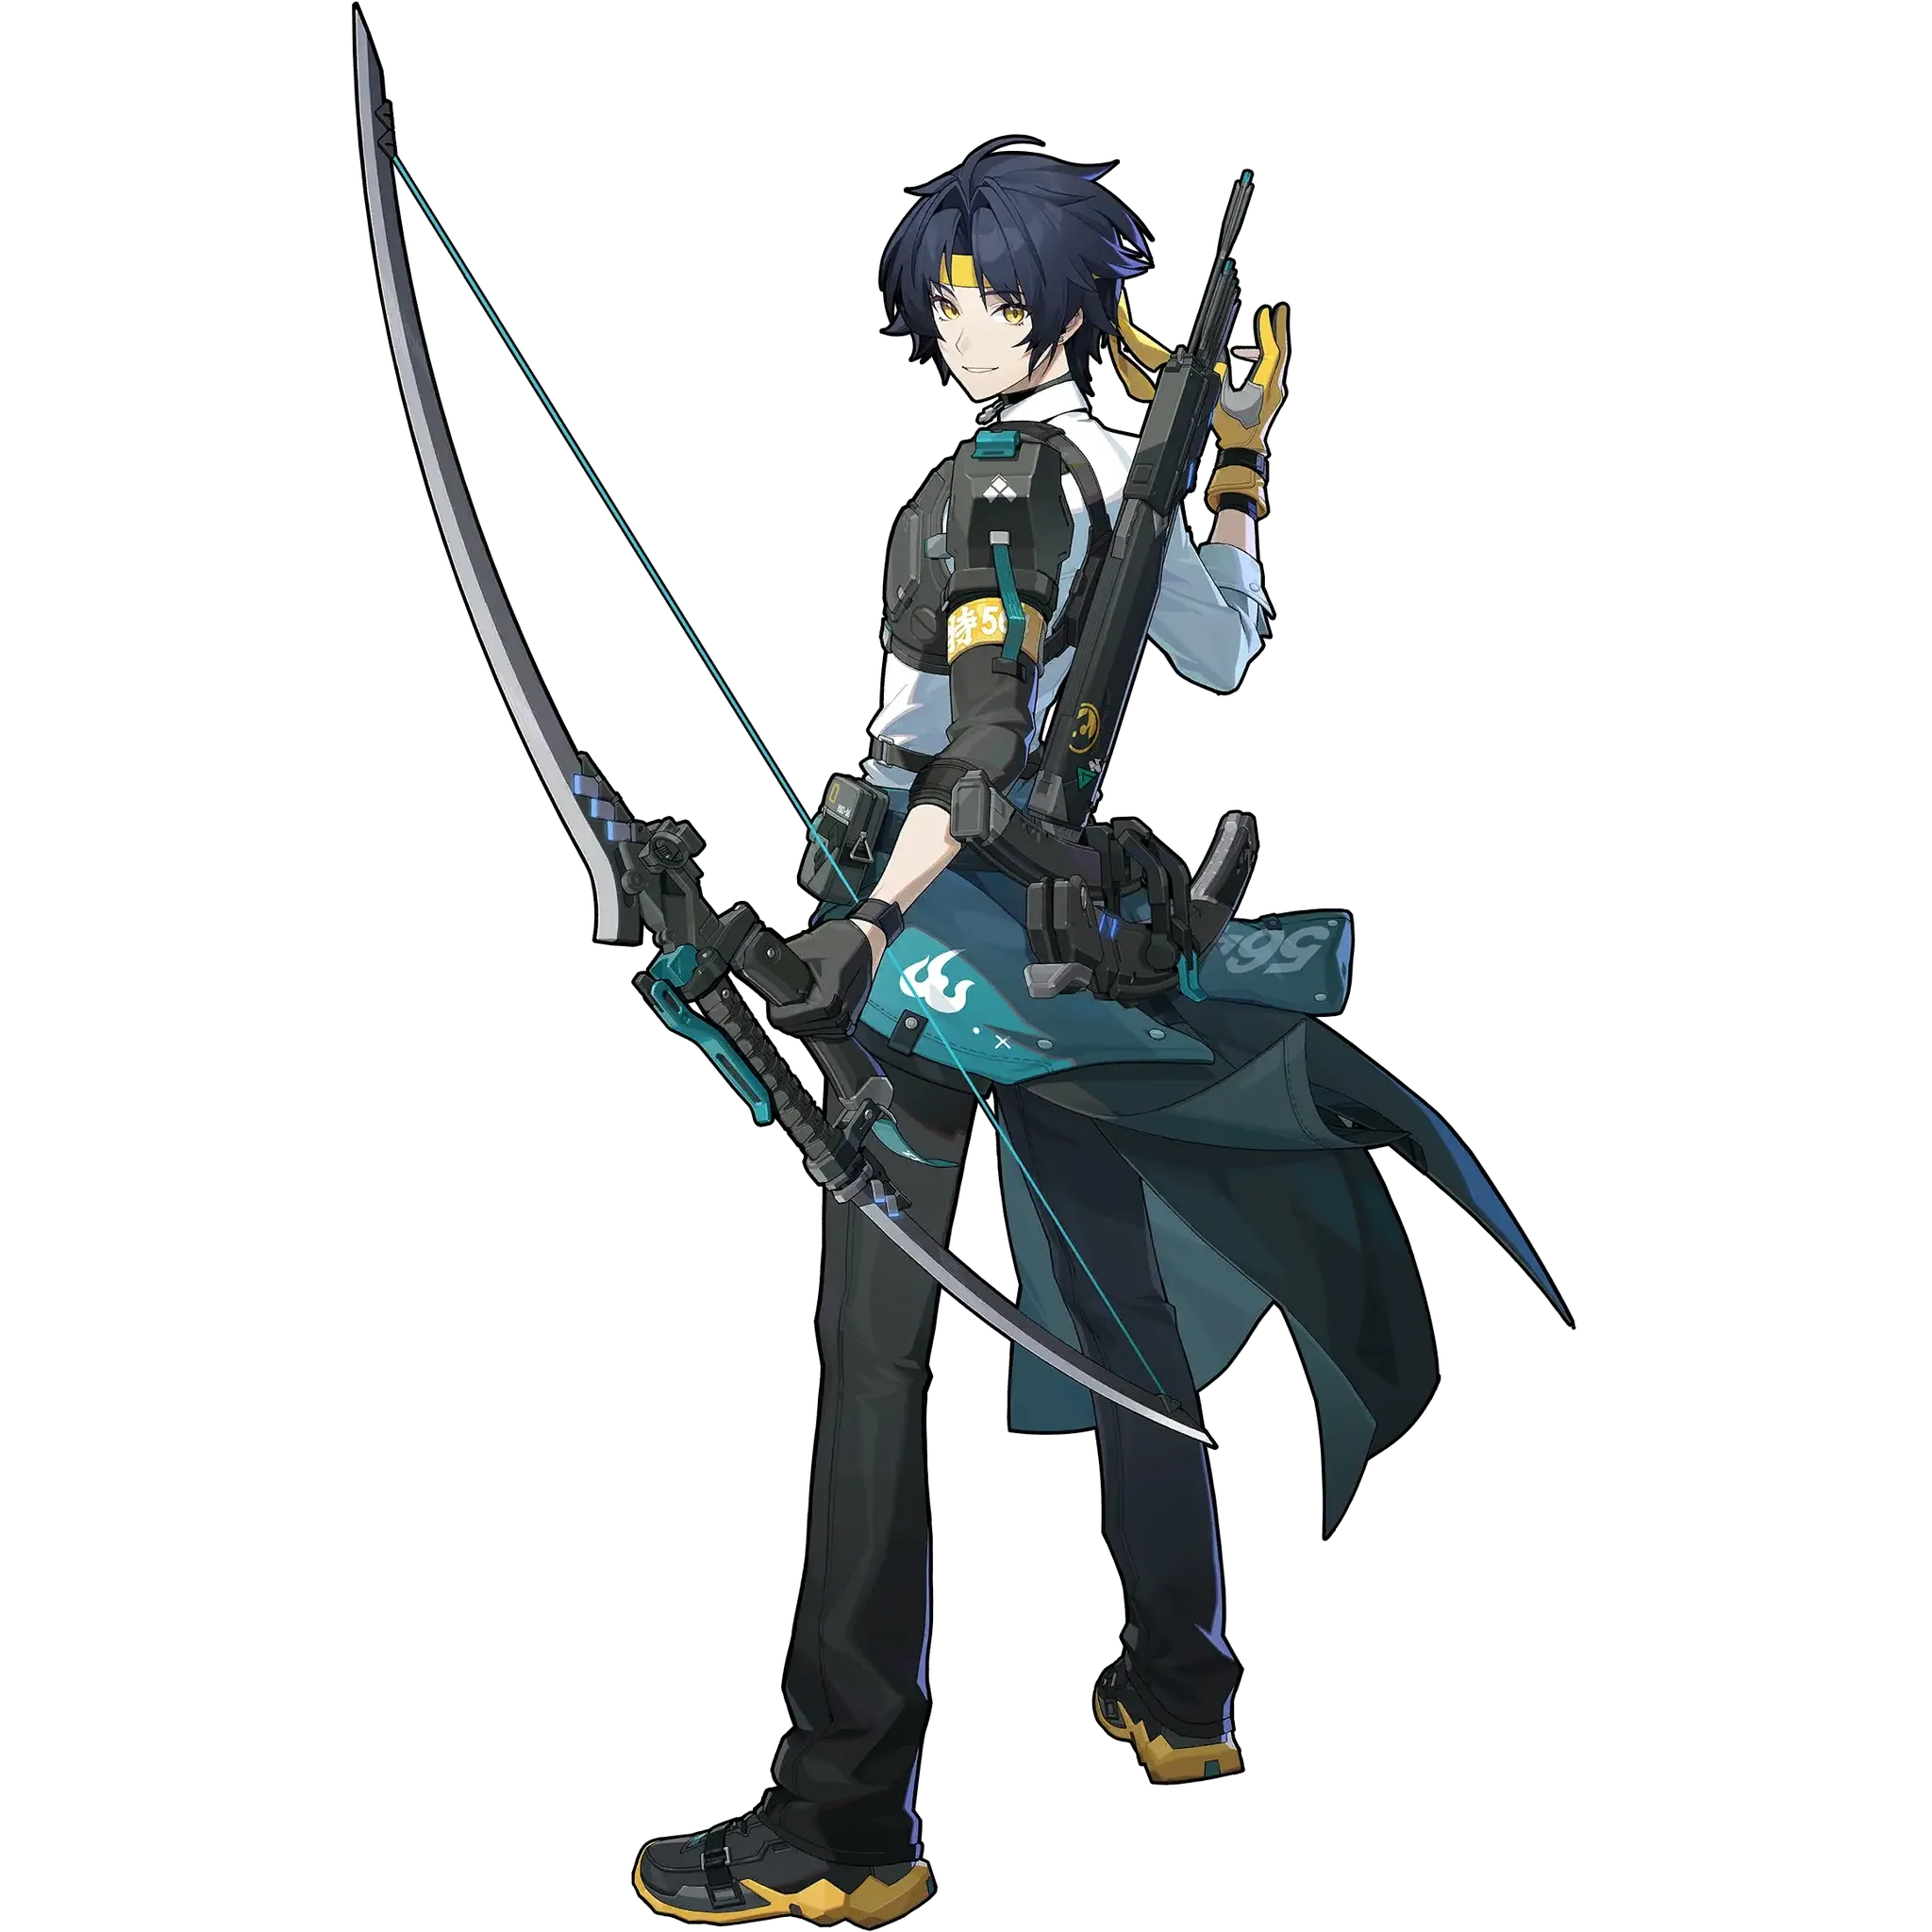
Best guide and build for Harumasa from ZZZ (Zenless Zone Zero). Harumasa is an![]() rank character with the Electric attribute who belongs to the
rank character with the Electric attribute who belongs to the![]() Attack Specialty and who is part of the
Attack Specialty and who is part of the![]() Section 6 faction.
Section 6 faction.
Harumasa has at least one video guide available, so if you prefer this sort of medium to learn more about a character, check it out:
Last review update
Patch 2.6
Last build update
Patch 2.6
Last teams update
Patch 2.6
Last profile update*
14/June/2026
*Profile update means smaller edits to disk drives, stats or other things that don't require new calculations.
To learn more about Harumasa check the sections below. Use the tabs to quickly switch to the kind of information you're looking for.
Profile
Core Passive Day Break
The CRIT Rate of Dash Attack: Hiten no Tsuru - Slash increases by 10.6%, and when Harumasa's Dash Attack: Hiten no Tsuru - Slash triggers a critical hit against an enemy, he gains 1 stack of Gleaming Edge, for up to a maximum of 3 stacks per use of the skill and stacking up to 6 times, lasting 5s, repeated triggers reset the duration. Each stack of Gleaming Edge increases the CRIT DMG of Dash Attack: Hiten no Tsuru - Slash by 6%.
CRIT Rate 0
BASE ATK: 0
Additional Ability Overclock
When another character in your squad is a Stun or Anomaly character:
When Harumasa's attacks hit Stunned enemies or enemies under Attribute Anomaly, his DMG increases by 40%. When Harumasa's Falling Feather hits Stunned enemies or enemies under Attribute Anomaly, it will apply 2 stacks of Electro Prison to the target.
Basic Attack: Cloud Piercer
Basic Attack: Cloud Piercer - Drift
Basic Attack: Falling Feather
Basic Attack: Ha-Oto no Ya
Dodge: Quick Flash
Dash Attack: Hiten no Tsuru
Dodge Counter: Hidden Edge
Dash Attack: Hiten no Tsuru - Slash
Special Attack: Nowhere to Hide
EX Special Attack: Nowhere to Run
Chain Attack: Kai - Hanare
Ultimate: Zanshin
Defensive Assist: Yugamae
Defensive Assist: Yugamae - Slash
Quick Assist: Braced Bow
High Spirit
Mindscape 1
Languish
Mindscape 2
White Lies
Mindscape 3
Occasionally Motivated
Mindscape 4
No One Knows
Mindscape 5
Tacit Understanding
Mindscape 6
Harumasa Stats at level 60 (including Core passive bonuses).
Review
This tier list assesses Agents (characters) based on their combat potential in Zenless Zone Zero's most demanding contents - Deadly Assault (DA) and Shiyu Defense (SD). Please keep in mind Zenless Zone Zero is a skill-based game and each character has a different playstyle, difficulty level and even special tricks and combos. Zenless Zone Zero is also a team based game and it's only by combining both these factors to the highest level a character can reach optimal performance.
High skill ceiling character that thoroughly rewards player skill expression.
Variety of team options, working well in pure stun burst/hypercarry teams, as well as non-standard comps (like with Seed or mono-Shock) depending on investment.
Was handed out for free to all players.
Mastering him is the epitome of ZZZ bragging rights.
Demanding execution requirements, with an unforgiving skill floor that can be somewhat hostile to beginners.
Needs proper route planning and mapping to perform at his best, with Anomaly alignment being required for the best combos and builds.
Pre-stacking of Quivers before fights begin is tedious and often mandatory for the highest level of play.
May not live long enough to see EoS.
Harumasa is an Electric Attacker who specialises in high-damaging in-stun burst, with the ability to make use of Anomalies to improve his combos and general gameplan.
He’s notorious for being a difficult character to pick up, with both a high skill floor and ceiling, and while recent Agent releases and his Potentials have made him more accessible, it’s only by mastering his kit that one can get him to truly perform.
To reach such mastery, it’s important to first understand his kit, which revolves around Electro Quivers, Electro Prison and X-Marks.
Harumasa can deploy a varying number of Electro Quivers out in the field - a set of trap-looking orbs that linger for 60 seconds - by doing the following:
2 from using the 5th part of his Basic Attack combo Cloud Piercer.
6 from using the 5th part of his Basic Attack combo Cloud Piercer after a Chain Attack.
6 from using a Chain Attack.
6 from using either of his EX Specials.
6 when any squad member applies an Attribute Anomaly & no Quivers are currently active (12 Second Cooldown).
Haramusa can only have 6 Electro Quivers active on the field at once, but when more of them are generated or when hitting enemies with either his Basic Attack: Falling Feather or enhanced EX Special Attack: Nowhere to Run - Patrol, the ones currently on field will fire towards enemies, dealing a small amount of damage and most importantly building 1 Electro Prison per Quiver.
By default, enemies can have up to 8 stacks of Electro Prison, lasting only 10 seconds. Any target that has 2 or more stacks of it will be X-Marked, indicated by an bright icon.
When X-Marked enemies are nearby, Harumasa will enter the Awakened State, where his Dash Attack is enhanced. Using it will hone in on said targets and consume 2 stacks of Electro Prison when doing so. It’s by fitting in as many of these Dash Attacks as possible in a fight (and especially in stun) that he gets the most damage out.
Harumasa’s Dodge Counter and standard Dash Attack: Hiten no Tsuru, are unremarkable and don’t see much use. While his Dodge Counter can build some Anomaly, his un-enhanced Dash Attack deals only Physical DMG and is best avoided.
Dash Attack: Hiten no Tsuru - Slash however, is incredibly strong, being the lynchpin skill that Harumasa’s gameplan revolves around. This is the enhanced Dash Attack which, as previously mentioned, is usable against X-Marked enemies.
It is not a singular skill, but a combo of 3: a gap closing slash, followed by 2 alternating left-right slashes that will loop back and forth until all Electro Prison stacks are consumed and the X-Mark is removed.
As part of his Potential awakening, when this enhanced Dash Attack strikes Stunned enemies, it will trigger Chasing Thunder, an additional burst of Electric DMG. The first, gap closing slash also has guard point properties, blocking enemy attacks during its cast.
Harumasa’s Basic Attacks offer little in terms of damage, but have a fair bit of utility that should be woven into certain parts of Harumasa’s rotation to set-up for his burst. There are 4 Basic Attacks in total:
Basic Attack: Cloud Piercer is his standard Basic Attack string with 5 hits in total, with the first 3 dealing Physical DMG and the final 2 dealing Electric DMG. Basic 4 can be shortcut to after some abilities (like Assist Follow-Ups or enhanced Dash Attacks), and Basic 5 will place 2 Electro Quivers on field. Looping this over and over at the start of a fight can help stack a full set of Quivers before timers tick, making rotations smoother.
As previously mentioned, using the Basic 5 after a Chain Attack will lead to 6 Quivers instead. This does not have to immediately follow from it, but rather is considered a “stack” that enhances the next Basic 5, allowing for it to be used long after the Chain Attack itself.
Basic Attack: Cloud Piercer - Drift is a variant of his standard Basics, which can be used between its attacks to reposition, but it’s never really worth using, dealing Physical DMG and having disappointing multipliers.
Basic Attack: Falling Feather is accessed by holding down the Basic Attack and it’s one of the primary ways in which Harumasa can apply Electro Prison to enemies. It’s an aimed shot of sorts, which when fired will cause all Quivers on field to fire towards the struck target.
While in combos, it’s possible to get Quivers to fire simply by generating more of them, this is still very important as Harumasa’s Additional Ability causes enemies that are stunned or under Attribute Anomaly to have 2 stacks of Electro Prison applied regardless of Quivers. As only 6 Quivers can exist on field at a given time, this is the only way for Harumasa to reach the maximum 8 Electro Prison stack limit, enabling 4 enhanced Dash Attacks with one set instead of 3.
Lastly, it’s Basic Attack: Ha-Oto no Ya, which is the damaging hits of the Quivers firing. It’s here that most of the Electro Quiver/Prison/X-Mark mechanics are outlined, but it itself is little more than a weak hitting Basic Attack that’s useful to build and maintain stacks of W-Engines and Drive Disc sets (e.g. Woodpecker Electro Basics are fulfilled by this, even without Basic Attack: Falling Feather being used).
Note that the Quivers are only generated by Anomalies if there are no other Quivers on field, however the check for it is done before the Quiver generation from skills.
So for example, if a Shock Anomaly happens to be triggered on the final hit of Cloud Piercer’s Basic 5, the 6 Anomaly Quivers will be generated, followed by the ones from Cloud Piercer.
It should also be mentioned that Ha-Oto No Ya has travel time. If Quivers are placed too far from enemies, it can take a short while before they hit and build Electro Prison stacks.
Harumasa’s regular Special Attack: Nowhere to Hide, is unremarkable and not worth using, taking up time for lacklustre multipliers.
His EX Specials however are important for combos, with him having a standard and enhanced variant. EX Special Attack: Nowhere to Run is the standard one, costing 60 Energy and deploying 6 Electro Quivers with its final hit.
It is not a particularly damaging skill, but it’s one of the most accessible ways to generate Quivers, often being used to simultaneously build them and fire pre-existing Quivers on field.
The enhanced version, EX Special Attack: Nowhere to Run - Patrol, can only be used after Cloud Piercer’s Basic 4/5, Ultimate, Quick Assists, and either Dodge Counters or enhanced Dash Attacks. It’s very similar to its standard variant, but is slightly stronger and has the added benefit of generating 6 Quivers at the start of its cast, then automatically triggering Basic Attack: Ha-Oto No Ya with its final shot, allowing for Electro Prison stacks to be built even without pre-existing Quivers or Basic Attack: Falling Feather.
Note that because these stacks are not built via Basic Attack: Falling Feather, the extra 2 Electro Prison stacks from landing it do not apply! If there already are Quivers on field however, it will only fire as many as is needed to max out Electro Prison, ensuring that there are no wasted Quivers.
None of Harumasa’s Assists are great, but his Quick Assist does see occasional use, be it to refresh effects (like Starlight Engine) or as a set-up for his enhanced EX Special.
As for Defensive Assists and Assist Follow-Ups, neither are outstanding, but making use of them can sometimes be needed for Anomaly alignment, as the latter has somewhat decent Anomaly build-up values - far more efficient than his Basics. It may also be needed for Decibels occasionally, so shouldn’t be entirely written off, but they’re only worth using with intent.
At first glance, Harumasa’s Chain Attack: Kai - Hanare is not a great skill, with a long animation and low multipliers for the time it takes, but it’s invaluable due to its 6 Quiver generation, providing a stack for Cloud Piercer’s Basic 5 to generate 6 Quivers up from 2 as well as having good Anomaly application, making it the best skill to trigger Shock and make use of the Anomaly Quiver generation properties.
It also has a unique property where holding Basic or Special after its cast will lead to an alternate version of Harumasa’s Basic Attack: Falling Feather, rapidly building Electro Prison stacks,
All this means that it shouldn’t be used carelessly, but rather worked into specific points of a combo to maximise its value.
Ultimate: Zanshin is a straightforward, singular burst of damage that shoots quickly. There isn’t much more to it, with it being a pure damage nuke, but with Harumasa’s Potentials, it leads to Zanshin - Scattered Blossoms, an automatic follow-up that deals a wide-area attack and further boosts its total damage output.
Most of Harumasa’s kit is covered by his other skills, leaving Core Passive as little more than a stat boost. It provides a flat 25% CRIT RATE increase to his enhanced Dash Attack and Ultimate, as well as generating a stack of Gleaming Edge whenever either of them trigger a Critical Hit on an enemy.
Ultimates grant 1 stack, but enhanced Dash Attacks can give up to 3, with a cap of 6 stacks and lasting 5 seconds at base, but 10 seconds with his Potentials. Each stack increases the damage of the enhanced Dash Attack, the Chasing Thunder effect and Ultimate by 12%, adding up to a 72% CRIT DMG gain when maxed.
In regard to the Additional Ability, it needs either Stun or Anomaly Agents, and as previously mentioned, it allows Basic Attack: Falling Feather to build 2 stacks of Electro Prison on stunned or Anomaly-inflicted enemies, regardless of Quivers.
It also has an additional effect of boosting his damage towards such enemies by 40%, significantly increasing his burst potential.
As part of his Potentials, Harumasa also gets an extra 12% Combat ATK when activating his EX Special, Chain Attack, or Ultimate, and both his enhanced Dash Attacks and Chasing Thunder will ignore 15% of a target’s Electric RES Shred for 12s.
Harumasa’s difficulty comes not from the complexity of his kit, but how to best route fights with him and in having the skill to perfectly time attacks to maximise his damage.
There is no clear cut way to play him, as each encounter demands its own adjustments, where trying to get Anomalies to trigger at specific points is a significant value add. If using Thunder Metal, this is doubly important, as Shock timings are needed not only for Quiver generation, but for Combat ATK buffs too.
To start with, using Cloud Piercer 3 times before a fight begins is ideal, as this allows one to pre-build 6 Electro Quivers.
From there, the route to stun can change depending on the team, with some teams (like those with Trigger or mono-Shock) demanding some field time, but most standard comps having Harumasa sit out until stun arrives, with only the occasional Defensive Assist and Assist Follow-Up for Decibel generation and Electric Anomaly build-up.
Stun should arrive in less than 60 seconds from the first Quiver being set-up and ideally Anomaly should be at around 3/4s full, so that it can align with certain points of his combo (varies based on enemy Anomaly limit and weaknesses).
A standard Anomaly-timed combo would be:
Nicole EX Special Attack: Stuffed Sugarcoated Bullet
Harumasa Quick Assist: Braced Bow
EX Special Attack: Nowhere to Run - Patrol
Dash Attack: Hiten no Tsuru - Slash 1
Dash Attack: Hiten no Tsuru - Slash 2
Dash Attack: Hiten no Tsuru - Slash 3
Dash Attack: Hiten no Tsuru - Slash 2
Basic Attack: Falling Feather
Dash Attack: Hiten no Tsuru - Slash 1
Dash Attack: Hiten no Tsuru - Slash 2
Dash Attack: Hiten no Tsuru - Slash 3
Nicole Ultimate: Ether Grenade
Harumasa Chain Attack: Kai - Hanare (Shock Anomaly)
Cancel
Dash Attack: Hiten no Tsuru - Slash 1
Dash Attack: Hiten no Tsuru - Slash 2
Dash Attack: Hiten no Tsuru - Slash 3
EX Special Attack: Nowhere to Run - Patrol
Ultimate: Zanshin
Nicole Chain Attack: Ether Shellacking
Zanshin - Scattered Blossoms
Harumasa Quick Assist: Braced Bow
Dash Attack: Hiten no Tsuru - Slash 1
Dash Attack: Hiten no Tsuru - Slash 2
Dash Attack: Hiten no Tsuru - Slash 3
Dash Attack: Hiten no Tsuru - Slash 2
Basic Attack: Falling Feather
Dash Attack: Hiten no Tsuru - Slash 1
Dash Attack: Hiten no Tsuru - Slash 2
Dash Attack: Hiten no Tsuru - Slash 3
Basic Attack: Falling Feather
Dash Attack: Hiten no Tsuru - Slash 1
Basic Attack: Cloud Piercer 4
Basic Attack: Cloud Piercer 5
The final Basic Attacks would be landing out of stun, and are used only to set-up 6 Electro Quivers in advance of the next combo cycle.
The Shock Anomaly can happen anytime between the first Basic Attack: Falling Feather and his Chain Attack.
In order to have the time to fit everything in, one needs to perform a “chain trigger tech” of sorts, where Harumasa’s Ultimate is timed to happen right before the final arrow from his enhanced EX Special lands on an enemy.
This allows for a Chain prompt to come up mid-Ultimate animation and for his Zanshin - Scattered Blossoms to land while other characters’ Chain Attacks (in this case Nicole, but others work too, like Rina).
It’s also possible to get an extra enhanced Dash Attack if pre-building 2 Electro Prison on the target just before the combo begins, such as with a Basic 5 after an Assist Follow-Up within 10s, but this is not recommended as it can get in the way of out-of-stun rotations.
Without Anomalies, it’s still possible to get a high number of Dash Attacks by making use of double Chains on Harumasa:
Nicole EX Special Attack: Stuffed Sugarcoated Bullet
Harumasa Quick Assist: Braced Bow
EX Special Attack: Nowhere to Run - Patrol
Dash Attack: Hiten no Tsuru - Slash 1
Dash Attack: Hiten no Tsuru - Slash 2
Dash Attack: Hiten no Tsuru - Slash 3
Dash Attack: Hiten no Tsuru - Slash 2
Basic Attack: Falling Feather
Dash Attack: Hiten no Tsuru - Slash 1
Dash Attack: Hiten no Tsuru - Slash 2
Dash Attack: Hiten no Tsuru - Slash 3
Nicole Ultimate: Ether Grenade
Harumasa Chain Attack: Kai - Hanare
Cancel
Basic Attack: Falling Feather (alternate, from Chain Attack cast)
Dash Attack: Hiten no Tsuru - Slash 1
Dash Attack: Hiten no Tsuru - Slash 2
Dash Attack: Hiten no Tsuru - Slash 3
Dash Attack: Hiten no Tsuru - Slash 2
EX Special Attack: Nowhere to Run - Patrol
Nicole EX Special Attack: Stuffed Sugarcoated Bullet
Harumasa Chain Attack: Kai - Hanare
Ultimate: Zanshin
Zanshin - Scattered Blossoms
Dash Attack: Hiten no Tsuru - Slash 1
Dash Attack: Hiten no Tsuru - Slash 2
Dash Attack: Hiten no Tsuru - Slash 3
Basic Attack: Falling Feather
Dash Attack: Hiten no Tsuru - Slash 1
Dash Attack: Hiten no Tsuru - Slash 2
Dash Attack: Hiten no Tsuru - Slash 3
Basic Attack: Cloud Piercer 4
Basic Attack: Cloud Piercer 5
Due to the extended animation from Zanshin - Scattered Blossoms, it’s likely that 1 or 2 enhanced Dash Attacks will land out of stun, making it less than ideal but still a viable alternative when Anomalies can’t be aligned.
Both of the above demand Manual Chain, and Harumasa suffers a lot without it as it can heavily restrict how many enhanced Dash Attacks can fit in stuns. He can still work without it though, as in the following Auto Chain compatible combo:
Nicole EX Special Attack: Stuffed Sugarcoated Bullet
Harumasa Quick Assist: Braced Bow
Nicole Chain Attack: Ether Shellacking
Harumasa Chain Attack: Kai - Hanare
Dash Attack: Hiten no Tsuru - Slash 1
Dash Attack: Hiten no Tsuru - Slash 2
Dash Attack: Hiten no Tsuru - Slash 3
Basic Attack: Falling Feather
Dash Attack: Hiten no Tsuru - Slash 1
Dash Attack: Hiten no Tsuru - Slash 2
Dash Attack: Hiten no Tsuru - Slash 3
Dash Attack: Hiten no Tsuru - Slash 2
EX Special Attack: Nowhere to Run - Patrol
Nicole Ultimate: Ether Grenade
Harumasa Quick Assist: Braced Bow
Dash Attack: Hiten no Tsuru - Slash 1
Dash Attack: Hiten no Tsuru - Slash 2
Dash Attack: Hiten no Tsuru - Slash 3
EX Special Attack: Nowhere to Run - Patrol
Nicole EX Special Attack: Stuffed Sugarcoated Bullet
Harumasa Quick Assist: Braced Bow
Ultimate: Zanshin
Zanshin - Scattered Blossoms
Dash Attack: Hiten no Tsuru - Slash 1
Dash Attack: Hiten no Tsuru - Slash 2
Dash Attack: Hiten no Tsuru - Slash 3
Basic Attack: Cloud Piercer 4
Basic Attack: Cloud Piercer 5
Once the combos are complete, the cycle begins again, with fights ideally being routed in such a way that Anomalies can align for the next stun.
Build and teams

For ZZZ calculations we worked alongside Rivyn Elowen. Any other content such as comments on W-Engines, Disks, etc are our own.
The W-Engines are listed in order of priority. Sometimes the percentages appearing near them won't reflect their performance as pure damage or Stun output isn't the only thing we're looking at - the utility of the W-Engine might be more important than the calculations imply.
The W-Engine calculations below are team-buffed calculations and here's the team we used for them:
100.37%
100.00%
98.82%
95.29%
92.47%
90.29%
100.00%
Thunder Metal is the single highest source of ATK % out of all the Drive Discs, making it Harumasa's best option by far. It requires Shock to be active however, which limits the comps it can be used in to those with another Electric Agent. If well managed, it will outperform other sets, but if not its bonuses would fall behind that of alternatives like Hormone Punk or Shadow Harmony.
Best combined with your choice of 2-PC Set:

Hormone Punk

Astral Voice

Branch & Blade Song

Shadow Harmony

Woodpecker Electro
93.63%
Shadow Harmony does not supply as much raw Combat ATK as its alternatives in Thunder Metal and Hormone Punk, and its CRIT RATE bonuses can at times be difficult to build around (such as with Cordis Germina or Nicole), but it is the easiest set to manage while still offering significant damage gains. For most players, it will be the optimal choice, needing no real active management all the while ramping up fast and early in Harumasa's combos, making it consistent and effective for his full burst.
Best combined with your choice of 2-PC Set:
Branch & Blade Song
Woodpecker Electro
Astral Voice
Hormone Punk
Substats: Crit Rate (until 75% in stat screen) > ATK% > Crit DMG% > Flat PEN > Flat ATK
ATK: 2600 - 3400+
HP: 10000+
DEF: 800+
CRIT RATE: 75% (Not more)
CRIT DMG: 150-190%
Dodge
Chain Attack
Special Attack
Basic Attack
Assist
Teams & Synergy
Below we list only the most important synergies for Harumasa. The character can work with others if you know what to do and how to use them.
 Dialyn - With Harumasa being a stun-burst focused Attacker, Dialyn enabling just that firmly places her as a strong teammate for Harumasa. Yet she goes from a great partner to best when her buffs, Ultimate conversion and stun extension are factored in, allowing for double Ultimates and 16+ Harumasa Dash Attack combos in stun. Given the absurd amount of daze she builds and the ease in which Harumasa can set-up quivers between stuns, it makes for an especially potent duo.
 Qingyi
  Trigger
  Anby - These 3 Electric Stun Agents work with Harumasa by virtue of providing debuffs and/or filling in for field time when Harumasa's damage window is on cooldown. Qingyi is the best of all of these choices since she fills both niches, however Trigger is able to provide good Daze while providing a Stun DMG Multiplier debuff which greatly helps Harumasa's damage, and Anby fills in for field time while stunning quickly but she provides no buffs, so she ends up as a F2P option only if you don't have the other two.
 Yuzuha
  Nicole
  Astra Yao - These 3 generalist Support units are capable of servicing as the Support to any team in the game. Astra Yao provides Quick Assists, extra Chain Attacks, healing, super low field time, ATK, DMG and CRIT DMG buffs which makes her the overall best choice in almost all cases. Yuzuha is the ultimate Anomaly buffer, getting close to Astra Yao as she also has awesome ATK and DMG% buffs applicable to any Agent, giving her strong general use potential. Nicole provides the sought-after DEF Shred and CRIT Rate at M6 which makes her competitive. They can work with any team in the game to great effect, Nicole being particularly appreciated in Harumasa teams as she can ensure full uptime on her DEF Shred while Harumasa is performing his Stun combo.
 Seed - Seed can and wants to be paired alongside other Attack Agents who function as main damage dealers in order for her kit to work well. This is because Seed is able to buff Attack Agents in several ways, giving them Energy, ATK, DMG dealt and CRIT DMG increases. For this reason, she works well as a mix of DPS and Support for almost every Attack Agent in the game, including Harumasa.
 Rina - Rina is particularly good with Harumasa because while the PEN Ratio buffs she provides are appreciated, she also increases Shock duration and Electric DMG which makes her especially stand out with Electric Agents. While some other Support options are still stronger choices, if you wish to use Rina somewhere Harumasa's a very good choice.
 Sunna - Harumasa is a surprisingly good match for Sunna. The Stun DMG Multiplier increase that she provides syncs up very well given his focus on in-stun burst, not to mention that Harumasa is highly saturated on most stats other than Attack, making her buffs be relatively undiluted. She can use her Ultimate outside of stuns to set-up Cat's Gaze for it and has very easy buff maintenance, making her a competitive and comfortable option.
This section lists most popular teams featuring Harumasa in the current phase of Shiyu Defense.
Rank 161
App. rate: 0.05%
Avg. time: 33772
Rank 197
App. rate: 0.03%
Avg. time: 0
This section lists most popular teams featuring Harumasa in the current phase of Deadly Assault.
Rank 43
App. rate: 0.47%
Avg. score: 21869
Rank 61
App. rate: 0.26%
Avg. score: 23125
Rank 63
App. rate: 0.24%
Avg. score: 22049
Rank 66
App. rate: 0.23%
Avg. score: 21118
Rank 99
App. rate: 0.12%
Avg. score: 23485
Rank 104
App. rate: 0.11%
Avg. score: 31090
Rank 104
App. rate: 0.11%
Avg. score: 27134
Rank 137
App. rate: 0.07%
Avg. score: 22482
Rank 137
App. rate: 0.07%
Avg. score: 23151
Rank 143
App. rate: 0.06%
Avg. score: 22286